
Best Solar Flashlights to Buy in July 2026
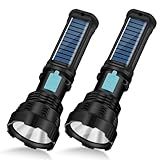
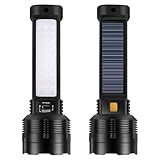
VOETIR Led Solar Flashlight, 1500 Lumens Led Solar Handheld Rechargeable Flashlights with IP65 Waterproof, 2000mAh Battery for Survival Emergencies Camping (2 Packs)
- ULTRA-BRIGHT 1500LM LED WITH 4 ADJUSTABLE LIGHT MODES.
- LONG-LASTING 2000MAH BATTERY; 8 HOURS OF CONTINUOUS USE.
- SOLAR & USB CHARGING; PERFECT FOR OUTDOOR ADVENTURES.


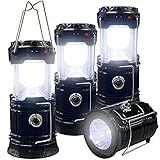
Collapsible Portable LED Camping Lantern XTAUTO Lightweight Waterproof Solar USB Rechargeable LED Flashlight Survival Kits for Indoor Outdoor Home Emergency Light Power Outages Hiking Hurricane 4-Pack
- VERSATILE 2-IN-1 DESIGN: FUNCTIONS AS A LANTERN AND FLASHLIGHT, VERSATILE FOR ALL NEEDS.
- COMPACT & LIGHTWEIGHT: COLLAPSIBLE DESIGN FOR EASY TRANSPORT, FITS IN YOUR POCKET.
- DUAL CHARGING OPTIONS: SOLAR AND USB CHARGING TO SUIT ANY SITUATION, WORRY-FREE!
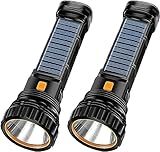
Hilngav 2 Pack Solar Flashlight, Rechargeable Zoomable LED Flashlight, High Lumens Solar Powered Flashlights with Tail Hook Rechargeable Handheld Flashlights for Home Emergency Camping Hiking
- VERSATILE 4 LIGHT MODES FOR VARIOUS LIGHTING NEEDS ANYTIME, ANYWHERE.
- ZOOMABLE DESIGN FOR FOCUSED LIGHT OR WIDE AREA COVERAGE WITH EASE.
- DUAL CHARGING OPTIONS: SOLAR OR USB-C-POWERS UP WHEREVER YOU ARE!
E-SHIDAI 2pcs Solar/Rechargeable Multi Function 1000 Lumens LED Flashlight, with Emergency Strobe Light and 1200 Mah Battery, Emergency Power Supply and USB Charging Cable, Fast Charging (2PC)
- ILLUMINATE UP TO 800M FOR 10 HOURS-PERFECT FOR ANY SITUATION!
- DUAL-USE BATTERY: LONG-LASTING LIGHT & EMERGENCY SMARTPHONE CHARGER.
- RUGGED DESIGN: WATERPROOF, SHOCKPROOF, AND READY FOR ANY ADVENTURE!
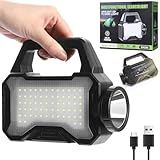
2 Pack LED Rechargeable Flashlight - 20000 Lumens Super Bright Tactical Flash Light, Compact & Waterproof, Long-Lasting Battery, Solar Flashlights for Home, Camping,Hiking, Emergencies, Adventures
-
BLAZING 20,000 LUMENS: EXPERIENCE UNMATCHED BRIGHTNESS FOR ANY SITUATION!
-
4 VERSATILE MODES: ADAPT LIGHTING TO YOUR NEEDS-PERFECT FOR ANY SCENARIO!
-
ECO-FRIENDLY DUAL CHARGING: RECHARGEABLE WITH SOLAR PANEL & USB OPTIONS!
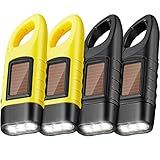
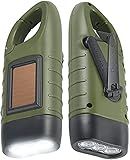
Mudder 4 Pack Hand Crank Solar Powered Flashlight Emergency Rechargeable Led Flashlight Survival Gear Self Powered Charging Torch for Hiking Backpack Camping Safety Emergency Pack(Yellow, Black)
- EMERGENCY READY: SOLAR AND HAND-CRANK POWER FOR RELIABLE LIGHT ANYTIME.
- PORTABLE DESIGN: CRANK FOR 10 MINS OF LIGHT; EASY TO CARRY EVERYWHERE.
- BRIGHT & EFFICIENT: QUALITY LEDS RECHARGE QUICKLY FROM SUNLIGHT OR CRANKING.
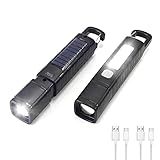
yeatem Solar Flashlight,Multifunctional Flashlight Solar Flashlight,led Flashlight Cell Phone Charger,USB Charging,Suitable for Home,Fishing,Outdoor Camping
- SOLAR & USB CHARGING FOR RELIABLE POWER ANYWHERE, ANYTIME.
- POWER INDICATORS KEEP YOU UPDATED ON BATTERY STATUS EASILY.
- COMFORTABLE GRIP DESIGN FOR EXTENDED USE DURING OUTDOOR ADVENTURES.
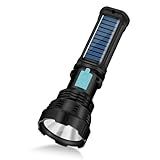
VOETIR Led Solar Flashlight, 1500 Lumens Led Solar Handheld Rechargeable Flashlights with IP65 Waterproof, 2000mAh Battery for Survival Emergencies Camping (1 Pack)
- POWERFUL 1500LM BRIGHTNESS WITH 4 VERSATILE MODES!
- RECHARGEABLE 2000MAH BATTERY: 8-HOUR CONTINUOUS USE!
- DURABLE & WATERPROOF: PERFECT FOR ANY OUTDOOR ADVENTURE!
Simpeak 2-Pack Hand Crank Solar Powered Flashlight, Emergency Rechargeable LED Survival Flashlight, Quick Snap Carbiner Dynamo Flash Light Torch for Outdoor Sports, Green
-
LIGHT UP EMERGENCIES: CRANK FOR 10+ MIN POWER, ANYTIME, ANYWHERE!
-
DUAL POWER: SOLAR PANEL CHARGES FROM ALL LIGHT SOURCES-VERSATILE!
-
RUGGED DESIGN WITH CARABINER-PERFECT FOR OUTDOOR ADVENTURES!
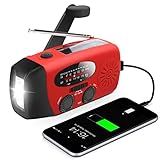
RunningSnail Emergency Hand Crank Radio With LED Flashlight For Emergency, AM/FM NOAA Portable Weather Radio With 2000mAh Power Bank Phone Charger, USB Charged & Solar Power For Camping, Emergency
- STAY SAFE WITH TIMELY EMERGENCY WEATHER ALERTS AND POWER BACKUP!
- CHARGE DEVICES IN EMERGENCIES WITH 2000MAH POWER BANK FEATURE!
- LIGHTWEIGHT, PORTABLE DESIGN WITH LED FLASHLIGHT FOR VISIBILITY!
Solar flashlights work by harnessing energy from the sun and storing it in batteries for later use. They are equipped with small solar panels, typically located on the handle or body of the flashlight, which contain photovoltaic cells. These cells convert sunlight into electrical energy, and this energy is then stored in rechargeable batteries inside the flashlight. When the flashlight is turned on, the stored energy powers LED bulbs, which provide illumination. The efficiency of a solar flashlight depends on the quality of the solar panel, the capacity of the battery, and the brightness and energy consumption of the LED bulbs. Solar flashlights are particularly useful for outdoor activities and emergency situations where conventional power sources are unavailable, as they eliminate the need for disposable batteries and can be charged during daylight hours.
How do rechargeable batteries work?
Rechargeable batteries, also known as secondary batteries, work by allowing chemical reactions to be reversed when an external electrical current is applied. This reversibility distinguishes them from primary batteries, which can only be used until their chemical reactions deplete the reactants. Here's a basic overview of how rechargeable batteries function:
- Basic Components: Anode (Negative Electrode): This is where oxidation occurs during discharge, releasing electrons. Cathode (Positive Electode): This is where reduction occurs during discharge, accepting electrons. Electrolyte: A medium that allows ions to move between the cathode and anode to balance the charge as electrons flow through an external circuit. Separator: A physical barrier preventing contact between the anode and cathode while allowing ion flow.
- Discharge Process: When the battery is discharging (supplying power), a chemical reaction occurs that generates an electric current. Electrons flow from the anode to the cathode through an external circuit, providing energy to a connected device. Simultaneously, positively charged ions flow through the electrolyte from the anode to the cathode to maintain charge balance.
- Charge Process: During charging, an external electrical current is applied, reversing the discharge chemical reactions. Electrons are forced to flow back to the anode from the cathode via the external circuit. Positively charged ions move back through the electrolyte to the anode, restoring the battery's original chemical state.
- Types of Rechargeable Batteries: Lead-Acid Batteries: Common in vehicles; relatively low cost but heavy and with moderate energy density. Nickel-Cadmium (NiCd) Batteries: Used in power tools and some electronics; known for durability but suffer from memory effect. Nickel-Metal Hydride (NiMH) Batteries: Higher capacity than NiCd and less prone to memory effect; used in consumer electronics. Lithium-Ion (Li-ion) Batteries: High energy density, low weight, and widely used in electronics, electric vehicles, and renewable energy storage. Lithium Iron Phosphate (LiFePO4) and other variations: Known for safety and long life.
The specific materials used in the anode, cathode, and electrolyte vary depending on the type of rechargeable battery, each with its own set of characteristics, advantages, and limitations. The choice of battery type depends on factors such as energy density, weight, longevity, cost, and safety.
How do solar batteries differ from traditional batteries?
Solar batteries and traditional batteries differ primarily in their design, application, and the way they store and discharge energy. Here are some key differences:
- Source of Energy: Solar Batteries: Specifically designed to store energy generated from solar panels. They collect energy during the day when the sun is shining and store it for use at night or during periods of low sunlight. Traditional Batteries: Typically charged using electricity from the grid or other sources and don’t rely on renewable energy sources like solar power.
- Chemistry and Types: Solar Batteries: Common types include lithium-ion, lithium iron phosphate (LiFePO4), and lead-acid batteries, with lithium-ion being the most popular due to its efficiency and longer lifespan. Traditional Batteries: Include a wide range of chemistries, like alkaline, lead-acid (used in car batteries), NiMH, and regular consumer lithium-ion for devices.
- Design and Purpose: Solar Batteries: Designed for energy storage and are often part of a larger solar energy system. They provide backup power and help maximize the use of solar energy by allowing storage and use during non-sunny periods. Traditional Batteries: Designed for immediate or short-term energy use. Examples include batteries for consumer electronics, vehicles, and other applications requiring portable or stationary power.
- Capacity and Scalability: Solar Batteries: Often have larger capacity to meet the storage needs of homes or businesses, and systems can be scaled by adding more batteries to increase storage as needed. Traditional Batteries: Usually smaller and not designed for scalable energy storage like solar battery systems.
- Lifecycle and Efficiency: Solar Batteries: Tailored for long cycles of charge and discharge, aiming for high efficiency and longevity to effectively manage daily switching between solar energy generation and consumption. Traditional Batteries: Their cycles, efficiency, and lifespan vary greatly depending on the type and usage.
- Cost and Investment: Solar Batteries: Generally represent a larger upfront investment as part of home or business energy systems, with the potential for long-term savings and energy independence. Traditional Batteries: Typically involve lower initial costs, suited for stand-alone applications or non-renewable forms of energy storage.
- Grid Independence: Solar Batteries: Support energy independence by enabling off-grid power supply or reducing reliance on the grid. Traditional Batteries: Mostly used to provide power when needed without necessarily promoting independence from conventional energy sources.
Overall, solar batteries are integral to renewable energy systems, allowing users to store and use clean energy efficiently, while traditional batteries serve a broad range of everyday applications with varying power needs.
What is the role of diodes in solar flashlights?
Diodes play a crucial role in the functionality of solar flashlights. In these devices, diodes are primarily used as blocking diodes or rectifier diodes. Here's how they function:
- Preventing Reverse Current: The main purpose of a diode in a solar flashlight is to prevent reverse current flow. Solar panels generate electricity only when they are exposed to sunlight. At night or during low-light conditions, the absence of light can cause the battery to discharge back into the solar panel, which could potentially damage the panel and reduce the battery's charge. Diodes allow current to flow only in one direction-typically from the solar panel to the battery-thereby blocking any reverse flow from the battery to the solar panel.
- Rectification: Diodes are used to convert the alternating current (AC) generated by the solar cells (though most small solar panels produce direct current (DC), some systems may have an inconsistent output) into direct current (DC), which is needed to charge the batteries and power the flashlight.
By ensuring unidirectional current flow and preventing reverse discharge, diodes enhance the efficiency and lifespan of solar flashlights.
How to troubleshoot a solar flashlight?
Troubleshooting a solar flashlight involves several steps to identify and resolve common issues. Here is a detailed guide to help you through the process:
- Check the Solar Panel: Clean the Panel: Dust, dirt, or grime on the solar panel can prevent it from charging properly. Use a soft, damp cloth to clean it and remove any obstructions. Inspect for Damage: Check for any visible cracks or damage to the solar panel that might impede its function. If damaged, the panel may need replacement.
- Testing the Battery: Charge Under Direct Sunlight: Ensure that the flashlight is placed in direct sunlight for several hours to give the battery a full charge. Battery Connection: Open the battery compartment and ensure that the batteries are seated correctly and there’s no corrosion. Clean the contacts if necessary. Replace the Batteries: If the batteries are old or not holding a charge, consider replacing them with new rechargeable batteries compatible with your flashlight.
- Check the Light Bulb/LED: Inspect for Damage: See if there’s any visible damage to the bulb or LED. If damaged, the bulb or the entire assembly may need replacement. Corroded Connections: Check for corrosion or dirt around the bulb connections. Clean them gently with a small brush or cloth.
- Switch and Wiring: Test the Switch: Ensure the switch is functioning correctly by toggling it on and off. If it's stuck or malfunctioning, it may need repair or replacement. Inspect the Wiring: Open the flashlight to check for any loose wires or connections. Reconnect any loose wires securely or solder them back if necessary.
- Evaluate the Charging Environment: Charge in Optimal Conditions: Ensure the flashlight is charging in optimal conditions, like under direct sunlight, rather than in shaded or indoor areas. Temperature: Extreme temperatures can affect the charging and discharging of batteries. Ensure the flashlight is not too hot or cold while charging.
- Test the Flashlight: Functional Test: After charging, test the flashlight in a dark environment to see if it provides the expected brightness. Duration Test: Leave the flashlight on to see how long it lights up. Short battery life might indicate battery or charging issues.
- Consult the Manual or Manufacturer: Review the Manual: Check the user manual for specific troubleshooting advice or contact the manufacturer’s customer support for assistance.
By systematically following these steps, you can diagnose and potentially resolve issues with your solar flashlight. If the flashlight is still not working after these checks, it may require professional repair or replacement.