
Best Studio Subwoofer Crossover Settings to Buy in July 2026
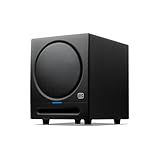
PreSonus Eris Sub 8BT — 8" Inch Powered Subwoofer, Powered Sub, Active Subwoofer, Wireless, Bluetooth, Home Audio, Bass Speaker, Home Theater, Music Production, Gaming
- BLUETOOTH 5.0 ENSURES SEAMLESS INTEGRATION WITH ALL DEVICES.
- PRECISION TUNING CONTROLS CUSTOMIZE AUDIO FOR ANY ROOM SETUP.
- 100 WATTS OF POWER DELIVERS DEEP, CLEAR BASS DOWN TO 30 HZ.


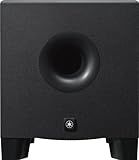
Yamaha HS8 Studio Subwoofer,Black
- DEEP BASS WITH 22HZ-150HZ FOR AN IMMERSIVE AUDIO EXPERIENCE.
- POWERFUL 150W AMP DELIVERS ROBUST SOUND PERFORMANCE.
- CUSTOMIZABLE LOW/HIGH CUT CONTROLS FOR TAILORED SOUND SETTINGS.
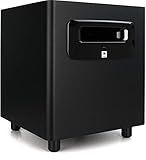
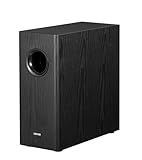
JBL Professional LSR310S - Studio Monitor Subwoofer, 10-Inch, Black
- DEEP, DYNAMIC BASS RESPONSE WITH PATENTED JBL PORT DESIGN.
- XLF SETTING EMULATES CLUB BASS FOR INSPIRING DANCE TRACK PRODUCTION.
- VERSATILE CONNECTIVITY WITH BALANCED INPUTS/OUTPUTS FOR ALL SYSTEMS.
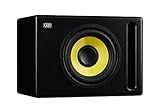
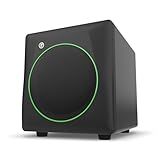
KRK S10.4 S10 Generation 4 10" 160 Watt Powered Studio Subwoofer
- DEEP BASS EXTENSION TO 28HZ FOR IMMERSIVE SOUND EXPERIENCE.
- FOOTSWITCH CONTROL FOR EASY SUB AND CROSSOVER MANAGEMENT.
- CURVED DESIGN WITH FRONT-FIRING PORT FOR VERSATILE PLACEMENT.
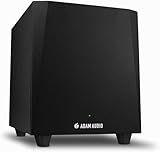
ADAM Audio T10S Studio Subwoofer for recording, mixing and mastering, Studio Quality Sound (Single)
- POWERFUL COMPACT BASS BOOST FOR CLEARER LOW FREQUENCIES.
- ENGINEERED TO PERFECTLY COMPLEMENT T5V AND T7V MONITORS.
- CUSTOMIZABLE PLACEMENT AND SETTINGS FOR OPTIMAL STUDIO PERFORMANCE.
Mackie CR8SBT 8” Powered Subwoofer with Desktop Remote, Bluetooth, TRS, RCA, Crossover and Polarity Controls, Compatible with CR Series Powered Studio Monitors
-
BLUETOOTH STREAMING: EFFORTLESSLY PAIR ANY DEVICE FOR EASY MUSIC PLAYBACK.
-
VERSATILE CONNECTIVITY: CONNECT POWERED SPEAKERS AND ENHANCE YOUR SYSTEM.
-
PROFESSIONAL DESIGN: SLEEK, STYLISH LOOK FITS ANY ROOM OR STUDIO DECOR.
Edifier T5s Powered Active Subwoofer with 70W RMS, 8" Long-Throw Woofer, Deep Bass (35Hz) Speaker, Built-in Amp, Low Distortion, Phase Selector & Energy-Efficient for Home & Studio Audio, Black
-
DEEP 35HZ BASS: POWERFUL 8-INCH WOOFER DELIVERS BOOMING AUDIO IMPACT.
-
CUSTOMIZABLE SOUND: ADJUST LOW-PASS FILTER AND PHASE FOR PERFECT INTEGRATION.
-
SLEEK, COMPACT DESIGN: FITS SEAMLESSLY INTO ANY HOME DÉCOR WITHOUT DISTORTION.
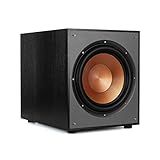
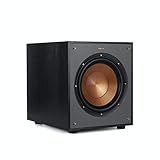
Klipsch R-120SW Subwoofer, Black
-
DEEP, POWERFUL BASS WITH 12 SPUN-COPPER WOOFER FOR ULTIMATE IMPACT.
-
MASSIVE 400 WATTS PEAK FOR THRILLING 116DB ACOUSTIC PERFORMANCE.
-
EASY SETUP WITH INCLUDED MANUAL, GRILL, AND POWER CORD FOR CONVENIENCE.
Klipsch R-100SW 10" Subwoofer, Incredibly Deep Bass and an All-digital Amplifier,14 5" x 12 5" x 16 4"
- POWERFUL 300W PEAK FOR DEEP BASS AND IMPACTFUL SOUND EXPERIENCE.
- VERSATILE INPUTS FOR SEAMLESS INTEGRATION WITH ANY AUDIO RECEIVER.
- CUSTOMIZABLE SETTINGS FOR OPTIMAL SOUND CONTROL AND PHASE ADJUSTMENT.
To adjust crossover settings on studio subwoofers, you will first need to identify the crossover frequency knob on your subwoofer. This knob allows you to adjust the frequency at which the subwoofer starts to kick in and blend with your main speakers.
Start by playing some audio through your studio monitors and subwoofer. Slowly turn the crossover frequency knob clockwise or counterclockwise until you find a frequency that blends well with your main speakers without overpowering them.
It is important to listen carefully as you make adjustments, as setting the crossover frequency too high or too low can result in muddy or boomy bass.
You may also have other settings on your subwoofer that can be adjusted, such as phase and volume. Experiment with these settings as well to find the optimal balance between your main speakers and subwoofer.
Remember to take your time and make small adjustments to achieve the best sound quality for your studio setup.
How to set crossover settings on studio subwoofers for accurate bass reproduction?
Setting crossover settings on studio subwoofers for accurate bass reproduction can vary depending on the specific setup and equipment used, but here are some general guidelines to help you get started:
- Determine the crossover frequency: The crossover frequency refers to the point at which the subwoofer starts to handle low-frequency sounds, while the main speakers handle higher frequencies. This frequency is typically set between 80Hz and 120Hz, but it can vary depending on the size and capabilities of your speakers and subwoofer.
- Use a crossover control: Most studio subwoofers have a built-in crossover control that allows you to adjust the frequency at which the subwoofer kicks in. This control is usually located on the back of the subwoofer and can be adjusted using a dial or switch.
- Experiment with different settings: Start by setting the crossover frequency to a moderate setting, such as 100Hz, and then play some music or sound through your speakers. Listen carefully to the bass frequencies and adjust the crossover control up or down until you find the setting that gives you the most balanced and accurate bass reproduction.
- Consider room acoustics: The acoustics of your studio space can also affect the way bass frequencies are reproduced. Experiment with different crossover settings to find the optimal balance between the subwoofer and main speakers based on the acoustics of your room.
- Use reference tracks: To ensure that your subwoofer settings are accurate, listen to a variety of reference tracks that you are familiar with and that feature a range of bass frequencies. This will help you fine-tune your crossover settings to achieve accurate bass reproduction across different types of music.
- Consider using a calibration microphone: If you have access to a calibration microphone or room measurement system, you can use this equipment to measure and adjust the frequency response of your subwoofer and main speakers for even more precise bass reproduction.
By following these guidelines and experimenting with different settings, you can set your studio subwoofers' crossover settings for accurate and balanced bass reproduction in your recording setup.
How to find the crossover frequency on studio subwoofers?
To find the crossover frequency on studio subwoofers, follow these steps:
- Check the user manual: The manufacturer's user manual for the subwoofer should have information about the crossover frequency settings. Look for a section that explains how to adjust the crossover frequency on the subwoofer.
- Look for control knobs or buttons: Many studio subwoofers have physical controls on the back or front of the unit that can be used to adjust the crossover frequency. These controls may be labeled as "crossover frequency," "low pass filter," or something similar.
- Use a sound meter and test tones: If the crossover frequency settings are not clearly labeled on the subwoofer or in the manual, you can use a sound meter and test tones to determine the crossover frequency. Play a test tone through the subwoofer and slowly adjust the crossover frequency until you hear the point where the sound transitions from the subwoofer to the main speakers.
- Consult with a professional: If you are still unsure about the crossover frequency settings or how to adjust them, consider consulting with a professional audio technician or the manufacturer's customer support for guidance.
By following these steps, you should be able to find and adjust the crossover frequency on your studio subwoofers to achieve the best sound quality for your setup.
What is the difference between a low-pass and high-pass filter in crossover settings?
In crossover settings, a low-pass filter is used to allow frequencies below a certain point to pass through, while attenuating frequencies above that point. This is typically used to direct low-frequency signals to a subwoofer in a speaker system.
On the other hand, a high-pass filter is used to allow frequencies above a certain point to pass through, while attenuating frequencies below that point. This is typically used to direct high-frequency signals to tweeters or other high-frequency drivers in a speaker system.
The main difference between the two is their frequency response characteristics - a low-pass filter allows low frequencies to pass through, while a high-pass filter allows high frequencies to pass through.