
Best Elliptical Trainer Pedals to Buy in July 2026

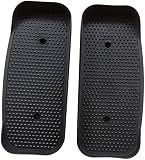
Harilla Universal Elliptical Machine Foot Pedals Part Lightweight Stable Fitness Equipment Pedals Elliptical Trainer Pedals for Fitness Indoor Parts
- DURABLE PP MATERIAL ENSURES LONG-LASTING FITNESS EQUIPMENT.
- NONSLIP SURFACE AND SHOCK ABSORPTION ENHANCE WORKOUT STABILITY.
- LIGHTWEIGHT DESIGN FOR EASY TRANSPORT AND HOME GYM USE.


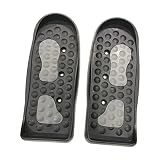
Multifunction Elliptical Machine Pedals Durable Lightweight Easy to Install Elliptical Trainer Pedals for Sports Workout Supplies
- DURABLE PP MATERIAL ENSURES LONG-LASTING USE AND STURDINESS.
- LIGHTWEIGHT DESIGN MAKES IT EASY TO CARRY, ASSEMBLE, AND STORE.
- NONSLIP SURFACE AND SHOCK ABSORPTION FOR STABLE, EFFICIENT WORKOUTS.
Colaxi Elliptical Machine Foot Pedals Replacement Fitness Equipment Pedals for Exercise
- LIGHTWEIGHT DESIGN FOR EASY TRANSPORT AND STORAGE ANYWHERE.
- DURABLE PP MATERIAL ENSURES LONG-LASTING, STURDY PERFORMANCE.
- NON-SLIP SURFACE WITH SHOCK ABSORPTION FOR SAFE, EFFICIENT WORKOUTS.

Deevoka Universal Elliptical Machine Foot Pedal Non Slip Supplies Easy to Install Replacement Fitness Equipment Footboard for Household Use, 1pcs Pedal
- NONSLIP, SHOCK-ABSORBING PEDALS ENSURE SAFE, EFFICIENT WORKOUTS.
- SUITABLE FOR ALL FITNESS LEVELS; PERFECT FOR HOME GYM ROUTINES.
- LIGHTWEIGHT, EASY ASSEMBLY MAKES IT PORTABLE AND CONVENIENT.
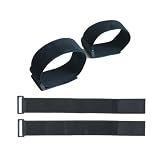
GUMWIG Leg Exerciser Traction Straps, Under Desk Elliptical Trainer 2 Pack Traction Straps,Electric Leg Exerciser Ellipse Equipment Pedal Band for Seniors to Secure & Stability Foot Accessories
-
SECURE YOUR FEET: ENJOY STABLE WORKOUTS WITH OUR SLIP-RESISTANT STRAP.
-
EASY TO USE: LIGHTWEIGHT DESIGN FOR QUICK ASSEMBLY AND STORAGE.
-
COMFORT-FOCUSED: CUSHIONED MATERIALS PREVENT DISCOMFORT DURING WORKOUTS.
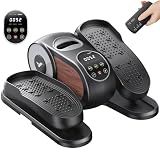
MERACH Under Desk Elliptical Machine, Leg Exerciser While Sitting for Seniors with Remote Control & 12-Speeds, Quiet Portable Electric Seated Pedal Exerciser Machine for Home Office (Black)
- SMOOTH, LOW-IMPACT EXERCISE: BURN CALORIES WITHOUT JOINT STRAIN!
- WHISPER-QUIET OPERATION: ENJOY WORKOUTS ANYTIME WITHOUT DISTURBING OTHERS.
- DUAL CONTROL CONVENIENCE: EASY USE VIA TOUCH SCREEN OR REMOTE CONTROL!
Adjusting the pedals on an elliptical trainer is important in ensuring proper alignment and comfort while using the machine. Here are step-by-step instructions on how to adjust the pedals:
- Start by unclipping your feet from the pedals and ensuring the elliptical is turned off.
- Locate the pedal adjustment knobs or levers on either side of the machine. These are usually found near the base of the pedal arms or underneath the pedals.
- Depending on the model, you may need to loosen the adjustment knobs by turning them counterclockwise or release the levers to allow for pedal adjustments.
- To adjust the pedal position, you can either move the pedals forward or backward. Push the pedals gently to slide them along their tracks until you find your desired position.
- Once you have adjusted the pedals, make sure they are aligned parallel to the floor. Uneven pedals can cause discomfort and strain on your joints.
- Tighten the adjustment knobs by turning them clockwise or lock the levers back into place. Ensure they are secured tightly to avoid any movement during use.
- After adjusting the position, test the elliptical trainer by stepping onto the pedals and mimicking your natural stride. Pay attention to any discomfort or strain. If needed, further fine-tune the pedals until you feel comfortable.
- If you regularly share the elliptical trainer with others who have different foot sizes, it's recommended to remember your preferred setting or mark it for quick adjustments later.
Remember, properly adjusted pedals will help prevent any unnecessary strain or injuries during your elliptical workout.
How to adjust the height of the handlebars on an elliptical trainer?
The processes to adjust the height of the handlebars on an elliptical trainer may vary slightly depending on the specific model and brand. However, here is a general approach to adjusting the height of the handlebars on most elliptical trainers:
- Locate the adjustment mechanisms: Look for the knobs or levers on the uprights or console of the elliptical trainer that are associated with adjusting the handlebars. These knobs or levers are usually located near the top of the uprights where the handlebars are connected.
- Loosen the adjustment mechanism: If there is a knob, turn it counterclockwise to loosen it. If there is a lever, lift or push it away from the upright to release the lock.
- Adjust the height: While holding onto the handlebars, move them up or down to the desired height. Ensure that both handlebars are adjusted symmetrically to maintain balance and prevent strain.
- Secure the adjustment: Once the handlebars are at the desired height, tighten the adjustment mechanism. If there is a knob, turn it clockwise to secure it. If there is a lever, push or lower it back towards the upright to lock it in place. Make sure the handlebars are securely locked in position to ensure safety during workouts.
- Test the adjusted height: Before starting your workout, it is advisable to test the adjusted handlebar height to ensure it feels comfortable and allows for proper posture during exercise. Make any necessary fine adjustments if needed.
It's always a good idea to consult the user manual or manufacturer's instructions specific to your elliptical trainer for more detailed and accurate guidance on adjusting the handlebar height.
What is the role of the LED display on an elliptical trainer?
The LED display on an elliptical trainer serves multiple purposes and plays a crucial role in enhancing the user's workout experience. Here are some of its primary functions:
- Real-time Feedback: The display provides real-time feedback on various workout metrics such as time elapsed, distance covered, speed, calories burned, and heart rate. This information helps users track their progress and set specific goals for their workouts.
- Workout Programs: Many elliptical trainers come with pre-set workout programs designed to offer a diverse range of training routines. The LED display showcases these programs, allowing users to select the desired workout and follow the prescribed intervals, inclines, or resistance levels.
- Resistance levels: The LED display often includes controls to adjust the resistance levels of the elliptical trainer. Users can see the current resistance level and make changes on the fly to increase or decrease the intensity of their workout.
- Heart Rate Monitoring: Some elliptical trainers have built-in heart rate sensors in the handlebars or through wireless chest straps. The LED display shows the user's heart rate in real-time, enabling them to monitor and maintain their target heart rate zone for effective cardiovascular workouts.
- Entertainment and Connectivity: Many modern elliptical trainers offer LED displays with additional features like Bluetooth connectivity or built-in speakers. This allows users to connect their devices, play music, watch videos, or even engage in virtual workout programs like interactive scenic routes or virtual competitions.
Overall, the LED display on an elliptical trainer acts as a central hub for monitoring performance, adjusting settings, selecting workout programs, and enhancing the overall interactive experience during workouts.
How to adjust the stride length on an elliptical trainer?
To adjust the stride length on an elliptical trainer, follow these steps:
- Identify if your elliptical trainer has an adjustable stride length. Not all models have this feature, so consult the user manual or look for adjustment mechanisms on the machine.
- Look for the stride adjustment knob or lever located near the front or back of the elliptical. It can be a physical knob that needs to be turned or a lever that can be pushed or pulled.
- Adjust the stride length according to your preference or requirements. If it's a knob, turn it clockwise to increase the stride length and counterclockwise to decrease it. If it's a lever, simply push or pull it to the desired position.
- Test the stride length by getting on the elliptical and performing a few strides. Make sure it feels comfortable and suits your natural range of motion. If necessary, fine-tune the adjustment until you find your desired stride length.
- Secure the adjustment mechanism to prevent any unintentional changes during your workout. Double-check that the knob is securely tightened or the lever has engaged properly.
- Enjoy your workout with the newly adjusted stride length on your elliptical trainer.
Remember to consult the user manual specific to your elliptical trainer model if you need more detailed instructions or guidance.
How to adjust the levelers or stabilizers on an elliptical trainer?
To adjust the levelers or stabilizers on an elliptical trainer, follow these steps:
- Start by identifying the levelers or stabilizers at the base of the elliptical trainer. These are usually cylindrical or disc-shaped components underneath the machine.
- Ensure that the elliptical trainer is placed on a flat and stable surface before adjusting the levelers.
- Determine which area of the machine needs adjustment. If the elliptical rocks or wobbles, focus on the levelers at that particular side.
- Locate the adjustment mechanism, which is usually a small knob or lever on the leveler. It may be threaded or push-button style.
- Using your hand or a suitable tool, turn the knob clockwise or counter-clockwise to adjust the height of the leveler. If it's a push-button style, press it down and adjust the leveler height.
- Make small adjustments to avoid over-tightening or extending the leveler excessively. Test the elliptical after each adjustment to check for stability and balance.
- Repeat the process for each leveler on the elliptical trainer until it reaches a stable position on the floor.
- Once all the levelers are adjusted to the desired height, lock them in place if possible. Some elliptical trainers have locking mechanisms to prevent accidental readjustments.
- Double-check the overall stability of the machine by gently rocking it from side to side. If it remains stable, you have successfully adjusted the levelers.
Note: Refer to the manufacturer's instructions or the user manual for specific guidance on adjusting the levelers of your elliptical trainer, as different models may have variations in the adjustment mechanism.
What is the optimal stride length for different users on an elliptical trainer?
The optimal stride length for an elliptical trainer can vary depending on the user's height and preferences. Generally, a stride length of around 14-18 inches is suitable for individuals who are shorter in height (less than 5'3"). For users who are taller (5'4" and above), a stride length of 18-22 inches is typically recommended.
However, it is important to note that an optimal stride length is subjective and can vary from person to person. Some individuals may feel more comfortable with a shorter stride length, while others may prefer a longer stride length. It is recommended to choose an elliptical trainer with adjustable stride length to cater to individual needs and preferences.
Ultimately, the optimal stride length is one that allows for a natural and fluid motion, without causing any discomfort or strain on the joints. It is advisable to try out different elliptical trainers and adjust the stride length accordingly, based on personal comfort and biomechanics.