
Best Tablet Kiosk Assembly Tools to Buy in July 2026
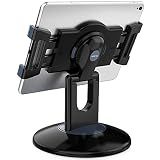
AboveTEK Retail Kiosk iPad Stand, 360° Rotating Commercial POS Tablet Stand, Fits 6"-13" (Screens) iPad mini Pro-Business Swivel Tablet Holder, for Store Office Reception Kitchen Desktop (Black)
-
UNMATCHED FLEXIBILITY: 360° ROTATION FOR PERFECT VIEWING ANGLES ANYTIME.
-
VERSATILE FIT: HOLDS 6-13 TABLETS SECURELY FOR ANY ENVIRONMENT.
-
ERGONOMIC EASE: QUICK ATTACH/DETACH FOR HASSLE-FREE STORAGE & TRANSPORT.


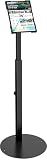
Anti-Theft iPad Kiosk Stand, Adjustable Tablet Floor Stand for POS Checkout
- ADVANCED ANTI-THEFT DESIGN SECURES DEVICES IN HIGH-TRAFFIC AREAS.
- FITS MOST 10-14 TABLETS, IDEAL FOR DIVERSE BUSINESS ENVIRONMENTS.
- HEAVY-DUTY STEEL BASE ENSURES STABILITY AND SAFETY IN COMMERCIAL SPACES.
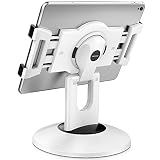
AboveTEK Retail Kiosk iPad Stand, 360° Rotating Commercial POS Tablet Stand, Fits 6"-13" (Screens) iPad mini Pro-Business Swivel Tablet Holder, for Store Office Reception Kitchen Desktop (White)
-
360° ROTATABLE BASE: EFFORTLESSLY SWITCH VIEWS FOR CASHIER AND SHOPPER.
-
VERSATILE COMPATIBILITY: FITS 6 - 13 TABLETS, PERFECT FOR ANY RETAIL SETUP.
-
ERGONOMIC & PORTABLE: EASY STORAGE WITH QUICK-RELEASE HOLDER DESIGN.
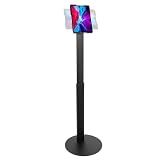
Mount-It! Anti-Theft Universal iPad & Samsung Tablet Floor Stand Kiosk, Locking Clamp, Height Adjustable 24.8"–42.5", 360° Rotating POS Kiosk for 7.9"–11" Tablets, Silver
-
SECURELY LOCKS TABLETS TO PREVENT THEFT IN HIGH-TRAFFIC AREAS.
-
COMPATIBLE WITH SQUARE & PAYPAL FOR SEAMLESS PAYMENT PROCESSING.
-
ADJUSTABLE HEIGHT & 360° ROTATION FOR OPTIMAL USER EXPERIENCE.
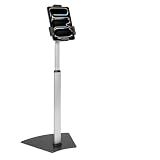
LanPavilion iPad Stand, Adjustable Tablet Floor Stand Metal Tablet Holder with Flexible Gooseneck, Compatible with iPad, Kindle, and Cell Phones (4.7''-13''), Ideal for Hands-Free Use
-
STABLE & SECURE: HEAVY 1.8KG BASE ENSURES RELIABILITY FOR YOUR DEVICE.
-
HANDS-FREE FLEXIBILITY: ADJUST 15.7 GOOSENECK FOR ULTIMATE COMFORT.
-
UNIVERSAL FIT: COMPATIBLE WITH DEVICES 4.7-13 FOR VERSATILE USE.
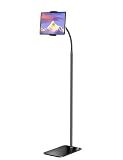
Mount-It! Anti-Theft Universal Tablet Floor Stand Kiosk, Locking Enclosure for iPad, Galaxy Tab & Surface Pro 9.7"–13.1", Height Adjustable 27.5"–47", Commercial Kiosk Stand, Black
- SECURE YOUR TABLET WITH ANTI-THEFT FEATURES FOR ANY COMMERCIAL SPACE.
- FITS 9.7–13.1 TABLETS FROM MAJOR BRANDS-CHECK YOUR DEVICE SIZE!
- ADJUSTABLE HEIGHT, TILT, AND ROTATION FOR VERSATILE CUSTOMER INTERACTION.

Mount-It! Anti-Theft iPad Floor Stand Kiosk, Locking Tablet Floor Stand for iPad Gen 7–11 & A16, Air & Pro (10.2"–11"), Commercial Kiosk for Retail, Lobby & Trade Show, Black
-
SECURE TABLET PROTECTION WITH HEAVY-DUTY, LOCKABLE STEEL ENCLOSURE.
-
FLEXIBLE VIEWING WITH 0–90° ROTATION AND 0–75° TILT ADJUSTMENTS.
-
PROFESSIONAL SETUP WITH BUILT-IN CABLE MANAGEMENT AND LIFETIME WARRANTY.
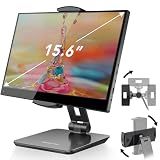
AboveTEK Business Kiosk Aluminum Tablet iPad Stand, 360° Swivel Tablet & Phone Holders for Any 4"-15.6" Display Tablets/Cell Phones/Portable Monitor, Sturdy for Store POS Office (Grey)
-
VERSATILE FIT: BRACKETS ACCOMMODATE DEVICES FROM 4 TO 15.6 EASILY.
-
ADAPTIVE USAGE: IDEAL FOR RETAIL, HOSPITALITY, AND OFFICE ENVIRONMENTS.
-
ROTATABLE DESIGN: 360° ROTATION & 220° FOLDING FOR OPTIMUM VIEWING ANGLES.
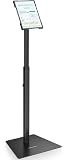
AboveTEK Security iPad Kiosk Floor Stand, Anti-Theft POS Tablet Stands for Retail Business, Height Adjustable Tablet Floor Stand, 360° Swivel Universal Locking Holder Fits 9.7"-13" iPads/iPad Pro/Air
-
ULTIMATE DEVICE SECURITY: ANTI-THEFT DESIGN KEEPS YOUR TABLET SAFE.
-
UNIVERSAL FIT: COMPATIBLE WITH 9.7 TO 13 TABLETS, VERSATILE FOR ANY SETTING.
-
ADJUSTABLE COMFORT: HEIGHT RANGES FROM 29.5 TO 45.3 FOR FLEXIBLE USE.
Assembling a desktop tablet kiosk involves several steps to ensure proper functionality and stability. Here is a general overview of the process:
- Start by gathering all the necessary components. This typically includes a tablet (with its power cord and any necessary accessories), a kiosk enclosure or stand, and any mounting brackets or screws required for installation.
- Carefully unpack the kiosk enclosure or stand, ensuring there are no missing parts or damages. Read the manufacturer's instructions, if available, to understand the specific requirements for your model.
- Assemble the base or stand of the kiosk according to the provided instructions. This may involve attaching different components together using screws or other connectors. Make sure all parts are securely tightened to ensure stability.
- If there's a mounting bracket included, attach it to the back of the tablet, following the instructions provided. This bracket will be used to secure the tablet to the kiosk enclosure.
- Position the tablet inside the kiosk enclosure or bracket, ensuring it fits securely and aligns properly with any designated ports or connectors. The tablet should be held firmly in place, and all access points should be easily accessible.
- Connect the tablet's power cord to a power outlet or any integrated charging ports within the kiosk enclosure, if available. Ensure that the power cable is neatly routed, avoiding any obstructions that might affect functionality or aesthetics.
- Double-check all the connections, making sure that the tablet is securely mounted and that all cables are properly connected. Verify that the tablet's screen is positioned at the desired angle for comfortable viewing.
- Test the tablet's functionality by turning it on and checking that all features, buttons, and ports are accessible and working correctly. Adjust the tablet's position if necessary.
- If provided, secure the tablet in place with any locking mechanisms or security features available on the kiosk enclosure. This step is especially important in public settings to prevent theft or unauthorized access.
Remember to consult the specific assembly instructions provided by the manufacturer for your particular model, as the steps may vary. It's also essential to exercise caution and seek professional assistance if needed, especially if working with electrical components or complex kiosk enclosures.
What are the different types of locks available for a desktop tablet kiosk?
There are several types of locks available for desktop tablet kiosks, including:
- Keyed Locks: These are traditional locks that require a physical key to open and secure the tablet kiosk.
- Combination Locks: These locks use a numeric combination to secure and open the tablet kiosk. The combination can be set by the owner and can be easily changed if needed.
- Biometric Locks: These locks use a unique biometric identifier, such as fingerprints or facial recognition, to secure and open the tablet kiosk. This provides an extra layer of security and convenience.
- Electronic Locks: These locks utilize electronic mechanisms, such as RFID (Radio Frequency Identification) or NFC (Near Field Communication), to secure and open the tablet kiosk. This allows for easy and quick access by authorized individuals.
- Cable Locks: These locks consist of a strong cable that is looped around the tablet kiosk and secured with a lock. They are designed to prevent theft or unauthorized removal of the tablet kiosk.
- Encrypted Locks: These locks provide an additional level of security by encrypting the data stored on the tablet and requiring a decryption code or key to access it. This helps protect sensitive information in case of theft or unauthorized access.
It is important to consider the specific requirements and security needs of the tablet kiosk before choosing the appropriate lock type.
What is the difference between a desktop tablet kiosk and a free-standing one?
A desktop tablet kiosk is a device that combines a tablet (like an iPad) with a stand or enclosure, designed to be placed on a desktop or countertop surface. It typically has a fixed position and is not meant to be moved around frequently. It offers a hands-free experience and is usually used for interactive purposes such as self-service check-ins, ordering, information access, or digital signage.
On the other hand, a free-standing kiosk is a standalone, self-contained device that is designed to be placed on the floor or mounted on a stand. It is generally larger and bulkier than a desktop tablet kiosk and often includes a larger display or multi-screen setup. Free-standing kiosks are usually used in public places like malls, airports, museums, or trade shows to provide various services like wayfinding, ticketing, product demonstrations, interactive maps, or marketing displays. Due to their size and mobility, free-standing kiosks can attract more attention and engagement from users.
In summary, the main differences between a desktop tablet kiosk and a free-standing one are the size, placement, mobility, and the context in which they are typically used.
What is the lifespan of a desktop tablet kiosk?
The lifespan of a desktop tablet kiosk can vary depending on several factors such as the quality of materials used, the level of usage, and technological advancements. On average, a well-maintained and high-quality desktop tablet kiosk can last around 5 to 8 years. However, it is important to note that technology is continuously evolving, and after a few years, newer models with improved features may become available, making the older kiosk less relevant or effective. It is also common for businesses to upgrade their kiosks periodically to stay up to date with the latest technology trends.