Best Treadmill Calibration Tools to Buy in July 2026


Calibrating your treadmill is essential to ensure accurate speed and distance readings. While the exact calibration process can vary depending on the treadmill model, the following steps generally apply:
- Consult the manual: Start by thoroughly reading your treadmill's manual. It should provide specific instructions for calibration, as different models often have unique procedures.
- Clear the treadmill: Make sure the treadmill belt is clear of any objects or debris that may interfere with calibration. Remove any accessories or items on top of the console.
- Safety first: Ensure the treadmill is turned off and unplugged before attempting any calibration adjustments.
- Access calibration mode: Some treadmills have a designated calibration mode that allows you to adjust the settings manually. Refer to your manual to find out how to enter this mode.
- Set the treadmill to zero: With the treadmill powered on, but the belt not moving, set the speed and distance readings to zero. Again, consult your manual on how to reset these values.
- Measure distance: Use a measuring tape to mark a specific distance on the treadmill belt. For example, you can measure out exactly one mile (or one kilometer) by marking the belt at appropriate intervals.
- Begin calibration: Start walking or running on the treadmill, and ensure you maintain a constant pace. Allow the treadmill to measure the marked distance from step 6.
- Adjust calibration: Compare the recorded distance with the actual distance you measured. If there's a disparity between the two, you may need to adjust the calibration settings. In calibration mode, follow the manual's instructions to modify the settings until the readings align accurately.
- Repeat if necessary: If after calibration, the readings are still not accurate, you may need to repeat the process. Follow the same steps and make further adjustments until you achieve the desired accuracy.
- Regular maintenance: To maintain accurate readings, it's recommended to periodically check and recalibrate your treadmill. This can help account for any wear and tear or changes in belt tension over time.
Remember, these steps provide a general guideline, and your treadmill's manual should always be the primary source of information for calibration. Follow the manufacturer's instructions for your specific treadmill model to ensure the most accurate speed and distance measurements.
What is the role of a treadmill's calibration certificate?
The role of a treadmill's calibration certificate is to provide assurance to the user that the equipment is accurate and functioning properly. A calibration certificate is a document issued by an authorized organization or technician that verifies the accuracy of the treadmill's speed and incline measurements. It ensures that the treadmill is calibrated correctly and is in compliance with required standards. The certificate usually includes the date and results of the calibration test, as well as the signature and contact information of the issuing body. This certificate is important for treadmill owners, gyms, or fitness centers to demonstrate that their equipment is properly maintained and accurate for users.
How to adjust the speed setting on a treadmill for accuracy?
To adjust the speed setting on a treadmill for accuracy, follow these steps:
- Check the user manual: Refer to the treadmill's user manual to understand how the speed adjustment works. Different treadmill models may have varying methods for adjusting speed accuracy.
- Zero calibration: Begin by calibrating the treadmill to set it at the baseline speed. Most treadmills have a zero-calibration feature that ensures accurate speed measurements. Follow the instructions in the user manual for zero calibration. This step is crucial for accurate speed adjustments.
- Use speed buttons: Treadmills typically have speed buttons to increase or decrease the speed. Gradually increase or decrease the speed in small increments using these buttons to fine-tune the accuracy. For example, if you find that the treadmill reports a speed of 6 mph while you are walking at a comfortable speed, but you want it to be more accurate, increase the speed by a small amount, like 0.1 or 0.2 mph, and observe how it matches your pace.
- Use a calibration tool: Some treadmills have calibration tools to adjust speed accuracy. These tools typically require you to run or walk on the treadmill at a certain speed while a sensor measures and adjusts the speed accordingly. Check the user manual to see if your treadmill model offers this feature.
- Consult the manufacturer: If you are still experiencing accuracy issues after following the above steps, it's best to reach out to the manufacturer's customer support. They can provide specific guidance on how to adjust the speed setting accurately and address any other concerns you may have.
Remember that periodic maintenance and treadmill inspections can also contribute to speed accuracy. Keeping the treadmill clean, lubricating the belt, and performing regular maintenance checks can help ensure its optimal functioning.
How to adjust the belt tension during treadmill calibration?
To adjust the belt tension during treadmill calibration, follow these steps:
- Start by locating the tension adjustment bolts on your treadmill. These are usually found at the rear end of the treadmill, near the motor housing.
- Make sure the treadmill is turned off and unplugged from the power source before making any adjustments.
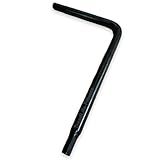
- Use a wrench or an Allen wrench (depending on the design of your treadmill) to loosen the tension adjustment bolts slightly. Do not remove them completely, just loosen them enough to allow for adjustment.
- Stand on the treadmill belt and walk at a slow pace to determine the current tension level. If the belt feels loose or slips while walking, you need to tighten it. If it feels too tight and causes excessive friction, you need to loosen it.
- To tighten the belt, turn the tension adjustment bolt clockwise. Start with small adjustments, about a quarter or half a turn at a time, and retest the belt tension after each adjustment. Keep making small adjustments until the belt feels secure and does not slip or slide while walking.
- Conversely, to loosen the belt, turn the tension adjustment bolt counterclockwise. Again, make small adjustments and retest the belt tension after each adjustment. Continue making adjustments until the belt feels smooth and glides easily without causing excessive friction.
- Once you have achieved the desired tension, tighten the tension adjustment bolts back up to secure the adjustment. Be careful not to overtighten them.
- Finally, plug in the treadmill, turn it on, and test the belt tension again by walking or running on it at various speeds. Make any additional adjustments if necessary.
Note: It's important to consult your treadmill's user manual for specific instructions and guidelines regarding belt tension adjustment for your particular model.
How to troubleshoot speed and distance inaccuracies on a treadmill?
If you are experiencing speed and distance inaccuracies on a treadmill, there are several troubleshooting steps you can take:
- Calibrate the treadmill: Most treadmills have a calibration function that allows you to adjust the speed and distance accuracy. Consult the user manual to find out how to calibrate your specific treadmill model.
- Check the belt tension: Ensure that the treadmill belt is properly tensioned. If it is too loose or too tight, it can affect speed and distance measurements. Follow the instructions in the user manual to adjust the belt tension if necessary.
- Clean the treadmill: Dust and debris can accumulate inside the treadmill, affecting its performance and accuracy. Clean the belt, deck, and other components regularly according to the manufacturer's instructions.
- Inspect the speed sensor: A faulty speed sensor can cause inaccuracies. Locate the speed sensor on your treadmill (usually near the front roller) and ensure it is clean and free from any obstructions. If it is dirty or damaged, clean it gently or contact the manufacturer for a replacement.
- Check the incline function: Some treadmills use the incline feature to calculate speed and distance. Make sure the incline function is working correctly and isn't causing any inaccuracies. Reset the incline to zero before testing the speed and distance measurements.
- Ensure proper power supply: Ensure that the treadmill is connected to a stable power source. Use a surge protector to protect it from voltage fluctuations that can affect accuracy.
- Check for software updates: Some treadmills have software updates available that may address speed and distance inaccuracies. Check the manufacturer's website or contact customer support to see if there are any updates available for your treadmill model.
- Contact customer support: If the above steps do not resolve the issue, reach out to the manufacturer's customer support for further assistance. They may have specific troubleshooting steps or recommendations tailored to your treadmill model.
What are the steps involved in calibrating a treadmill?
Calibrating a treadmill involves several steps, which may vary slightly depending on the specific model and brand. Here is a general guide to calibrating a treadmill:
- Read the user manual: First, thoroughly read the user manual provided by the manufacturer. It will provide specific instructions and procedures for calibration.
- Check the power supply: Ensure that the treadmill is properly plugged into a power source and turned on. Many treadmills have a calibration mode that can only be accessed when the machine is powered on.
- Level the treadmill: Make sure the treadmill is placed on a level surface. Adjust the machine's leveling feet or stabilizers to ensure it is stable and not tilting or wobbling.
- Set the safety key: Insert the safety key into the designated slot on the treadmill console. This key is usually attached to a cord or lanyard and is crucial for calibration.
- Enter calibration mode: Some treadmills have a specific button or combination of buttons to enter the calibration mode. Consult the user manual for instructions on how to access this mode.
- Select calibration option: Once in the calibration mode, the console will typically display various options. Look for the one related to calibration, speed or belt tension adjustment, or similar terms.
- Adjust speed or tension: Follow the specific instructions provided by the manufacturer to increase or decrease the speed or tension of the treadmill belt. This adjustment is usually made using buttons or keys on the console.
- Test and measure accuracy: After making the speed or tension adjustment, test the treadmill by walking or running on it. Use a stopwatch or a treadmill speed app on a smartphone to measure the speed accuracy. Walk or run for a specific duration (usually 1 or 2 minutes) and compare the distance measured on the console to the actual distance covered.
- Repeat if necessary: If the speed or tension is not accurate, repeat the calibration process by adjusting the speed or tension again. Keep testing and measuring until the desired accuracy is achieved.
- Exit calibration mode: Once satisfied with the calibration, exit the calibration mode by following the instructions provided in the user manual.
It is important to note that some treadmills have an automatic calibration feature that adjusts speed and tension on its own. In such cases, manual recalibration may not be necessary.
Always refer to the user manual for specific instructions and consult with the manufacturer or customer support if you encounter any issues during the calibration process.