Best Laravel Template Tools to Buy in July 2026
Laravel: Up & Running: A Framework for Building Modern PHP Apps


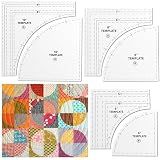
6 Set Drunkards Path Quilting Templates Large Quilting Rulers 10, 8, 6 Inch and Templates for Cutting Patterns with 1/4" Seam Allowance Supplies for Sewing Cut Measurement DIY Craft Quilting Tools
- SIX VERSATILE SIZES FOR ALL YOUR PATCHWORK AND QUILTING NEEDS.
- ESSENTIAL TOOL FOR BEGINNERS TO SIMPLIFY QUILTING PROJECTS.
- DURABLE 0.11 ACRYLIC REDUCES FABRIC WASTE FOR EFFICIENT CUTTING.
GAUENEEN 5 Pcs Architectural Templates: Circle, House Plan, Interior Design & Furniture Templates, Drafting Tools & Ruler Shapes for Architecture
- VERSATILE SET FOR ALL YOUR INTERIOR DESIGN AND ARCHITECTURAL NEEDS.
- DURABLE, FLEXIBLE MATERIAL ENSURES LONG-LASTING AND RELIABLE USE.
- PERFECT FOR PROFESSIONALS AND STUDENTS IN VARIOUS DESIGN DISCIPLINES.
6 PCS Circle Template Quilting Acrylic Templates Set, 1/2/3/4/5/6 Inch Diameter Circle Ruler Sewing Stencils Quilting Template with Binder Rings Clear Quilt Arc Cutter Ruler for Patchwork DIY Crafts
- COMPLETE TEMPLATE SET: SIX PRECISE SIZES FOR LIMITLESS QUILTING PROJECTS.
- CONVENIENT STORAGE: METAL RING KEEPS TEMPLATES ORGANIZED AND WORKSPACE TIDY.
- DURABLE ACRYLIC: LONG-LASTING AND SNAG-FREE FOR PERFECT FABRIC TRACING.
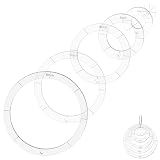
Using Quilting Templates Sewing Machine Domestic Free Motion Quilting Templates Rulers Transparent for A Simple Meander and A Great Secondary Quilting Design
- CREATE STUNNING QUILTS EFFORTLESSLY WITH EASY-TO-USE TEMPLATES!
- TRANSPARENT DESIGN ENSURES PERFECT FABRIC VISUALIZATION WHILE QUILTING.
- SUITABLE FOR MOST RULER FEET-ENJOY VERSATILE QUILTING EXPERIENCES!

32 Pcs Sashiko Stencil, 5.12 x 5.12 Inch Quilting Stencils, Geometric Pattern Drawing Line Embroidery Template, Embroidery Pattern Stabilizer for Sewing Hand Quilting and Crafting
-
32 UNIQUE PATTERNS: ELEVATE YOUR PROJECTS WITH STUNNING DESIGNS!
-
DURABLE & FLEXIBLE: TEAR-RESISTANT, FOR LONG-LASTING CRAFTING FUN!
-
EASY TO USE: PERFECT SIZE FOR FLAWLESS PATTERN ALIGNMENT EVERY TIME!
Kigley 3 Set Drunkards Path Quilting Templates Large Quilting Rulers and Templates for Cutting Patterns with 1/4" Seam Allowance Supplies for DIY Craft(Clear,10, 8, 6 inch)
- DURABLE, ACRYLIC TEMPLATES IN 3 SIZES REDUCE BREAKAGE AND DEFORMATION.
- 1/4-INCH SEAM ALLOWANCE ENSURES PERFECT FABRIC ALIGNMENT EVERY TIME.
- VERSATILE TOOLS FOR QUILTS, PATCHWORKS, AND DIVERSE SEWING PROJECTS.
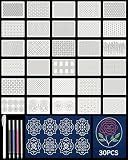
FIVEIZERO 30PCS Sashiko Stencils Kit-5.9inx8.3in Sashiko Template with 4 Heat Erasable Pens;Reusable Plastic Templates for Embroidery,Quilting,Sewing on Clothes,Jeans,Table Runners,DIY Crafts
-
30 UNIQUE DESIGNS TO SPARK CREATIVITY IN YOUR CRAFT PROJECTS!
-
THREE VERSATILE TEMPLATE SIZES FOR ANY PROJECT SCALE!
-
DURABLE, FLEXIBLE PLASTIC FOR LONG-LASTING REUSABILITY!
Blade is a templating engine used in the Laravel framework, which allows developers to write cleaner and more concise templates by utilizing PHP code snippets. The Blade template files have a .blade.php extension and are typically stored in the resources/views directory.
To create a Blade template, simply create a new .blade.php file and open it in a text editor. You can then mix HTML code with Blade syntax to build dynamic views. Blade provides various features like template inheritance, control structures, looping, and variable output.
To use Blade templates in Laravel, you can start by extending a master layout that will be used as the base template for your application. This can be achieved by using the @extends directive at the top of the Blade template file, followed by specifying the layout file to extend.
Within a Blade template, you can use the double curly braces {{ }} to output values of variables. For example, {{ $name }} would output the value of the $name variable. Blade also provides control structures like @if, @foreach, @for, and @while to handle conditional logic and loops.
Blade templates also support including other partial templates using the @include directive, allowing you to reuse common sections of code across multiple views. Additionally, you can define sections using the @section directive and yield their content using @yield.
To pass data into a Blade template from a controller, you can use the view helper function and pass an associative array of data as the second parameter. This data will then be accessible within the Blade template as variables.
Overall, Blade templates in Laravel provide a powerful and intuitive way to build dynamic and reusable views for your web application, making the development process more efficient and manageable.
What is the purpose of the @section directive in Blade templates?
The purpose of the @section directive in Blade templates is to define a named section of content that can be yielded or included in other templates.
When defining a section, you can give it a unique name, and then use the @yield directive to display the contents of that section in another template. This allows you to define reusable sections of a layout, and then insert specific content into those sections from different views.
For example, in a master layout template, you could define a section for the page's main content area using the @section('content') directive. Then, in the view that extends this layout template, you can provide the specific content for that section by placing it between @section('content') and @endsection directives. Finally, when the view is rendered, the content provided for the content section in the view will be displayed within the layout template.
What is the purpose of the @unless directive in Blade templates?
The @unless directive in Blade templates is used to conditionally display content based on the negation of a given condition.
It is the opposite of the @if directive. If the condition provided to @unless evaluates to false, the content within the directive will be executed. However, if the condition evaluates to true, the content within the @unless directive will be ignored.
The @unless directive provides a convenient way for developers to write more readable and expressive code in Blade templates.
How to pass variables to included Blade partials?
To pass variables to included Blade partials in Laravel, you can use the with method while including the partial.
Here's an example:
- In your controller, pass the desired variable to the view:
$data = [ 'name' => 'John', 'age' => 25 ];
return view('my-view', compact('data'));
- In your Blade template (my-view.blade.php), include the partial and pass the variable using the with method:
@include('my-partial')->with('data', $data)
- In your partial view (my-partial.blade.php), access the passed variable using the same name:
Name: {{ $data\['name'\] }}
Age: {{ $data\['age'\] }}
By using this approach, you can pass any variable from your controller to the included Blade partial and access it within the partial view.
How to escape output in Blade templates to prevent XSS attacks?
To prevent XSS (Cross-Site Scripting) attacks in Blade templates, you can use the double curly braces syntax {{ }} to automatically escape any output.
By default, Blade templates automatically escape any output within the double curly braces. This ensures that any user-generated content is sanitized and rendered as plain text, preventing the execution of any potentially malicious JavaScript code.
Here's an example:
Assume you have a variable $input that contains user input:
$input = '';
Instead of directly outputting the variable like {{ $input }}, use the !! double curly braces syntax to escape the output and render it as plain text:
{!! $input !!}
When the template is rendered, the HTML tags and JavaScript code inside $input will be rendered as plain text and will not be executed.
By using the !! syntax, you are explicitly indicating that you trust the variable and it does not need to be escaped. However, you should be cautious when using this syntax and always validate and sanitize user input before displaying it in your templates.
How to use conditional statements in Blade templates?
To use conditional statements in Blade templates, you can make use of the @if, @elseif, @else, and @endif directives.
Here's an example of how to use conditional statements in Blade templates:
@if($variable == 'value')
The variable is equal to 'value'.
@elseif($variable == 'other_value')The variable is equal to 'other_value'.
@elseThe variable is neither 'value' nor 'other_value'.
@endifYou can also use the @unless directive, which is similar to @if but checks for the opposite condition:
@unless($variable == 'value')
The variable is not equal to 'value'.
@endunlessYou can nest conditional statements as well:
@if($variable == 'value')
The variable is equal to 'value'.
@if($another_variable == 'another_value')The another_variable is equal to 'another_value'.
@elseThe another_variable is not equal to 'another_value'.
@endif @endifYou can also use the conditional statements inside HTML attributes:
These are just some examples of how you can use conditional statements in Blade templates. There are many other possibilities and variations, so make sure to check the Laravel documentation for more information.
How to create a new Blade template file in Laravel?
To create a new Blade template file in Laravel, you need to follow these steps:
- Open your project directory in your preferred code editor.
- Navigate to the directory where the templates are stored. By default, the templates are stored in the resources/views directory.
- Create a new folder if necessary to organize your template files.
- Inside the desired folder, create a new .blade.php file. The .blade.php extension denotes that this file is a Blade template file.
- Open the new file and start writing your Blade code.
For example, let's say you want to create a new template file named welcome.blade.php.
You can follow these steps:
- Open your project directory.
- Navigate to resources/views directory.
- Create a new folder (e.g., layouts) if you want to organize your template files.
- Inside the layouts folder, create a new file named welcome.blade.php.
- Open the welcome.blade.php file and start writing your Blade code.
By default, Laravel includes a basic layout file named app.blade.php in the resources/views/layouts directory. You can also create additional layout files if needed.
What is the purpose of the @verbatim directive in Blade templates?
The purpose of the @verbatim directive in Blade templates is to allow developers to write raw, untouched, plain-text content within the template without being parsed by the Blade template engine. This directive is particularly useful when developers want to include code snippets, template examples, or any content that would otherwise be parsed as Blade syntax. The @verbatim directive ensures that the content is displayed exactly as it is, without any modifications or parsing.
What are the different control structures available in Blade templates?
In Blade templates, there are several control structures available:
- If Statements: You can use if statements to conditionally display content based on a specific condition.
Example:
@if(condition) // code to be executed if condition is true @else // code to be executed if condition is false @endif
- Unless Statements: This is the opposite of if statements. You can use unless statements to conditionally display content if a certain condition is false.
Example:
@unless(condition) // code to be executed if condition is false @endunless
- Loops: You can use loops to iterate over a collection of data and display content for each item.
- For Loop:
@for($i = 0; $i < $count; $i++) // code to be executed for each iteration @endfor
- Foreach Loop (for iterating over arrays or objects):
@foreach($array as $item) // code to be executed for each item @endforeach
- While Loop:
@while(condition) // code to be executed until the condition is false @endwhile
- Switch Case: You can use switch case statements to conditionally display content based on different conditions.
Example:
@switch($variable) @case(value1) // code to be executed if variable matches value1 @break @case(value2) // code to be executed if variable matches value2 @break @default // code to be executed if variable does not match any case @endswitch
These control structures provide flexibility in controlling the flow and logic of your Blade templates.
How to include external CSS and JavaScript files in Blade templates?
To include external CSS and JavaScript files in Blade templates, you can use the asset() helper function to generate the appropriate file URLs.
- Place your CSS and JavaScript files in the public directory of your Laravel application. For example, create a css directory inside public and put your CSS file there.
- In your Blade template file, use the asset() helper function to include the CSS and JavaScript files. For example, to include a CSS file named styles.css, use the following code:
Similarly, to include a JavaScript file named script.js, use the following code:
- The asset() function generates a URL to the asset, using the base URL of your application. The function automatically resolves the correct path and version based on your application's configuration.
- Now, when you render the Blade template, the CSS and JavaScript files will be included. Make sure to use the correct paths and file names according to your project structure.
Note: You can also use the secure_asset() helper function instead of asset() to generate secure HTTPS URLs for your assets.