
Best Helm Chart Customization Tools to Buy in July 2026
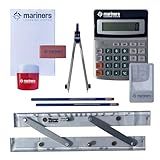
Mariners Chart Plotting Tool Kit - Marine Navigation Equipment, Weems and Plath Parallel Rulers, Dividers & Accessories for Nautical Charts, Sailing and Boating Exam Preparation
- MASTER TRADITIONAL NAVIGATION FOR RELIABLE COURSE PLOTTING ANYTIME.
- COMPLETE TOOL KIT ENSURES PRECISION FOR ASPIRING AND SEASONED SAILORS.
- ESSENTIAL FOR EXAM PREP-BOOSTS CONFIDENCE IN MARITIME CERTIFICATION.


Textbook of Therapeutics: Drug And Disease Management
- AFFORDABLE PRICES FOR QUALITY USED BOOKS YOU CAN TRUST.
- ECO-FRIENDLY CHOICE: PROMOTE READING WHILE REDUCING WASTE.
- FAST SHIPPING ENSURES YOU RECEIVE YOUR BOOK QUICKLY!
Managing Kubernetes Resources Using Helm: Simplifying how to build, package, and distribute applications for Kubernetes, 2nd Edition

Mastering Kubernetes: Dive into Kubernetes and learn how to create and operate world-class cloud-native systems
Mastering Kubernetes: Level up your container orchestration skills with Kubernetes to build, run, secure, and observe large-scale distributed apps

ESV Gospel Transformation Study Bible: Christ in All of Scripture, Grace for All of Life (Ebook)
To customize Helm chart installation paths, you can use the --set flag or a values YAML file during the installation process. This allows you to specify the desired installation paths for different components of the chart.
- Using the --set flag: Specify the installation paths for different components using the --set flag followed by the desired configuration. For example: helm install --set component.path1=/custom/path1 --set component.path2=/custom/path2 Replace with the desired release name, with the name of the chart, component.path1 and component.path2 with the specific configuration keys (in the values.yaml file) for component paths, and /custom/path1 and /custom/path2 with the actual installation paths you want.
- Using a values YAML file: Create a values YAML file to specify the custom paths. For example, create a file named custom-paths.yaml and define the required path configurations: component: path1: /custom/path1 path2: /custom/path2 Install the Helm chart using the --values flag to provide the values YAML file: helm install --values custom-paths.yaml Replace with the desired release name and with the name of the chart.
By using either of these methods, you can customize the installation paths for different components within a Helm chart.
What is the significance of specifying a separate installation path for different Helm chart releases in Kubernetes?
Specifying a separate installation path for different Helm chart releases in Kubernetes is significant for several reasons:
- Isolation: It provides a way to isolate different chart releases from each other. Each chart release can have its own set of resources, configuration, and dependencies, preventing interference between different releases. This allows for independent management and versioning of applications.
- Scalability: By specifying separate installation paths, you can easily scale resources based on the specific requirements of each chart release. For example, you can allocate more resources to critical applications and less resources to non-critical ones.
- Versioning: Each installation path can represent a specific version of the chart release. This allows you to easily manage and deploy different versions of the same application, enabling rollbacks or parallel deployments.
- Maintenance: By keeping different releases in separate installation paths, it becomes easier to maintain and troubleshoot issues. If one release encounters an issue, it does not affect the other releases, making debugging and monitoring simpler.
- Testing: Separate installation paths allow for easy testing of different chart releases. You can deploy new versions or configurations for testing purposes without impacting the stability of other releases.
- Security: By isolating different releases, security vulnerabilities in one release are less likely to impact other releases. It provides a level of security between different applications or components that might have different security requirements or risks.
In summary, using separate installation paths for different Helm chart releases in Kubernetes enhances isolation, scalability, versioning, maintenance, testing, and security, allowing for more effective management of applications in a Kubernetes cluster.
What is the process for updating the installation path of a Helm chart release in Kubernetes?
To update the installation path of a Helm chart release in Kubernetes, you need to perform the following steps:
- Fetch the current release using the Helm CLI command helm get .
- Modify the values.yaml or any other configuration file used during the release installation, changing the installation path to the desired value.
- Run the Helm upgrade command with the modified configuration file: helm upgrade -f : The name of the current release. : The name of the Helm chart. -f : Flag to specify the path to the modified values.yaml or any other configuration file.
- Helm will then update the release with the new installation path based on the modified configuration file.
Note: Make sure to verify the template of the Helm chart to ensure that any dependencies or hooks are correctly updated with the new installation path. It's also recommended to test the updated release to ensure it functions as expected in the new installation path.
What is the procedure to change the installation path of a Helm chart release in Kubernetes?
To change the installation path of a Helm chart release in Kubernetes, you need to follow these steps:
- List the existing releases by running the command: helm list
- Identify the release you want to change the installation path for.
- Uninstall the release using the command: helm uninstall RELEASE_NAME. Replace RELEASE_NAME with the name of the release you want to uninstall.
- Create a copy of the Helm chart files and edit the values.yaml file to modify the installation path. You can change the namespace, name, or any other variables relevant to the installation path.
- Install the modified release using the command: helm install RELEASE_NAME ./PATH_TO_HELM_CHART. Replace RELEASE_NAME with the desired name for the release and PATH_TO_HELM_CHART with the path to the modified Helm chart files.
- Verify that the release has been installed with the desired installation path by running: helm list
By following these steps, you can change the installation path of a Helm chart release in your Kubernetes cluster.
What is the command to modify Helm chart installation paths in Kubernetes?
The Helm command used to modify Helm chart installation paths in Kubernetes is helm install. However, the installation path itself cannot be modified through this command. The installation path is determined by the release name provided during installation.
How to integrate customized Helm chart installation paths into continuous integration and deployment pipelines in Kubernetes?
To integrate customized Helm chart installation paths into a continuous integration and deployment (CI/CD) pipeline in Kubernetes, you can follow these steps:
- Set up a CI/CD pipeline: Use a CI/CD tool such as Jenkins, GitLab CI/CD, or CircleCI to automate the deployment process.
- Customize your Helm chart: Modify your Helm chart to specify the installation path for each resource. You can do this by adding a values.yaml file or modifying the existing values file.
- Store the customized Helm chart: Store the customized Helm chart in a central repository or an artifact management system like Nexus or JFrog Artifactory. Ensure that the chart is version-controlled along with your application code.
- Build the application: Configure your CI/CD tool to build your application code and create the necessary container image for your Kubernetes deployment. Include the customization step for the Helm chart within the build process. This step may involve modifying the Helm chart with specific values based on the environment or other parameters.
- Store the container image: Once the build is complete, push the container image to a container registry, such as DockerHub, Google Container Registry, or AWS Elastic Container Registry. Ensure that the image is versioned and accessible to the deployment environment.
- Deploy the Helm chart: In the CI/CD tool, add a deployment step that triggers the Helm installation using the customized chart. Use the appropriate Helm commands, such as helm install or helm upgrade, along with the necessary arguments to specify the release name and installation path for the chart.
- Integrate with Kubernetes cluster: Ensure that the CI/CD pipeline has the necessary Kubernetes credentials to access the target cluster. This can be in the form of a kubeconfig file or environment variables containing authentication details.
- Test and verify: Include testing steps in the pipeline to validate the deployment, such as running integration tests or automated checks against the deployed application. Use tools like Kubernetes Test Framework or any custom scripts for verification.
- Continuous Deployment: Automate the CI/CD pipeline to trigger and deploy changes whenever there are updates to the application or Helm chart. You can use webhooks, code changes, or a schedule-based approach to trigger deployments automatically.
- Monitoring and Rollbacks: Set up monitoring and logging systems to track the health and performance of your deployed application. In case of any issues, configure your pipeline with rollback mechanisms to revert to the previous stable version.
By following these steps, you can integrate customized Helm chart installation paths into your CI/CD pipeline, enabling consistent and automated deployments in your Kubernetes environment.