Best Helm Chart Customization Guides to Buy in July 2026
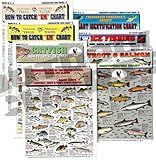
Freshwater Fish Identification Chart #3 - Waterproof Quick Reference Fishing Guide - Species ID + Fishing Methods - Double-Sided & Easy to Read - Great Gift for Beginners
- EASY FISH ID WITH VISUALS FOR ALL SKILL LEVELS-PERFECT FOR ANGLERS!
- 100% WATERPROOF DESIGN ENSURES RELIABILITY IN EVERY WEATHER CONDITION.
- LIGHTWEIGHT, PORTABLE GUIDE-FITS IN TACKLE BOXES FOR QUICK ACCESS!


Mastering Helm: A Complete Guide to Streamlined Kubernetes Deployment
Ice Fishing Chart #14 - Waterproof Quick Reference Fishing Guide - (Rigs, Baits, Safety & Techniques) - Double-Sided & Easy to Read - Great Gift for Beginners
- STEP-BY-STEP VISUALS MAKE MASTERING ICE FISHING EASY FOR EVERYONE!
- LEARN MULTIPLE RIGS IN ONE GUIDE FOR VARIED FISHING TECHNIQUES.
- 100% WATERPROOF AND PORTABLE-PERFECT FOR ANY FISHING ADVENTURE!

Kubernetes: Practical Guide for Developers and DevOps Teams—From Container Basics to Advanced Helm Deployments (Rheinwerk Computing)
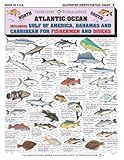
Saltwater Fish Identification Chart #5 - Waterproof Quick Reference Fishing Guide - 50+ Fish Species ID - (Florida, Atlantic, Gulf of Mexico, and Caribbean) - Great Gift for Beginners
- EASILY IDENTIFY SALTWATER FISH WITH VISUAL ILLUSTRATIONS FOR ALL SKILL LEVELS.
- 100% WATERPROOF DESIGN ENSURES DURABILITY ON EVERY FISHING ADVENTURE.
- LIGHTWEIGHT AND PORTABLE-FITS PERFECTLY IN ANY TACKLE BOX OR BAG.
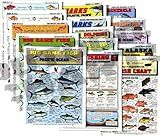
Freshwater Fish Identification Chart Set - Waterproof Quick Reference Fishing Guide - 80+ Fish Species ID - (US, Canada, and Alaska) - Double-Sided & Easy to Read - Great Gift for Beginners
- QUICKLY IDENTIFY FISH WITH VISUAL ILLUSTRATIONS-PERFECT FOR ALL LEVELS!
- 100% WATERPROOF DESIGN FOR RELIABLE USE IN ANY WEATHER CONDITIONS!
- COMPACT & LIGHTWEIGHT-EASILY FITS IN TACKLE BOXES FOR ON-THE-GO!
Saltwater Fish Identification Chart Set - Waterproof Quick Reference Fishing Guides - 100+ Species ID - (Atlantic and Pacific) - Double-Sided & Easy to Read - Great Gift for Beginners
- QUICK FISH ID: VISUALS FOR EASY IDENTIFICATION FOR ALL ANGLERS.
- RUGGED & WATERPROOF: DURABLE DESIGN WITHSTANDS TOUGH OUTDOOR CONDITIONS.
- LIGHTWEIGHT & PORTABLE: FITS IN ANY TACKLE BOX-ALWAYS READY FOR USE!
To customize values in a Helm chart during installation, you can make use of the --set or --values flag while running the [helm install](https://topminisite.com/blog/how-to-run-a-script-before-helm-install) command.
- Using the --set flag: Specify individual values using a key-value pair pattern as --set key=value. For example: helm install --set image.tag=v1.0.1.
- Using the --values flag: Create a separate values file (e.g., values.yaml) where you define the desired customizations. Provide the values file using the --values flag as --values values.yaml. For example: helm install --values values.yaml.
Both methods allow you to override default values defined in the Helm chart's values.yaml file. By specifying custom values through these flags, you can tailor the installation to your specific requirements.
How to lint a Helm chart for best practices?
To lint a Helm chart for best practices, follow these steps:
- Install Helm: If Helm is not already installed, you can download and install it from the official Helm website.
- Install Helm Chart Linter: Helm comes with a built-in linter called "Helm Chart Lint" (helm lint). While it is generally recommended to use the latest version of Helm, you can check the installed version using the command helm version.
- Navigate to your Chart directory: Open a terminal and navigate to the root directory of your Helm chart.
- Run the lint command: Execute the following command to run the linter on your chart: helm lint . (don't forget the dot at the end). This command will analyze the chart and provide you with a list of errors, warnings, and informational messages.
- Review and fix issues: Carefully review the linter output and address any identified issues. Common issues flagged by the linter include missing required values, incorrect indentation, using deprecated APIs, and other best practice violations.
- Repeat and retest: After fixing the identified issues, re-run the linting process to ensure all problems have been resolved.
- Additional checks: While the Helm lint command covers most best practices, it's also recommended to perform any additional checks specific to your application or organization. This may include security audits, performance optimizations, and other custom checks.
By following these steps, you can lint your Helm chart and ensure it follows best practices, resulting in a more robust and maintainable chart.
What is the purpose of the --wait flag in Helm install command?
The --wait flag in the Helm install command is used to make the Helm CLI wait until all of the deployed resources are in a ready state before completing the install operation.
By default, Helm sends the install command and immediately returns, without waiting for the actual deployment to complete. However, by using the --wait flag, Helm will continuously poll the status of the deployed resources until they are all in the ready state. This is particularly useful for applications that have dependencies or complex deployment processes.
Using the --wait flag ensures that Helm does not consider the installation as complete until all the resources are ready, providing better visibility and assurance that the deployment is successful before moving on to the next task.
What is the recommended directory structure for a Helm chart?
The recommended directory structure for a Helm chart typically follows a specific format. Here is an example of the recommended directory structure for a Helm chart:
mychart/
- Chart.yaml
- values.yaml
- charts/
- (dependencies)
- templates/
- deployment.yaml
- service.yaml
- ...
- charts/
- (dependencies)
- templates/
- (_helpers.tpl)
- tests/
- (test files)
- .helmignore
- README.md
Let's go through the purpose of each directory and file:
- Chart.yaml: This file is used to define the metadata and configuration of the Helm chart.
- values.yaml: This file contains the default values for the Helm chart. Users can override these values during installation or via command-line flags.
- charts/: This directory is used to store any dependencies of the Helm chart.
- templates/: This directory contains the Kubernetes manifest templates for the different resources (e.g., deployments, services) that the Helm chart will generate. These templates can use the Go template syntax.
- tests/: This directory is used to store test files for the Helm chart.
- .helmignore: Similar to .gitignore, this file specifies patterns of files and directories to be ignored when packaging the chart.
- README.md: This file provides documentation and instructions on how to use the Helm chart.
Including these directories and files in your Helm chart's directory structure will help organize and structure your chart properly.
What is the purpose of a values.yaml file in a Helm chart?
A values.yaml file in a Helm chart is used to provide values or configuration options for the various templates and components within the chart. It allows users to customize the deployment of the chart without modifying the actual templates or Helm chart structure.
The purpose of the values.yaml file is to provide a single central location for users to modify and override default values of the chart's variables or parameters. It serves as a configuration file that defines the initial or default settings for the Helm chart. Users can edit this file to customize deployment settings, such as image versions, service ports, resource limits, environment variables, and more.
By separating the values into a separate file, it simplifies the management of different deployments and makes it easier to maintain parameter changes across different environments (e.g., development, staging, production). Additionally, it enhances the repeatability and modularity of Helm charts as changes can be made by simply modifying the values.yaml file rather than modifying the underlying templates.
How to rollback a failed Helm release?
To rollback a failed Helm release, you can follow these steps:
- Check the status of the current release by running the command: helm ls
- Identify the name of the failed release that you want to rollback.
- Use the following command to rollback the release: helm rollback Replace with the name of the release and with the desired revision number. You can find the revision number from the helm ls command output. If you want to rollback to the previous version, you can use the shorthand command: helm rollback
- Helm will perform the rollback operation and restore the previous version of the release.
- After the rollback is complete, check the status of the release again to ensure that it is restored successfully: helm ls
That's it! You have now successfully rolled back a failed Helm release.
What is the command to inspect the contents of a Helm chart?
The command to inspect the contents of a Helm chart is:
helm inspect chart <chart_name>
Replace <chart_name> with the name of the chart you want to inspect.