Best Low-Light Mirrorless Cameras to Buy in July 2026
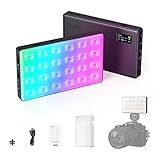
SmallRig P96 LED Video Light, Portable Camera Lights, 96 LED Beads for Photography Video Lighting, Rechargeable 2200mAh CRI 95+ 2700-6500K w 3 Cold Shoe
-
VERSATILE RGB LIGHT: 96 BEADS, 120° ANGLE, PERFECT FOR ANY SCENE.
-
CUSTOMIZABLE BRIGHTNESS & COLOR: DIMMABLE 2700K-6500K FOR ALL NEEDS.
-
PORTABLE POWER: 2200MAH BATTERY, 105 MINS RUNTIME, USB CHARGE ON-THE-GO.


ULANZI VL49 RGB Video Lights, LED Camera Light 360° Full Color Portable Photography Lighting w 3 Cold Shoe, 2000mAh Rechargeable CRI 95+ 2500-9000K Dimmable Panel Lamp Support Magnetic Attraction
- UNMATCHED COLOR ACCURACY: CRI95 ENSURES VIBRANT, LIFELIKE COLORS.
- VERSATILE BRIGHTNESS & COLOR: FULLY ADJUSTABLE HUES AND BRIGHTNESS.
- PORTABLE & POWERFUL: MAGNETIC DESIGN & LONG-LASTING 2000MAH BATTERY.
ULANZI VL-81 3000mAh Bi-Color LED Video Light w Softbox - 3200K-5600K+CRI95 Rechargeable Camera Light, 3 Cold Shoe Mount for DSLR/GoPro/Sony/Canon/iPhone, Vlog Filming TikTok Live & Photography
-
ADJUSTABLE COLOR TEMP: SWITCH BETWEEN WARM AND WHITE LIGHT EASILY.
-
LONG-LASTING BATTERY: UP TO 480 MIN ON LOW, IDEAL FOR SHOOTS.
-
COMPACT & VERSATILE: LIGHTWEIGHT DESIGN FOR EASY PORTABILITY AND USE.
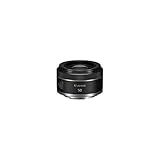
Canon RF50mm F1.8 STM Lens, Fixed Focal Length Prime Lens, Compatible with EOS R Series Mirrorless Cameras, Black
-
COMPACT & LIGHTWEIGHT DESIGN FOR EASY PORTABILITY ANYWHERE.
-
WIDE F/1.8 APERTURE FOR STUNNING LOW-LIGHT & BACKGROUND EFFECTS.
-
SMOOTH, QUIET AF IDEAL FOR VIDEO & PHOTO WITH CONTROL RING ACCESS.
SmallRig RM120 RGB Video Light, 5000mAh 180 Minutes Portable Camera Light 7W Output Power, LED Video Light Panel, 2500-8500K CRI TLCI 98+ for TikTok, Content Creator, Photographer
- 5000MAH BATTERY: CAPTURE BRILLIANT FOOTAGE FOR UP TO 180 MINUTES!
- VERSATILE LIGHTING: 2500-8500K COLOR TEMP & 12 DYNAMIC EFFECTS.
- COMPACT & DURABLE: LIGHTWEIGHT DESIGN WITH ALL-METAL CONSTRUCTION.
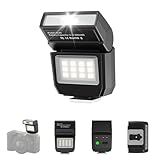
ULANZI SL03 Camera Mini Flash Speedlite with Video Light for Beginners Basic, GN8 6500K Flash 90° Angle Adjustable Compatible with Sony/Canon/Fuji/Nikon DSLR, Universal Single Contact Hot Shoe Mount
-
VERIFY COMPATIBILITY BEFORE PURCHASE: CHECK HOTSHOE TYPE FIRST!
-
ULTIMATE CONTROL: ADJUSTABLE BRIGHTNESS WITH 4 LEVELS FOR ANY SHOT!
-
FAST RECHARGE: BUILT-IN BATTERY CHARGES IN 1 HOUR, USE WHILE CHARGING!
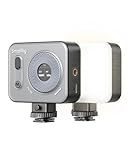
SMALLRIG Vibe P96 Pro Led Video Light, Portable Camera Light for Photography, Cold Shoe Light, CRI95+, 2500-6500K, 5 Effects, Fill Light Accessories for Content Creator, Streaming Black
-
UPGRADED DESIGN: LCD SCREEN FOR EASY, ONE-HANDED ADJUSTMENTS.
-
HIGH CRI PERFORMANCE: PREMIUM LIGHTING WITH CRI > 95 FOR TRUE COLORS.
-
FLEXIBLE USE: VERSATILE MOUNTS FOR SMARTPHONES AND CAMERAS, ANY SETUP!
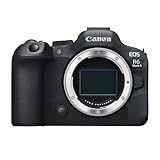
Canon EOS R6 Mark II Mirrorless Camera (Body Only), Full-Frame Camera, 24.2 Megapixel CMOS Sensor, Photo and Video Capabilities, Black
- CAPTURE STUNNING LOW-LIGHT IMAGES WITH 24.2 MP FULL-FRAME SENSOR!
- SHOOT HIGH-RES VIDEOS AT UP TO 180 FPS WITH ADVANCED IMAGE PROCESSING!
- EFFORTLESSLY TRACK SUBJECTS WITH ENHANCED FOCUS ON FACES AND ANIMALS!
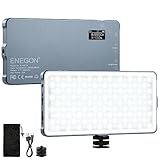
ENEGON 4000mAh Rechargeable Mountable Bicolor LED Video Light with Mini Panel for Professional DSLR Cameras | Photo Video Lighting Long Battery Life | Fits for iPhone Sony Canon Nikon Fuji Panasonic
- 90-MINUTE RUNTIME: POWERFUL 4000MAH BATTERY FOR EXTENDED SHOOTING.
- COMPACT DESIGN: LIGHTWEIGHT, DURABLE ALUMINUM FOR EASY TRAVEL AND USE.
- PRECISE CONTROL: ADJUSTABLE BRIGHTNESS AND COLOR TEMPERATURE FOR PERFECT LIGHTING.
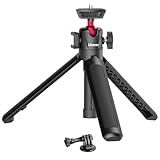
ULANZI MT-16 Extendable Mini Camera Tripod, 4 Levels Adjustment 360° Ball Head Cold Shoe Lightweight Portable Vlog Travel Selfie Stick Handle Grip Desktop Webcam Tripod for DSLR Action Camera
- UPGRADE FOR STABILITY: MORE ADJUSTABLE LEVELS & COLD SHOE FOR CONVENIENCE.
- MINI TRIPOD: LIGHTWEIGHT AND PORTABLE-PERFECT FOR TRAVEL AND VLOGGING!
- 360° BALL HEAD: VERSATILE ANGLES FOR IMPROVED VIDEO QUALITY & CREATIVITY.
Improving low-light photography with a mirrorless camera can be achieved by following a few key tips. Firstly, using a fast lens with a wide aperture, such as f/1.8 or f/2.8, will allow more light to enter the camera and improve the overall image quality in low-light conditions.
Additionally, increasing the ISO setting on the camera can help to brighten the image, although this may introduce some noise or graininess to the photo. Experimenting with different ISO levels to find the right balance between brightness and image quality is essential.
Using the camera's built-in image stabilization feature or a tripod can also help to minimize camera shake, resulting in sharper images in low light. Finally, adjusting the white balance settings on the camera can help to correct any color cast that may occur in low-light situations.
By incorporating these techniques into your photography, you can significantly improve your low-light images with a mirrorless camera.
What is the best way to balance ambient light and flash in low-light photography?
One of the best ways to balance ambient light and flash in low-light photography is to use a technique called "dragging the shutter." This involves using a slower shutter speed to allow more ambient light to enter the camera, while using a burst of flash to properly expose the subject.
To do this, start by setting your camera to manual mode and adjust your ISO to a low setting to reduce noise. Then, choose an appropriate aperture based on your desired depth of field. Next, set your shutter speed to a slower setting, such as 1/30 or 1/60, depending on the amount of ambient light available.
Once your settings are dialed in, take a test shot and adjust your flash power as needed to properly expose the subject. Be mindful of the distance and direction of the flash to ensure a natural look and avoid harsh shadows. Experiment with different shutter speeds and flash power levels until you achieve the desired balance between ambient light and flash. Practice and experimentation are key to mastering this technique and achieving stunning low-light photos.
What is the difference between noise reduction and image stabilization for low-light photography?
Noise reduction and image stabilization are two different techniques used in low-light photography to improve the quality of images.
- Noise reduction: In low-light conditions, images captured by a camera may contain a higher level of digital noise, which can result in grainy or speckled looking images. Noise reduction is a software-based technique that helps to reduce this unwanted noise by processing the image and smoothing out the pixelated areas. This results in a cleaner and more detailed image, particularly in low-light situations.
- Image stabilization: Image stabilization is a hardware-based technique that helps to reduce blurriness in photos caused by camera shake. In low-light conditions, the camera often needs to use slower shutter speeds to capture enough light, which can make the image more susceptible to blurring if the camera is not held steady. Image stabilization systems built into cameras or lenses help to compensate for this movement, allowing for sharper images even at slower shutter speeds.
In summary, noise reduction helps to improve image quality by reducing digital noise, while image stabilization helps to reduce blurriness caused by camera shake in low-light conditions. Both techniques can be used together to produce high-quality images in challenging lighting situations.
What is the best way to use natural light in low-light photography?
- Look for soft, diffused natural light: Try shooting during the golden hours (sunrise or sunset) when the light is soft and golden. This can create a warm and romantic atmosphere in your photos.
- Use reflectors: Reflectors can help bounce light back onto your subject and fill in shadows, especially when shooting in low light. You can use a professional reflector or even a white piece of paper or foam board.
- Increase your ISO: In low light conditions, you may need to increase your camera's ISO to capture more light. However, be careful not to increase it too much as it can introduce noise in your photos.
- Use a tripod: A tripod can help stabilize your camera and prevent any blur from camera shake in low light conditions. This is especially important if you need to use a slower shutter speed to let in more light.
- Shoot near windows or doors: If you're shooting indoors, try positioning your subject near a window or door where natural light is coming in. This can create a beautiful soft light that is ideal for low-light photography.
- Experiment with different angles: Sometimes changing the angle of your shot can help capture more natural light. Try shooting from different angles and see how the light falls on your subject.
- Use a wide aperture: A wide aperture lets in more light, which can be helpful in low-light conditions. Experiment with different apertures to find the right balance between light and depth of field.
Overall, the key to using natural light in low-light photography is to be creative and experiment with different techniques to find what works best for your particular situation.