
Best Tools for 4K Monitor Management to Buy in July 2026
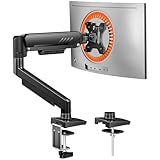
ErGear Single Monitor Arm, Fully Adjustable Monitor Mount for 13–34 Inch Screens, Fast Install Computer Monitor Stand with Tool-Free VESA Mount, Cable Management, Holds 19.8 lbs, Max VESA 100x100mm
- UNIVERSAL FIT: SUPPORTS 13″–34″ MONITORS UP TO 19.8 LBS, ENSURE COMPATIBILITY.
- DURABLE DESIGN: 40% WIDER VESA HEAD FOR STABILITY, LASTING UP TO 20,000 CYCLES.
- EFFORTLESS ADJUSTMENTS: FULL MOTION FLEXIBILITY FOR IDEAL VIEWING ANGLES AND COMFORT.


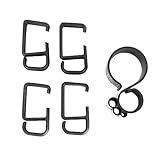
VIVO Cable Management Clips for Desk Monitor Stands, Computer Office Workstation Cord Organization Kit, 1 Pole and 4 Arm Clips, Set of Monitor Mount Wire Holder Hooks, Black, PT-SD-WC05C
- ORGANIZE CABLES EASILY WITH A SET OF 5 DURABLE CLIPS.
- COMPATIBLE WITH POPULAR VIVO MONITOR MODELS FOR VERSATILE USE.
- ACHIEVE A CLUTTER-FREE WORKSPACE-INSTALL IN SECONDS, NO TOOLS NEEDED!
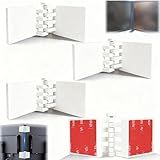
Agamino 4 Pack Dual Monitor Alignment Tool - Invisible Dual Screen Alignment Connector for VESA Mounts & Monitor Stands, Universal Fit Multi-Monitor Connector for Racing Sims, Multitasking
-
FAST CALIBRATION FOR PERFECT MULTI-MONITOR SETUP ALIGN SCREENS QUICKLY AND ACCURATELY FOR IMMERSIVE VIEWING.
-
STABILITY THAT KEEPS SCREENS IN PLACE ENJOY CONSISTENT POSITIONING WITHOUT FREQUENT ADJUSTMENTS.
-
EASY INSTALLATION IN JUST MINUTES ACHIEVE PROFESSIONAL ALIGNMENT EFFORTLESSLY AND QUICKLY.
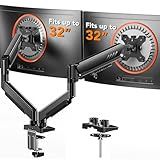
ErGear Dual Monitor Arm, Full Adjustable Monitor Mount for 13–32″ Screens, Fast Install Computer Monitor Stand with Tool-Free VESA Mount, Max Load 19.8 lbs, Max VESA 100x100mm
-
WIDE COMPATIBILITY: FITS 13″–32″ MONITORS, SUPPORTING UP TO 19.8 LBS.
-
EASY SETUP: TOOL-FREE VESA MOUNTING FOR QUICK INSTALLATION IN 3 STEPS.
-
CUSTOMIZABLE POSITIONING: EXPLORE ADJUSTABLE HEIGHT, TILT, AND ROTATION ANGLES.
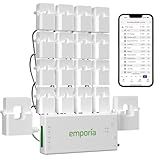
Emporia Vue 3 Home Energy Monitor - Smart Home Automation Module and Real Time Electricity Usage Monitor, Power Consumption Meter, Solar and Net Metering for UL Certified Safe Energy Monitoring
-
TRUSTED UL CERTIFICATION: ENSURES SAFETY AND RELIABILITY IN ENERGY MONITORING.
-
REAL-TIME MONITORING: TRACK ENERGY USAGE ANYTIME VIA APP FOR SAVINGS INSIGHTS.
-
SMART MANAGEMENT: AUTOMATE SETTINGS TO LOWER YOUR ELECTRIC BILL EFFICIENTLY.

Opuweiy TPMS Relearn Tool for Auto Tire Pressure Monitor System, Efficient TPMS Reset Tool, Tire Pressure Sensor Activation Device, Universal for Most Cars Trucks SUV (Black, Not Batter)
-
QUICK SENSOR ACTIVATION IN SECONDS-NO COMPLEX PROCEDURES NEEDED!
-
DURABLE DESIGN ENSURES LONG-TERM RELIABILITY AND WEAR RESISTANCE.
-
PORTABLE SIZE FITS MOST VEHICLES-PERFECT FOR EASY MAINTENANCE!
To effectively organize and manage windows on a 4K monitor, there are a few tips you can follow:
- Maximize Window: Take advantage of the large screen space by maximizing the windows of essential applications. This allows you to utilize the entire screen real estate and view more content.
- Snap Windows: Use the snap feature to manage multiple windows side by side. You can snap windows to either side of the screen or arrange them in a quadrant, depending on your preference. This makes multitasking easier and helps you view different applications simultaneously.
- Virtual Desktops: Take advantage of virtual desktops to create separate workspaces. This allows you to group similar applications or projects together, leading to better organization and improved productivity. You can switch between virtual desktops to focus on specific tasks without cluttering your screen.
- Taskbar and Start Menu: Customize your taskbar and start menu to access frequently used applications quickly. Pin important applications to the taskbar for easy access, reducing the need to search for them. Utilize the start menu to find and launch applications efficiently.
- Multiple Monitor Setup: If you have multiple monitors, consider extending your desktop across them. This provides even more screen real estate to manage and organize windows effectively. You can dedicate one monitor for specific tasks or applications while using the other for general work.
- Window Management Software: Explore window management software that offers advanced features for managing windows. These tools allow you to create custom layouts, set up predefined window arrangements, and assign shortcuts for quick window management.
- Display Scaling: Adjust the display scaling settings according to your preferences. With a 4K monitor, you might need to increase the scaling to ensure text and icons are easily readable without straining your eyes. Experiment with different scaling levels until you find the one that suits you best.
By implementing these tips and techniques, you can optimize your workflow and make the most out of your 4K monitor's screen space, leading to increased productivity and better multitasking capabilities.
How to create custom window layouts on a 4K monitor?
To create custom window layouts on a 4K monitor, you can follow these steps:
- Open the application or program you want to adjust the window layout for.
- Resize the window to your desired size by clicking and dragging its edges or corners. Take advantage of the high-resolution of the 4K monitor by making the window larger.
- Arrange multiple windows side-by-side by dragging them to the edges of the screen. In a 4K resolution, you have more screen real estate to work with, so you can fit multiple windows comfortably.
- To maximize a window, simply click the maximize button on the top-right corner of the window. This will make the window utilize the entire screen.
- If you have an operating system that supports virtual desktops, such as Windows 10 or MacOS, you can create separate desktops for different window layouts. This allows you to switch between different sets of windows and configurations effortlessly.
Additionally, some operating systems or third-party software may provide window management tools that offer more advanced customization options for window layouts on a 4K monitor.
What is the recommended refresh rate for smooth window management on a 4K monitor?
The recommended refresh rate for smooth window management on a 4K monitor is generally 60 Hz. This allows for smooth scrolling, dragging, and moving of windows on the display. Higher refresh rates, such as 120 Hz or 144 Hz, may offer even smoother motion, but they are not typically necessary for window management tasks. It is important to note that the graphics card and connection (such as HDMI, DisplayPort) on your computer should also support the desired refresh rate for optimal performance.
How to configure the taskbar for efficient window management on a 4K monitor?
Configuring the taskbar for efficient window management on a 4K monitor involves adjusting the settings and using the available features to optimize your workflow. Here are some steps you can follow:
- Right-click on an empty area of the taskbar and select "Taskbar settings" from the context menu.
- In the Taskbar settings window, under the "Taskbar" tab, you can adjust various settings to suit your needs. Here are a few options to consider: Lock the taskbar: This option prevents accidental changes in the taskbar. Taskbar location on screen: Choose whether you want the taskbar at the bottom, top, left, or right side of the screen, depending on your preference and available space.
- Enable "Use small taskbar buttons" to reduce the size of the icons in the taskbar. This will allow more space for additional icons and windows.
- Under the "Notification area" section, click on "Select which icons appear on the taskbar." Here, you can choose which system and application icons are displayed in the taskbar. Enable essential icons and disable less-used ones to reduce clutter.
- In the same "Notification area" section, click on "Turn system icons on or off." Here, you can choose to enable or disable system icons like clock, volume, network, etc., based on your requirements.
- Take advantage of Task View and virtual desktops: Task View: Click on the Task View icon (next to the search bar in the taskbar), or press Win + Tab, to access Task View. This feature allows you to view and switch between open windows, making it easier to manage multiple applications. Virtual desktops: Click on the Task View icon and then select "New desktop" at the top left of the screen. This enables you to create multiple virtual desktops, allowing you to group related applications and switch between them swiftly.
- Consider using 3rd-party window management tools that provide additional features for managing multiple windows efficiently. Some popular options include DisplayFusion, AquaSnap, and WindowGrid.
Remember to experiment with these settings and features to find the configuration that works best for your workflow and maximize your productivity on a 4K monitor.
How to split the screen into multiple windows on a 4K monitor?
To split the screen into multiple windows on a 4K monitor, you can follow these steps:
- Identify your operating system: The process may vary slightly depending on whether you are using Windows, macOS, or Linux.
- Windows:
- Right-click on an empty space on the taskbar.
- From the pop-up menu, select "Show windows side by side" to split the screen into two equal-sized windows.
- Alternatively, you can click and drag a window to the left or right side of the screen until it snaps into place, then select another window to fill the other half.
- macOS:
- Click and hold the green full-screen button located in the top-left corner of any window.
- The window will shrink and you can drag it to either the left or right edge of the screen.
- Release the mouse button, and the window will snap into place.
- Repeat the process with other windows to create additional split-screen windows.
- Linux (GNOME Desktop):
- Click and hold the title bar of a window.
- Drag it to the left or right edge of the screen.
- Release the mouse button to snap the window into place.
- Repeat the process with other windows to create more split-screen windows.
Note: These instructions may not apply to all versions and configurations of these operating systems, as different versions may have different methods to split the screen.