
Best Electric Scooter Repair Tools to Buy in July 2026
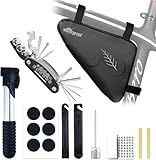
Bicycle Repair Bag With Tire Pump, Portable Tool Kit for Camping Travel - Bike Glueless Patches, Maintenance Essentials All in One Safety Kit
-
COMPLETE KIT: TOOLS FOR EVERY BIKE MAINTENANCE AND EMERGENCY NEED!
-
COMPACT DESIGN: EASY TO CARRY, ENSURING QUICK REPAIRS ON THE GO.
-
HIGH-QUALITY TOOLS: DURABLE, RELIABLE, AND PERFECT FOR ALL CYCLISTS.


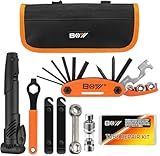
Bike Repair Kit, Bicycle Repair Bag With Tire Pump, Bike Tool Kit for Camping Cycling, 16-in-1 Bike Multitool, Bicycle Tire Repair Kit, 4mm and 5mm Allen Wrenches, Used for Mountain Bike and Road Bike
- ALL-IN-ONE TOOL KIT ENSURES YOU'RE READY FOR ANY BIKE EMERGENCY.
- LIGHTWEIGHT, PORTABLE DESIGN FITS EASILY ON ANY BIKE FOR CONVENIENCE.
- VERSATILE MINI PUMP WORKS WITH BOTH SCHRADER AND PRESTA VALVES.

cyctravel Bike Tire Repair Kit, Bicycle Inner Tube Puncture Patch Kits with 20 PCS Vulcanizing Patches, User Manual, Metal Rasp and Tire Lever, Bike Patch Kit for Mountain and Road Bike. (Plastic-ABS)
- QUICK-DRYING VULCANIZING FLUID FOR RAPID TIRE REPAIRS IN MINUTES.
- VERSATILE PATCH PLATE WITH MULTIPLE SIZES FOR VARIED PUNCTURES.
- COMPLETE KIT WITH TOOLS FOR ALL BICYCLE AND PNEUMATIC TUBE REPAIRS.
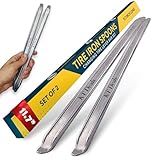
KT Deals Tire Iron Spoons Changing Tire Lever Bar Set Repair Tool Kit Tyre Changer Remover Heavy Duty Metal Steel for Motorcycle Bike Scooter Bicycle Mower (2pc 11.7 INCH)
-
COMPACT & PORTABLE: EASILY CARRY ESSENTIAL TOOLS FOR ON-THE-GO REPAIRS.
-
STRONG & DURABLE: MADE FROM HIGH-QUALITY FORGED STEEL FOR LONG-LASTING USE.
-
EFFORTLESS TIRE CHANGES: DESIGNED FOR EASY INSTALLATION, SAVING TIME AND HASSLE.
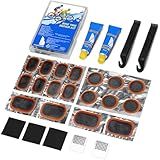
Beanewone Bike Tire Repair Kit, Bicycle Inner Tube Patch Kit with 18PCS Tube Patches, Tire Levers & Repair Glue – Portable Case for Bicycle & Inflatable Tubes (Tire Repair Kit)
- RAPID 10-MINUTE REPAIRS WITH HIGH-STRENGTH VULCANIZING GLUE.
- COMPACT & ULTRA-LIGHT DESIGN, PERFECT FOR ON-THE-GO CYCLISTS.
- UNIVERSAL COMPATIBILITY FOR BIKES, EBIKES, AND MORE!
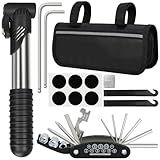
NDakter Bike Repair Kit for Flat Tire Repair, Bicycle Tool Kit Set with Pump Portable for Mountain Road Bike Emergency, Bike Bag with 16 in 1 Multitool and Lever Patch, Accessories for MTB Cycling
- ALL-IN-ONE KIT ENSURES QUICK FIXES FOR TIRE TROUBLES ON-THE-GO.
- DURABLE 16-IN-1 TOOL HANDLES ALL BIKE REPAIRS WITH EASE AND PRECISION.
- COMPACT STORAGE BAG KEEPS ESSENTIALS DRY AND ACCESSIBLE DURING RIDES.
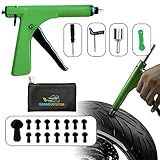
GRAND PITSTOP Tubeless Tire Gun Puncture Repair Kit with Mushroom Plug for Tyre Punctures and Flats on Cars, Motorcycles, ATV, Trucks & Tractors (Gun Puncture kit 15 Plugs, Green)
-
COMPATIBLE WITH ALL TUBELESS TIRES FOR SEAMLESS MOTORCYCLE MAINTENANCE.
-
QUICK DIY REPAIRS SIMPLIFY MAINTENANCE, SAVING TIME AND EFFORT.
-
LIGHTWEIGHT AND PORTABLE DESIGN FOR EASY TRANSPORT ON LONG JOURNEYS.

cyctravel Bike Tire Repair Kit, Bicycle Inner Tube Puncture Patch Kits with 20 PCS Vulcanizing Patches, Tire Lever, Bike Patch Kit for Mountain and Road Bike. (Plastic-Fiberglass Reinforced)
- QUICK-DRYING VULCANIZING FLUID FOR FAST, EFFICIENT TIRE REPAIRS.
- VERSATILE PATCH PLATE FITS VARIOUS PUNCTURE SIZES FOR RELIABLE FIXES.
- COMPLETE TOOLKIT INCLUDES TIRE LEVERS AND RASPS FOR EASY MAINTENANCE.
Performing basic repairs on an electric scooter can help prolong its lifespan and save you money on professional repairs. Start by identifying the issue with your scooter, whether it's a problem with the battery, brakes, tires, or another component.
If you need to replace the battery, unscrew the battery compartment and disconnect the old battery before installing the new one. To repair the brakes, adjust the brake cable or pads if they are loose or worn out. If your tires are flat, remove the wheel and replace the inner tube before reattaching the tire.
Inspecting and tightening any loose screws or bolts on your scooter can also prevent future damage. If you're unsure about how to make a repair, consult the manufacturer's manual or watch online tutorials for guidance. Remember to test your scooter after making any repairs to ensure it's running smoothly.
How to test the electric scooter's motor controller for functionality?
- Check the connections: Make sure all the connections to the motor controller are secure and properly plugged in.
- Inspect for damage: Look for any physical damage to the motor controller, such as cracks or burns. If any damage is found, the controller may need to be replaced.
- Check the sensor wires: Ensure that the sensor wires are connected properly and not damaged.
- Use a multimeter: Test the voltage output of the motor controller using a multimeter. Make sure the voltage readings are within the expected range.
- Test the throttle response: Connect the throttle to the motor controller and test the responsiveness of the system. The motor should start smoothly and accelerate steadily when the throttle is engaged.
- Listen for unusual noises: When the motor is running, listen for any strange noises coming from the motor or controller. Unusual sounds may indicate a problem with the controller.
- Test the brakes: Check that the brakes are functioning properly when the motor is engaged. The motor should stop promptly when the brakes are applied.
- Take the scooter for a test ride: Finally, take the scooter for a test ride to ensure that the motor controller is functioning correctly under real-world conditions. Pay attention to the acceleration, speed, and braking performance of the scooter.
What is the process for diagnosing a malfunctioning electric scooter display?
- Power On: Check that the electric scooter is turned on and that the battery is fully charged. If the display is not turning on at all, it may be a power issue.
- Check Connections: Ensure that all the connections between the display and the scooter's main control unit are secure and properly connected. Loose or damaged connections can cause display malfunctions.
- Restart the Scooter: Try turning off the scooter and turning it back on again. This can sometimes reset the display and fix any temporary glitches.
- Test the Display: If the display is turned on but not functioning properly, test its functionality by navigating through the different settings and modes. If certain functions are not working or if the display is frozen, it may indicate a hardware issue.
- Diagnosis Tools: Use diagnostic tools or software provided by the scooter manufacturer to run tests on the display and identify any specific errors or malfunctions.
- Contact Customer Support: If the issue persists and you are unable to diagnose the problem on your own, contact the manufacturer's customer support for further assistance. They may be able to provide troubleshooting tips or arrange for repairs or replacement of the display.
What is the proper way to clean the electric scooter's chain?
To clean the electric scooter's chain, you will need the following materials:
- Chain cleaner or degreaser
- Chain brush
- Clean rags or towels
- Lubricant specifically designed for bike or scooter chains
Here is the proper way to clean the electric scooter's chain:
- Start by turning off the scooter and removing the chain guard if applicable.
- Apply the chain cleaner or degreaser to the chain. Be sure to cover the entire chain.
- Let the cleaner sit for a few minutes to break down any built-up grease and grime.
- Use the chain brush to scrub the chain, working the cleaner into the links and removing any dirt and debris.
- Wipe the chain clean with a rag or towel to remove the cleaner and any remaining grime.
- Apply a small amount of lubricant to the chain, making sure to coat each link evenly.
- Let the lubricant sit for a few minutes to penetrate the chain.
- Wipe off any excess lubricant with a clean rag.
- Turn on the scooter and run the chain through a few cycles to distribute the lubricant evenly.
- Check the chain tension and adjust if necessary before replacing the chain guard and riding the scooter.
Regular maintenance of the chain will help prolong its lifespan and ensure smoother and quieter operation of the electric scooter.
How to adjust the suspension on an electric scooter?
Each electric scooter model may have slightly different methods for adjusting the suspension, but here are some general steps you can follow:
- Start by locating the suspension system on your electric scooter. This is typically located on the front and/or rear wheel of the scooter.
- Check the user manual for your scooter to determine the recommended suspension settings based on your weight and riding preferences.
- Many electric scooters have adjustable suspension settings that can be changed using a tool or by hand. Consult your user manual to see how to adjust the suspension on your specific model.
- If your scooter has adjustable suspension forks, you may need to use a suspension pump to add or release air pressure in the forks. Increasing the air pressure will make the suspension stiffer, while decreasing the air pressure will make it softer.
- If your scooter has adjustable rear suspension, you may need to adjust the preload or damping settings to make the suspension firmer or softer. Again, consult your user manual for specific instructions on how to do this.
- Test ride your scooter after making adjustments to the suspension to see how it feels. Make further adjustments as needed until you find the right balance of comfort and performance for your riding style.
If you are unsure about how to adjust the suspension on your electric scooter, it's always best to consult the user manual or contact the manufacturer for assistance.
What is the process for checking the electric scooter's voltage regulator?
To check the electric scooter's voltage regulator, follow these steps:
- Turn off the scooter and disconnect the battery to prevent any electrical shock.
- Locate the voltage regulator on the scooter. It is typically a small box mounted near the battery.
- Use a multimeter set to the DC voltage setting.
- Connect the multimeter's probes to the input terminals of the voltage regulator, which is where the wires from the battery are connected.
- Turn on the scooter and check the output voltage of the voltage regulator. It should be within the specified range as indicated in the scooter's manual.
- If the voltage regulator is not functioning properly, you may need to replace it with a new one.
- Reconnect the battery and test the scooter to ensure that the voltage regulator is working correctly and that the scooter is operating normally.