
Best Audio Playback Solutions for Vue.js to Buy in July 2026
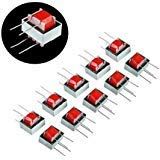
BOJACK EI-14 High Efficiency Audio Isolation Transformers 1:1 600:600 Ohm (Pack of 10)
- ACHIEVE PRISTINE SOUND QUALITY WITH HIGH-EFFICIENCY ISOLATION.
- PERFECTLY MATCHED 1:1 VOLTAGE RATIO FOR OPTIMAL PERFORMANCE.
- ENJOY ECO-FRIENDLY, LEAD-FREE, ROHS COMPLIANT COMPONENTS.


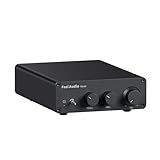
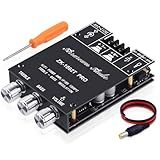
Fosi Audio TB10D 2 Channel Stereo Amplifier, Class D Mini Power Integrated Amplifiers 600W for Passive Speakers/Bass Shaker, Home Audio Component Desktop Amp Receiver TPA3255 with Bass Treble Control
-
POWERFUL 600W OUTPUT: DRIVE 2-8 OHM SPEAKERS WITH PRISTINE SOUND QUALITY.
-
VERSATILE COMPATIBILITY: FLAWLESSLY INTEGRATES INTO ANY AUDIO SETUP.
-
PERSONALIZED SOUND CONTROL: TAILOR BASS AND TREBLE TO MATCH YOUR PREFERENCES.
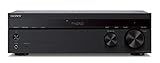
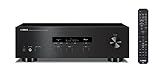
Sony STRDH190 2-ch Home Stereo Receiver with Phono Inputs & Bluetooth Black
-
HIGH-RESOLUTION AUDIO: EXPERIENCE STUDIO-QUALITY SOUND AT HOME!
-
BUILT-IN BLUETOOTH: STREAM MUSIC WIRELESSLY FROM ANY DEVICE!
-
A/B SPEAKER SWITCHING: ENJOY FLEXIBILITY WITH MULTI-ZONE PLAYBACK!
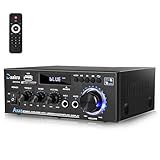
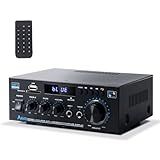
Daakro AK45 Stereo Audio Amplifier,300W Home 2 Channel Wireless Bluetooth 5.0 Power Amplifier System, Home Amplifiers FM Radio, USB, SD Card, with Remote Control Home Theater Audio Stereo System
-
POWERFUL 300W OUTPUT: PERFECT FOR KARAOKE, HOME THEATER, & SMALL SPACES.
-
ADVANCED BLUETOOTH 5.0: ENJOY SEAMLESS HIFI SOUND WITHOUT NOISY CONNECTIONS.
-
VERSATILE CONNECTIVITY: USB/SD INPUT & ADJUSTABLE BASS/TREBLE FOR PERSONALIZED AUDIO.
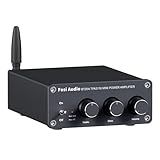
ARRAROWN ZK-1002T PRO 2.0 Channel Bluetooth 5.0 Amplifier Board 200W HiFi Subwoofer Audio AMP with Treble and Bass, BT USB and AUX Inputs, DC 12-24V 2.0 Channel Stereo AMP Module for DIY Speakers
- POWERFUL 100W BLUETOOTH AMP: ENJOY 2.1 CHANNEL SOUND WITH LOW DISTORTION!
- CUSTOMIZE AUDIO: ADJUST TREBLE AND BASS EASILY WITH DEDICATED CONTROLS.
- ROBUST PROTECTION FEATURES: ENJOY PEACE OF MIND WITH BUILT-IN SAFETY MECHANISMS.
YAMAHA R-S202BL Stereo Receiver
- EFFORTLESSLY CONNECT TWO AUDIO SYSTEMS WITH THE SPEAKER SELECTOR.
- STREAMING MADE EASY WITH BLUETOOTH FOR YOUR FAVORITE SERVICES.
- ENJOY RICH SOUND WITH A WIDE FREQUENCY RESPONSE (10HZ – 100KHZ).
Fosi Audio BT20A Bluetooth Stereo Amplifier, 2 Channel Home Audio Component Amplifiers for Passive Speakers, Mini Class D Amp Receiver 200W for Indoor/Outdoor/Garage/Ceiling/Bookshelf Speaker
-
100W POWER OUTPUT: ELEVATE SOUND QUALITY FOR HOME OR SMALL VENUES.
-
COMPACT & VERSATILE: IDEAL FOR OFFICES, BEDROOMS, AND PATIOS ALIKE.
-
BLUETOOTH CONNECTIVITY: STREAM MUSIC EFFORTLESSLY WITHOUT DROPOUTS.
Stereo Receiver & Amplifier Home Audio Amp, AK45 Bluetooth Receiver for Home Stereo, 300Wx2, Bluetooth 5.0, 2 Channel, w/FM & Karaoke, w/USB/SD/RCA/MIC/FM in, w/Remote, for Garage Party Market
-
POWERFUL 300W DUAL OUTPUTS FOR DYNAMIC SOUND EXPERIENCE.
-
VERSATILE INPUTS: CONNECT SMARTPHONES, USB, & MICROPHONES EASILY.
-
HI-FI SOUND QUALITY WITH NOISE REDUCTION FOR ULTIMATE LISTENING.
To play an audio file with Vue.js, you would need to follow these steps:
- Import the audio file: Make sure you have the audio file you want to play stored in your project directory.
- Create a new Vue component: In your Vue component file, import the audio file using require or import.
- Add an tag: Inside the template section of your Vue component, add an tag with the source attribute pointing to your imported audio file.
- Use Vue data properties: Add data properties to control the playback behavior of the audio file. For example, you can add a property to track whether the audio is playing or not.
- Implement play/pause functionality: Attach event listeners to buttons or other elements in the component to control the play/pause behavior of the audio. Use the audio element's methods like play() and pause() within these event handlers to control audio playback.
- Optional: Implement additional features: You can also include features like seeking, volume control, and displaying the current playing time by using additional data properties and event handlers.
Remember to set up appropriate styling and handle any error cases that may arise, such as the audio file not being found or failing to load.
What is an audio file format compatible with Vue.js?
Vue.js is a JavaScript framework used for building user interfaces. It is primarily used for client-side applications that run in the web browser. Consequently, Vue.js is not specifically designed to handle audio file formats.
However, Vue.js can easily work with HTML5 audio elements or audio-related JavaScript libraries. HTML5 natively supports several audio file formats, including MP3, WAV, and Ogg. Therefore, these formats are compatible with Vue.js. You can use the element in Vue.js templates to embed audio in the application.
How to display the artist and title information of an audio file in Vue.js?
To display the artist and title information of an audio file in Vue.js, you can use the following steps:
- Import the audio file and store it in your Vue component's data:
data() { return { audioFile: require('@/assets/audio.mp3'), artist: '', title: '', }; },
- Use the metadata event of the audio element to retrieve the artist and title information:
<audio ref="audioElement" :src="audioFile" @loadedmetadata="getMetadata">
- Implement the getMetadata method in your Vue component to extract the artist and title information from the audio element:
methods: { getMetadata() { const audioElement = this.$refs.audioElement; this.artist = audioElement?.metadata?.artist || 'Unknown Artist'; // Set a default value if artist information is not available this.title = audioElement?.metadata?.title || 'Unknown Title'; // Set a default value if title information is not available }, },
- Finally, display the artist and title information in your Vue component's template:
Artist: {{ artist }}
Title: {{ title }}
Make sure to replace audio.mp3 with the actual path or URL of your audio file.
How to import an audio file in a Vue.js project?
To import an audio file in a Vue.js project, you can use the require function or the import statement.
- Place your audio file in the assets folder of your project. For example, let's say we have an audio file named music.mp3 located at src/assets/music.mp3.
- In your Vue component file where you want to use the audio file, you can use require to import it:
// Import the audio file const music = require('@/assets/music.mp3');
export default { data() { return { audioSrc: music.default // Set the audio source using the import result }; } // other component options }
- In your template, you can use the audio tag to play the file:
This audio tag with the src attribute binds to the imported audio source. The controls attribute adds a basic audio player with play/pause buttons and a volume slider.
Note: The require function is a CommonJS syntax, and it works out of the box with Vue CLI and webpack. If you are using a different setup or module bundler, you might need to adjust the import statement accordingly.
What is the recommended approach for handling audio file errors in Vue.js?
When encountering audio file errors in Vue.js, the recommended approach is to use the @error event listener provided by the <audio> element.
- In your Vue component, define a method to handle the audio error:
methods: { handleAudioError() { // Handle the error here }, },
- In your template, add the element and attach the @error event listener to it:
<audio @error="handleAudioError">
- When an error occurs while loading or playing the audio file, the handleAudioError method will be triggered. You can then implement the necessary error handling logic within the method, such as displaying an error message or taking alternative action.
Remember to replace "path_to_audio_file" with the actual path to your audio file.
Additionally, you can enhance the error handling by adding a data property to store the error message and conditionally display it in the template. This allows you to provide more user-friendly error feedback.
By using the @error event listener in conjunction with a dedicated method, you can easily handle audio file errors in Vue.js.
What is the recommended approach for handling audio file caching with Vue.js?
The recommended approach for handling audio file caching with Vue.js is to use a combination of techniques such as lazy loading, preloading, and caching.
- Lazy loading: Load the audio file only when it is needed, i.e., when it is about to be played. This can be achieved by using dynamic imports or by conditionally rendering the audio player component only when the user requests to play the audio.
- Preloading: Preload the audio file in the background before it is required. This can be done by using the preload attribute in the audio tag or by leveraging the HTML5 Audio API to create an Audio object and trigger the load method on it. const audio = new Audio('path/to/audiofile.mp3'); audio.load();
- Caching: Cache the audio file to avoid repeated network requests. You can utilize browser caching mechanisms such as Service Workers, Local Storage, or IndexedDB to store and retrieve the audio file. This allows the audio file to be loaded quickly from the local cache for subsequent plays. Service Workers: Use Service Workers to intercept the network requests and store the audio file in the cache. Whenever a request is made for the audio file, the Service Worker can first check if it exists in the cache and return the cached version if available. Local Storage: Store the audio file as a base64-encoded string in the local storage. When the audio is needed, retrieve it from the local storage and create an audio element with the base64 string as the source. This reduces the need for network requests but be mindful of the local storage size limitations and potential performance impacts. IndexedDB: Store the audio file in an IndexedDB database. This offers more flexibility in managing and retrieving the cached resources compared to local storage.
Implementing a combination of these techniques will ensure efficient handling of audio file caching in your Vue.js application.
What is the best practice for handling multiple audio files in Vue.js?
There are several best practices for handling multiple audio files in Vue.js:
- Use a component-based approach: Create a separate component for each audio file or for a group of related audio files. This allows for better organization and reusability of code.
- Utilize the Vue Router: If you have a large number of audio files or want to have separate pages for different sets of audio files, consider using the Vue Router to handle navigation and dynamic loading of audio files.
- Store audio file data in the Vuex store: If you need to share audio file data across multiple components, consider storing the data in the Vuex store. This makes it easily accessible and updatable from any component.
- Use a library for audio playback: Vue.js has a wide range of audio playback libraries available that can simplify the implementation of audio file handling. Some popular options include Howler.js, Vue-Audio, and Plyr.
- Implement lazy loading: If you have a large number of audio files, consider implementing lazy loading to improve performance. Load only the audio files that are currently being viewed or needed, and dynamically load additional files as needed.
- Optimize audio file formats: Depending on your use case, you may need to optimize the audio files for different formats (e.g., mp3, ogg). Use appropriate tools for compressing and converting the audio files to reduce file size without significant loss in audio quality.
- Implement error handling: Handle any errors that may occur during the loading or playback of audio files. Show appropriate error messages or fallback options to ensure a smooth user experience.
- Consider accessibility: Ensure that your audio player is accessible to all users, including those with visual or hearing impairments. Provide subtitles/captions and alternative text descriptions for audio files as necessary.
Overall, the best practice for handling multiple audio files in Vue.js is to create modular and reusable components, leverage existing libraries, optimize performance, and ensure accessibility.
How to create custom audio player controls in Vue.js?
To create custom audio player controls in Vue.js, you can follow these steps:
- Set up a new Vue component for the audio player controls:
- In your parent component, import the custom audio player controls component and use it with the audio source URL:
- Customize the audio player controls component according to your needs by adding additional buttons (e.g., volume control, repeat button) or styling.
Note: Make sure to replace "/path/to/audio.mp3" with the actual path to your audio file.