
Best Countertop Dishwasher Replacement Parts to Buy in June 2026
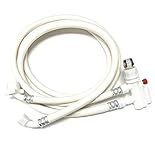
Shark Industrial 6 FT Countertop Dishwasher Fill and Drain Hose Kit with faucet adapter for all major brands (6)
- COMPATIBLE WITH ALL MAJOR BRANDS OF COUNTERTOP DISHWASHERS.
- DURABLE CONSTRUCTION SURPASSING RIGOROUS INDUSTRY TESTING STANDARDS.
- INCLUDES FAUCET FILTER & RUBBER WASHER FOR EASY, UNIVERSAL FIT.


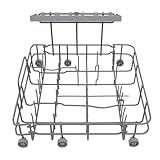
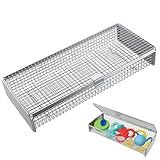
Hermitlux Countertop Dishwasher Tableware Basket With Storage Rack
-
DURABLE METAL DESIGN: LONG-LASTING AND RUST-RESISTANT FOR REPEATED USE.
-
SPACE-EFFICIENT STORAGE: FITS MORE ITEMS FOR OPTIMAL CLEANING AND ACCESS.
-
STABILITY & SAFETY: PREVENTS SHIFTING AND BREAKAGE DURING DISHWASHER CYCLES.
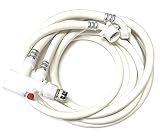
Shark Industrial 8 FT Countertop Dishwasher Fill and Drain Hose Kit with faucet adapter for all major brands (8)
- UNIVERSAL FIT FOR ALL MAJOR BRAND COUNTERTOP DISHWASHERS.
- DURABLE CONSTRUCTION EXCEEDS INDUSTRY STANDARDS FOR LASTING USE.
- EASY INSTALLATION WITH ADAPTER PACK, SEALANT TAPE, AND WRENCH INCLUDED.
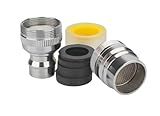
Dishwasher Faucet Adapter (Chrome-brass) fit for Danby, SPT, Homelabs, Costway, Panda, Rovsun Portable Dishwasher to Sink
-
DUAL-THREAD DESIGN: FITS MOST FAUCETS, INSIDE OR OUTSIDE THREADS.
-
DURABLE BRASS CONSTRUCTION: CHROME-PLATED FOR LONG-LASTING USE.
-
WIDE COMPATIBILITY: WORKS WITH MULTIPLE BRANDS AND PORTABLE MODELS.
Dishwasher Basket for Small Items, 304 Stainless Steel Dishwasher Basket, Bottle Parts, Scoops, Forks, Chopsticks Cleaning (Silver)
-
VERSATILE STORAGE: ORGANIZES BABY ITEMS & KITCHEN ACCESSORIES SEAMLESSLY.
-
DURABLE DESIGN: MADE FROM RUSTPROOF 304 STAINLESS STEEL FOR LASTING USE.
-
EFFORTLESS USE: ONE-TOUCH PRESS OPENS EASILY; FITS MOST DISHWASHERS PERFECTLY.
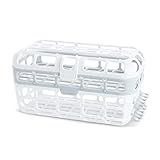
Munchkin® High Capacity Dishwasher Basket, 1 Pack, Grey
- SPACIOUS DESIGN FITS BOTH STANDARD AND WIDE-MOUTH BOTTLES EASILY.
- QUICK-LOADING: SLIDE NIPPLES IN WITHOUT OPENING THE TOP LID.
- FEATURES STRAW RACK AND DEDICATED SPOT FOR CLEANING PACIFIERS.
To replace parts in a countertop dishwasher, you will first need to disconnect the power supply and water source to the appliance. Next, remove the outer housing of the dishwasher to access the internal components. Identify the part that needs to be replaced and carefully disconnect any wires or hoses attached to it.
Once the old part is removed, install the new part in its place, making sure it is securely fastened and all connections are reattached. Reassemble the outer housing of the dishwasher and reconnect the power and water supply. Test the dishwasher to ensure the new part is functioning properly. If you are unsure about how to replace a specific part, it is recommended to consult the appliance's manual or contact a professional for assistance.
How to remove and replace a faulty heating element in a countertop dishwasher?
- Unplug the countertop dishwasher from the power source to ensure safety.
- Remove the screws holding the dishwasher's back panel in place. This will give you access to the heating element.
- Carefully disconnect the wires connected to the heating element. It's a good idea to take a picture of the wiring configuration before disconnecting to ensure you can reconnect them correctly later.
- Once the wires are disconnected, remove the screws holding the heating element in place. Take note of how the heating element is positioned in the dishwasher so you can reinstall it correctly.
- Take out the faulty heating element and replace it with a new one. Make sure the new heating element is compatible with your dishwasher model.
- Secure the new heating element in place using the screws you removed earlier.
- Reconnect the wires to the new heating element, following the wiring configuration you noted earlier.
- Replace the back panel of the dishwasher and secure it with the screws.
- Plug the countertop dishwasher back into the power source and test to make sure the new heating element is functioning properly.
- If everything is working correctly, you can start using your dishwasher again. If not, double-check all connections and consult the manufacturer's instructions or a professional technician for further assistance.
How to properly install a new detergent dispenser in a countertop dishwasher?
- Turn off the power to the dishwasher and disconnect it from the power source.
- Open the door of the dishwasher and locate the detergent dispenser. It is typically located on the inside of the door.
- Remove the old detergent dispenser by unscrewing or unclipping it from the door. Be careful not to damage the dispenser or the surrounding area.
- Take the new detergent dispenser and ensure that it is compatible with your dishwasher model. Check the manufacturer's instructions for any specific installation steps.
- Position the new detergent dispenser in the same location as the old one and secure it in place. This may involve screwing it in, clipping it on, or using adhesive.
- Reconnect the power to the dishwasher and test the new detergent dispenser by running a cycle with detergent inside. Make sure that the dispenser opens and dispenses the detergent properly.
- Close the dishwasher door and check for any leaks or malfunctions. If everything is working correctly, the installation is complete.
- Dispose of the old detergent dispenser properly according to local regulations.
How to replace the door spring mechanism in a countertop dishwasher?
- Unplug the dishwasher and disconnect it from any water supply before starting the repair.
- Remove the screws that secure the outer door panel to the dishwasher. Carefully remove the panel to access the spring mechanism.
- Locate the door spring mechanism on the inside of the dishwasher door. Use a screwdriver or pliers to remove the old spring mechanism from its mounting brackets.
- Install the new door spring mechanism by attaching it to the mounting brackets inside the dishwasher door. Make sure the spring is properly secured in place.
- Test the new door spring mechanism by opening and closing the dishwasher door a few times. Make sure it operates smoothly without any resistance.
- Reattach the outer door panel to the dishwasher using the screws that were removed earlier.
- Plug the dishwasher back in and reconnect it to the water supply. Run a test cycle to ensure that the door spring mechanism is functioning properly.
- If the door spring mechanism is working correctly, replace any other parts that were removed during the repair process and reassemble the dishwasher. If the door spring mechanism is still not working properly, double-check the installation and make any necessary adjustments.
- Once you are satisfied with the repair, run a full wash cycle to ensure that the dishwasher is functioning correctly.
What is the procedure for installing a new controller board in a countertop dishwasher?
- Unplug the dishwasher and turn off the water supply to the appliance.
- Remove the screws or fasteners holding the front control panel in place. This may require a screwdriver or other tools.
- Carefully pull out the front control panel to access the old controller board.
- Disconnect any wires or cables connected to the old controller board. Take note of the placement and orientation of each wire to ensure they are reconnected correctly.
- Remove the old controller board from the dishwasher.
- Install the new controller board in the same location as the old one, ensuring it is securely in place.
- Reconnect the wires or cables to the new controller board, matching them to their corresponding connections.
- Replace the front control panel and secure it with the screws or fasteners.
- Turn on the water supply and plug in the dishwasher.
- Test the dishwasher to ensure the new controller board is functioning properly. If there are any issues, double-check the connections and refer to the manufacturer's instructions for troubleshooting tips.