
Best 4K Monitor Setup Tools to Buy in July 2026

LG 27US500-W Ultrafine Monitor 27-Inch 4K UHD (3840x2160) HDR10 IPS Borderless Design Reader Mode Flicker Safe Switch App HDMI DisplayPort - White
-
STUNNING 4K UHD & 1000:1 CONTRAST FOR VIBRANT, DETAILED VISUALS.
-
EXPERIENCE TRUE COLORS WITH HDR10 AND 90% DCI-P3 SPECTRUM.
-
ENJOY EASY CUSTOMIZATION AND ERGONOMIC ADJUSTMENTS FOR COMFORT.


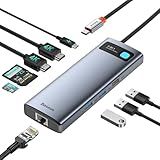
Baseus Laptop Docking Station Dual Monitor 4K@120Hz, 9 in 1 USB C Hub with 2 HDMI, 1000Mbps LAN, Max 85W PD, 3 USB, SD Card Reader, USB C Dock Compatible with iPhone 15/Mac/Dell/HP/Surface/Steam Deck
- 4K@120HZ DUAL DISPLAY SUPPORT: ENHANCE PRODUCTIVITY WITH CRYSTAL-CLEAR VISUALS.
- STABLE 1000MBPS ETHERNET: ENJOY FASTER, SECURE INTERNET OVER UNSTABLE WI-FI.
- ULTRA-FAST DATA TRANSFER: TRANSFER HD MOVIES IN SECONDS WITH USB 3.0 PORTS.

Vlog Selfie Monitor Screen, Magnetic Phone Vlog Selfie Monitor Screen 4K 30fps Bluetooth Remote, Back Camera Monitor for Vlog Live Stream TikTok, Compatible with iPhone & Android
-
EFFORTLESS 4K RECORDING: PLUG-AND-PLAY WITH REAL-TIME SYNC FOR IPHONE.
-
BRIGHT OUTDOOR DISPLAY: 400-LUMEN SCREEN FOR CLEAR VISUALS IN SUNLIGHT.
-
CONVENIENT FEATURES: SMART CHARGING AND 33FT REMOTE FOR SOLO CREATORS.

FEELWORLD FW759 7 Inch DSLR Camera Field Monitor with F550 2200mAh Battery and Bag HD Video Assist Slim IPS 1280x800 4K HDMI 1080p
- CRISP 1280X800 HD DISPLAY ENSURES VIBRANT COLORS AND SHARP VISUALS.
- VERSATILE 4K HDMI INPUT COMPATIBLE WITH DIY CAMERAS & CAMCORDERS.
- ULTRA-SLIM, LIGHTWEIGHT DESIGN PERFECT FOR PORTABLE ON-THE-GO FILMING.
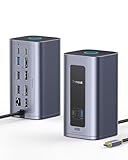
Baseus Docking Station Dual Monitor for macOS/Win, Nomos Mac Air(12 in 1) Laptop Docking Station with 4K HDMI, 10Gbps USB Ports, 1Gbps Ethernet, PD 100W(No Power Adapter)
- 12 PORTS, ONE HUB: MAXIMIZE CONNECTIVITY WITH A SLEEK, ORGANIZED DOCK.
- DUAL MONITOR SUPPORT: ENHANCE PRODUCTIVITY WITH STUNNING DUAL 4K DISPLAYS.
- 10GBPS TRANSFER SPEED: TRANSFER FILES IN SECONDS FOR SEAMLESS PERFORMANCE.

SYNCO XView Selfie Monitor Screen for iPhone 17 Series & Android, Wireless 4K/1080p Magnetic Vlog Back Camera Monitor with 164FT Range, Built-in Speaker for YouTube TikTok Live Streaming Photo(Black)
-
CAPTURE & STREAM 4K VIDEOS EFFORTLESSLY WHILE STAYING CONNECTED!
-
BUILT-IN SPEAKER + 3-HOUR PLAYBACK FOR ENGAGING, VIRAL CONTENT!
-
SHOOT FROM 164FT AWAY WITH A MAGNETIC GRIP FOR ULTIMATE FLEXIBILITY!
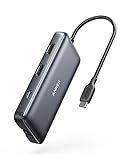
Anker Laptop Docking Station Dual Monitor, 8-in-1 USB C Hub, 4K Dual Monitor with 2 HDMI, 1 Gbps Ethernet Hub, 85W Power Delivery, SD Card Reader for MacBook Pro, XPS and More (Charger not Included)
-
JOIN 50M+ USERS: EXPERIENCE THE TRUSTED ANKER TECHNOLOGY ADVANTAGE.
-
ALL-IN-ONE EXPANSION: ENJOY 8 FUNCTIONS FROM A SINGLE USB-C PORT.
-
STUNNING DISPLAYS: DUAL 4K SUPPORT FOR IMMERSIVE SCREEN EXPERIENCES.

Glomtheia USB C Hub Docking Station Dual Monitor for Laptop, MacBook Air/Pro Dock Adapter Multiport Dongle with 2 HDMI Ports 4K 60Hz, 100W PD Charging, 3 USBA 3.0 & USBC
- DUAL 4K SUPPORT: ENHANCE PRODUCTIVITY WITH DUAL 4K@60HZ DISPLAYS.
- FAST 100W CHARGING: KEEP YOUR LAPTOP POWERED WHILE USING ALL PORTS.
- SUPERSPEED TRANSFER: ENJOY QUICK 5GBPS DATA TRANSFER FOR ALL YOUR DEVICES.

VILTROX DC-550 Touch Screen DSLR Camera Field Monitor 1200 Nits High-Bright 5.5 inch DSLR Camera Monitor with Sunshade Hood/Battery 3D LUT HDR 4K HDMI in and Out Exposure Focus Assist Waveform Monitor
-
1200 NITS BRIGHTNESS FOR CLEAR DAYLIGHT VIEWING ANYWHERE!
-
CUSTOM 3D LUT SUPPORTS CREATIVE EFFECTS & PROFESSIONAL MONITORING!
-
TRIPLE POWER SUPPLY: FLEXIBILITY FOR INDOOR & OUTDOOR SHOOTING!
To set up a 4K monitor on Windows 10, you can follow these steps:
- Begin by connecting your 4K monitor to your computer using the appropriate cable, such as an HDMI or DisplayPort cable.
- After connecting the monitor, right-click on any empty space on your desktop and select "Display settings" from the context menu.
- In the Display settings window, scroll down to the "Scale and layout" section. Here, you will see an option labeled "Scale and layout." Adjust the scaling options to your preference. It's recommended to set it to 100% or 150% for a 4K monitor, depending on your visual preferences and the monitor's size.
- Next, scroll further down to the "Resolution" section. You should see a drop-down menu with different resolution options for your monitor. Select the highest available resolution, which would be the native resolution of your 4K monitor. Typically, it will be labeled as "3840 x 2160" or "4096 x 2160."
- After selecting the appropriate resolution, Windows will ask you to confirm the change. Click on the "Apply" button to proceed.
- Windows will now adjust the display settings and switch to the selected 4K resolution. If the screen goes black or displays an error message, Windows will automatically revert to the previous settings after a few seconds. This is normal, and you can try a different resolution or proceed to the next step.
- In some cases, you may need to update your graphics driver to ensure the best compatibility and performance with your 4K monitor. To do this, right-click on the Windows Start button and select "Device Manager" from the menu. Expand the "Display adapters" section, right-click on your graphics card, and choose "Update driver" or "Search automatically for updated driver software." Follow the on-screen instructions to complete the update.
- Once the display settings are configured and your graphics driver is up-to-date, you should be able to enjoy the crisp visuals of your 4K monitor on Windows 10.
Remember that the interface of some applications may not be optimized for high-resolution displays, resulting in smaller texts or icons. In such cases, you can try adjusting the scaling settings for individual applications if supported.
Keep in mind that these instructions may vary slightly depending on your system configuration, monitor model, and graphics card. It's always a good idea to refer to the user manual for your specific monitor and consult the manufacturer's support resources if you encounter any issues.
How to set up a 4K monitor as the primary display on Windows 10?
To set up a 4K monitor as the primary display on Windows 10, follow these steps:
- Connect your 4K monitor to your computer using an HDMI or DisplayPort cable.
- Right-click on the desktop and select "Display settings" from the context menu.
- In the "Display settings" window, you will see multiple displays listed. Identify the 4K monitor you want to set as the primary display.
- Click on the desired 4K monitor and scroll down to the "Multiple displays" section.
- Check the box "Make this my main display" under the "Multiple displays" section. This will set the selected 4K monitor as the primary display.
- Adjust any other display settings you wish to modify, such as screen resolution, display orientation, or scaling.
- Click "Apply" to save the changes. Your 4K monitor should now be set as the primary display.
Note: If you don't see the desired monitor in the "Display settings" window, make sure the monitor is properly connected and turned on. You may need to click "Detect" to refresh the display connection or check the physical cable connection.
How to connect a 4K monitor to a Windows 10 laptop?
To connect a 4K monitor to a Windows 10 laptop, you need to ensure that your laptop and monitor support 4K resolution and have the necessary ports. Then, follow these steps:
- Check the ports: Look for the available video ports on your laptop and the 4K monitor. The most common ports for video output are HDMI, DisplayPort, and USB-C/Thunderbolt.
- Determine the correct cable: Based on the available ports on your laptop and the monitor, choose the appropriate cable. For example, if both devices have an HDMI port, you can use an HDMI cable. If the laptop has a USB-C port and the monitor has a DisplayPort, you may need to use a USB-C to DisplayPort cable or an adapter.
- Connect the cable: Plug one end of the cable into the appropriate port on your laptop and the other end into the corresponding port on the 4K monitor.
- Turn on the monitor: Connect the monitor to a power source and turn it on. Ensure that it's set to the correct input source using the monitor's menu settings.
- Configure display settings: Right-click on the desktop and select "Display settings." In the Settings window, you should see the connected monitor listed. Select the monitor and adjust the resolution to 3840x2160 (4K). You can also choose the orientation and scaling options to fit your preferences.
- Apply settings: Click "Apply" to save the changes. Windows may ask you to confirm the resolution change. If the screen appears cropped or distorted, you may need to adjust the display settings further or update your graphics drivers.
Note: In some cases, laptops may have limitations on the maximum resolution or refresh rate they can support. Ensure that your laptop specifications are compatible with the 4K display you want to connect. Additionally, make sure your graphics drivers are up to date.
How to adjust brightness and contrast on a 4K monitor in Windows 10?
To adjust brightness and contrast on a 4K monitor in Windows 10, you can follow these steps:
- Right-click on the desktop and select "Display settings" from the drop-down menu.
- In the Display settings, scroll down and locate the "Brightness and color" section.
- Adjust the slider under "Brightness" to increase or decrease the brightness level according to your preference.
- To adjust contrast, click on the "Advanced display settings" link located below the brightness slider.
- In the Advanced display settings, locate and click on the "Color calibration" link.
- The Display Color Calibration wizard will open. Follow the on-screen instructions to adjust the contrast.
Alternatively, some 4K monitors have built-in buttons or controls to adjust brightness and contrast directly on the monitor itself. Consult your monitor's user manual for specific instructions on adjusting these settings.
How to enable and configure adaptive sync on a 4K monitor in Windows 10?
To enable and configure adaptive sync on a 4K monitor in Windows 10, follow these steps:
- Make sure your monitor supports adaptive sync technology. Most modern 4K monitors usually support it, but you can check the manufacturer's website or the monitor's manual for confirmation.
- Ensure your graphics card also supports adaptive sync. NVIDIA GPUs support Adaptive Sync under the name "G-Sync Compatible," while AMD GPUs support it under "FreeSync." Check the respective manufacturer's website for a list of supported graphics cards.
- Connect your 4K monitor to your computer using a DisplayPort cable. Adaptive sync is typically supported through DisplayPort instead of HDMI.
- Once your monitor is connected, right-click on your desktop and select "Display settings" from the context menu.
- In the Display settings window, scroll down to the "Advanced display settings" section and click on "Display adapter properties for Display X" (where X represents the number associated with your 4K monitor).
- In the Graphics Properties window that opens, go to the "Display" tab, and check if you have an option for Adaptive Sync or FreeSync/G-Sync Compatible. If the option is available, enable it and click "Apply."
- If you don't find an adaptive sync option in the Graphics Properties window, you may need to update your graphics driver to the latest version. Visit the website of your graphics card manufacturer (NVIDIA or AMD) and download the appropriate driver for your GPU model. Install the driver and restart your computer.
- After updating the driver, repeat steps 4 to 6 and check again for the adaptive sync option. If it is still not available, ensure that your monitor's firmware is up to date. Check the manufacturer's website for any available firmware updates specific to your model and follow their instructions for installation.
- Once enabled, you may want to configure additional adaptive sync settings specific to your monitor. To do this, access your monitor's settings menu using the physical buttons on the monitor. Look for options related to adaptive sync, such as overdrive or response time settings. Adjust these settings according to your preferences.
- Finally, test if adaptive sync is functioning correctly by running a game or application that supports it. Check for smoother motion and reduced tearing or stuttering. If everything is working as expected, you have successfully enabled and configured adaptive sync on your 4K monitor in Windows 10.
What is the ideal screen refresh rate for gaming on a 4K monitor in Windows 10?
The ideal screen refresh rate for gaming on a 4K monitor in Windows 10 would typically be 60Hz. Most 4K monitors have a default refresh rate of 60Hz, which means they can display up to 60 frames per second. This refresh rate is suitable for most gaming scenarios and provides smooth gameplay experience. However, some high-end 4K monitors may support higher refresh rates, such as 120Hz or even 144Hz, which can provide even smoother motion and more responsive gaming experience if your graphics card can handle it.