
Best Tools to Zip Files to Buy in July 2026
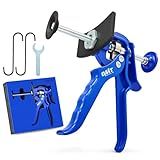
Orion Motor Tech Speedy Brake Caliper Compression Tool, Heavy Duty Caliper Piston Compressor Tool for Brake Pad Replacement, Disc Brake Caliper Tool for Single Piston Dual Piston on Most Cars & Trucks
- QUICK BRAKE PAD REPLACEMENTS FOR FASTER ROAD READINESS.
- VERSATILE TOOL FOR MOST CARS, TRUCKS, ATVS, AND UTVS.
- POWERFUL COMPRESSION WITH MINIMAL EFFORT FOR EASY USE.


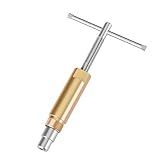
DURATECH Compression Sleeve Puller Tool, Ferrule Puller for 1/2 ” Compression Fittings, Without Damage, Corrosion Resistance, Remove Nut and Ferrule of Pipe in Kitchen, Sinks, and Bathtubs
-
CORROSION RESISTANCE: A3 STEEL & ZINC FINISH ENSURE LASTING DURABILITY.
-
DAMAGE-FREE REMOVAL: WORKS IN TIGHT SPOTS, PRESERVING PIPES & WALLS.
-
EASY TO USE: UNIQUE T-BAR DESIGN FOR QUICK AND EFFORTLESS NUT REMOVAL.
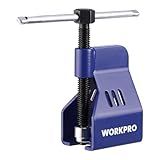
WORKPRO 1/2 Inch Copper Tube Compression Sleeve Puller, Ferrule and Compression Ring Removal Tool, Faucet Handle Puller, Damage-Free Design
- RAPID VALVE REPLACEMENT: STREAMLINE REPAIRS ON SHOWERS, SINKS, AND TOILETS.
- AVOID DAMAGE: SAFELY REMOVE PARTS WITHOUT CUTTING PIPES OR WALLS.
- USER-FRIENDLY DESIGN: EFFORTLESS FERRULE REMOVAL IN TIGHT SPACES.
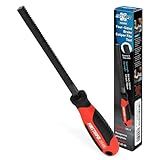
FIRSTINFO H5408 Coarse and Fine-Tooth CR-V Steel Brake Caliper File | Four-Sided | HRC 62-66 | 9mm File Width | 5.9 inches File Length
-
VERSATILE FOUR-SIDED DESIGN: COARSE AND FINE TEETH FOR ALL RUST TASKS.
-
ERGONOMIC COMFORT: ANTI-SLIP HANDLE ENSURES SECURE AND EASY USE.
-
PREMIUM DURABLE BUILD: CR-V STEEL WITH ANTI-RUST TREATMENT FOR LONGEVITY.

OFBAND Car Brake Caliper Compression Tool,Heavy Duty Swivel Caliper Piston Compressor Tool with Ergonomic Handle,Carbon Steel Automotive Tools Brake Piston Compressor Tools
- ENSURE SAFETY WITH OUR HIGH-QUALITY BRAKE PAD SPREADER TOOL.
- DURABLE CARBON STEEL CONSTRUCTION FOR LONG-LASTING PERFORMANCE.
- ERGONOMIC HANDLE FOR EASY OPERATION AND TIME-SAVING EFFICIENCY.

5PCS Car Brake Caliper Compression Tool with Adapter,High-Precision Steel Car Brake Caliper Tool Set Compatible with Lincoln GMC,Right Handle Calipers Piston Compressor Tools (5PCS)
-
BUILT TO LAST: HIGH-QUALITY STEEL CONSTRUCTION ENSURES DURABILITY.
-
VERSATILE COMPATIBILITY: FITS NUMEROUS CAR BRANDS FOR WIDER APPEAL.
-
EASY INSTALLATION: STEP-BY-STEP GUIDE SIMPLIFIES BRAKE SERVICING.
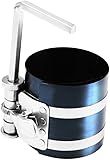
DEDC 3 inch Piston Ring Compressor Tool, Adjustable Ratchet Piston Installation Tool Removal Tool Installation Compressing Capacity 2 to 6.9 Inch
-
DURABLE SPRING STEEL CONSTRUCTION ENSURES MAXIMUM STRENGTH AND LONGEVITY.
-
SAFELY INSTALLS PISTONS AND RINGS WITHOUT DAMAGING COMPONENTS.
-
ADJUSTABLE DESIGN FITS A WIDE RANGE OF PISTON SIZES FOR VERSATILE USE.
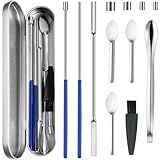
Artcome 12 PCS Versatile Capsule Filling Tool Kit for Pill Filler - Lab Scoops, Dual-Ended Long Spoon, and Herb Tamper - Ideal Tools for Medication and Supplements - All Sizes 000 00 0 1 2 3 4 5
- FITS ALL COMMON CAPSULE SIZES: PERFECT FOR VARIED MEDICATION NEEDS.
- ACCURATE FILLING EVERY TIME: CUSTOM SPOONS ENSURE PRECISION AND EASE.
- DURABLE STAINLESS STEEL: STRONG, RUST-RESISTANT TOOLS BUILT TO LAST.

Capsules Filling Machine Tray Kit - 12Pcs Powder Tamper Capsule Holder Filler Maker Tool - Empty Gel Lab Scoops Tiny Spatula Micro Spoon Funnel Quick Fill Tools Size #000 00 0 1 2 3
-
EFFORTLESS CAPSULE CREATION WITH 12 ESSENTIAL, PRECISION TOOLS.
-
FITS ALL STANDARD CAPSULE SIZES FOR ULTIMATE VERSATILITY AND EASE.
-
DURABLE RUSTPROOF STAINLESS STEEL FOR LONG-LASTING, RELIABLE USE.
To zip individual files in PowerShell, you can use the Compress-Archive cmdlet.
First, specify the path to the file that you want to compress. For example:
$fileToZip = "C:\Path\To\File.txt"
Then, specify the path where you want to save the zipped file:
$zipFile = "C:\Path\To\ZippedFile.zip"
Finally, use the Compress-Archive cmdlet to compress the file:
Compress-Archive -Path $fileToZip -DestinationPath $zipFile
This will create a zipped file containing the individual file you specified.
What is the purpose of zipping individual files in PowerShell?
The purpose of zipping individual files in PowerShell is to compress the files into a single archive, making it easier to store, share, or transfer multiple files as a single file. Zipping files can also help reduce file size, which can save storage space and make it faster to transfer over a network.
How to zip files without including parent directories in PowerShell?
You can use the Compress-Archive cmdlet in PowerShell to zip files without including parent directories. Here's an example of how you can do this:
$source = "C:\path\to\files" $destination = "C:\path\to\archive.zip"
$files = Get-ChildItem $source -File Compress-Archive -Path $files.FullName -DestinationPath $destination
In this example, the $source variable should contain the path to the directory containing the files you want to zip. The $destination variable should contain the path where you want to save the zip archive.
The Get-ChildItem cmdlet is used to get a list of files in the specified directory. The -File parameter ensures that only files are included (not directories).
Finally, the Compress-Archive cmdlet is used to create the zip archive using the list of files obtained from Get-ChildItem. This cmdlet does not include the parent directories in the zip archive.
What is the advantage of zipping files in PowerShell over other methods?
One advantage of zipping files in PowerShell is that it allows for automation and scripting. Since PowerShell is a powerful scripting language, you can easily write scripts to zip multiple files or folders, making it a more efficient and streamlined process. Additionally, PowerShell offers more flexibility and control over the zipping process, allowing you to specify compression levels, include/exclude specific files, and customize the output file format. This level of customization may not be as easily achievable with other methods of zipping files. Overall, using PowerShell to zip files can save time and effort, especially when dealing with large numbers of files or complex zipping requirements.
How to zip files in PowerShell using wildcards?
To zip files in PowerShell using wildcards, you can use the Compress-Archive cmdlet. Here's how you can do it:
- Open PowerShell on your computer.
- Use the following command to zip files using wildcards:
Compress-Archive -Path "C:\path\to\files\*" -DestinationPath "C:\path\to\archive.zip"
In this command:
- Replace "C:\path\to\files*" with the path to the files you want to zip. The wildcard * will match all files in the specified directory.
- Replace "C:\path\to\archive.zip" with the path where you want to save the zip archive.
- Press Enter to run the command. PowerShell will create a zip file containing all the files that match the wildcard in the specified directory.
That's it! You have now successfully zipped files in PowerShell using wildcards.
How to zip files without including empty folders in PowerShell?
To zip files without including empty folders in PowerShell, you can use the following command:
Compress-Archive -Path "C:\path\to\files\*" -DestinationPath "C:\path\to\out\archive.zip"
This command will compress all files in the specified folder without including any empty folders. The * wildcard is used to select all files in the folder. Make sure to replace the paths with the actual paths to your files and desired output archive.