
Best Web Cameras for Zoom to Buy in July 2026
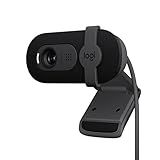
Logitech Brio 101 Full HD 1080p Webcam for Meetings, Streaming, Desktop, Laptop, PC - Built-in Mic, Shutter, Works with Zoom, Microsoft Teams, Nintendo Switch 2’s New GameChat Mode, USB-A,-Black
- PERFECT FOR NINTENDO SWITCH 2’S GAMECHAT MODE-ENHANCE GAMING CHATS!
- AUTO-LIGHT BALANCE BOOSTS BRIGHTNESS BY 50% FOR STUNNING CLARITY.
- EASY PLUG-AND-PLAY SETUP FOR SEAMLESS USE ON ANY VIDEO PLATFORM.


Logitech C920x HD Pro PC Webcam, Full HD 1080p/30fps Video, Clear Audio, HD Light Correction, Works with Microsoft Teams, Google Meet, Zoom, Nintendo Switch 2’s new GameChat mode, Mac/Tablet- Black
-
GAMECHAT READY: PERFECT FOR NINTENDO SWITCH 2'S NEW GAMECHAT MODE!
-
BRILLIANT LOW-LIGHT: HD LIGHTING AND AUTOFOCUS ENSURE CLEAR STREAMING.
-
DUAL MICS FOR CLARITY: ENJOY NATURAL SOUND IN CALLS AND RECORDINGS!

Gohero Full HD 1080P Video Webcam, Noise Cancellation, Privacy Cover, Wide-Angle Lens, Auto Light Correction, Plug & Play USB Webcam for Laptop, Desktop, PC, Mac, Zoom, Skype Pro Series
-
1080P HD & WIDE-ANGLE: ELEVATE YOUR VISUALS WITH SHARP, VIBRANT CLARITY!
-
NOISE-CANCELING MIC: ENSURE CRYSTAL-CLEAR AUDIO IN ANY ENVIRONMENT!
-
PLUG-AND-PLAY CONVENIENCE: EFFORTLESS SETUP FOR INSTANT HIGH-QUALITY STREAMING!
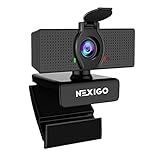
NexiGo N60 1080P Webcam with Microphone, Software Control & Privacy Cover, USB HD Computer Web Camera, Plug and Play, for Zoom/Skype/Teams, Conferencing and Video Calling
- ULTRA-CLEAR 1080P VIDEO: ENJOY SHARP VIDEO QUALITY AT 30FPS!
- EASY PLUG & PLAY: INSTANT SETUP ON ANY COMPATIBLE DEVICE!
- PRIVACY PROTECTION INCLUDED: BUILT-IN COVER FOR YOUR PEACE OF MIND!
EMEET 1080P Webcam with Microphone, C960 Web Cam, 2 Mics, 90° FOV, USB Type-A & A-to-C Adapter, Plug&Play Computer Camera for Online Calling, Zoom/Teams/Facetime, Switch 2 Camera Support, 2025 Version
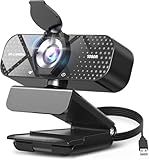
TRAUSI 1080P Full HD Webcam with Privacy Cover, Wide Angle Lens, Active Light Correction, Plug and Play USB Webcam for PC, Desktop, Laptop
- STUNNING 1080P CLARITY & WIDE-ANGLE FOR VIBRANT VIDEO
- NOISE-CANCELING MIC ENSURES CRISP, CLEAR AUDIO ANYWHERE
- AUTOMATIC LIGHT CORRECTION FOR OPTIMAL VISUAL QUALITY
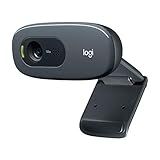
Logitech C270 HD Webcam, 720p, Widescreen HD Video Calling, Light Correction, Noise-Reducing Mic, Works with Zoom, Nintendo Switch 2’s new GameChat mode, PC/Mac/Laptop/Macbook/Tablet - Black
- ENHANCE VIDEO CALLS WITH HD 720P AND AUTO LIGHT CORRECTION.
- BUILT-IN NOISE-REDUCING MIC ENSURES CLEAR AUDIO IN BUSY SPACES.
- VERSATILE CLIP DESIGN FOR SECURE ATTACHMENT ON SCREENS OR SHELVES.
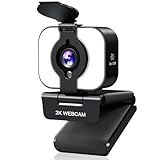
MELCAM 2K Webcam for PC, Web Camera with Microphone, Light, Privacy Cover, Plug and Play Autofocus USB Computer Camera for Laptop, Desktop, PC, Mac, Zoom, Skype, Meeting, Streaming(Black)
- UPGRADE TO 2K RESOLUTION FOR CRYSTAL-CLEAR VIDEO CALLS ANYTIME!
- ADJUST BRIGHTNESS WITH THE 3-LEVEL RING LIGHT FOR PERFECT LIGHTING.
- ENJOY PRIVACY & CLEAR AUDIO WITH BUILT-IN COVER & NOISE-CANCELING MIC.
When selecting the best webcam for Zoom, consider features like video quality, autofocus capabilities, field of view, microphone quality, and low-light performance. A high-resolution camera, preferably 1080p or higher, ensures clear video during meetings. Autofocus helps maintain sharpness as you move, and a wider field of view can accommodate more participants or show more of your surroundings. Built-in microphones with noise cancellation can enhance audio quality, though it's often beneficial to use a separate microphone for optimal sound clarity. Additionally, webcams with good low-light performance will ensure you look your best even in dim lighting conditions. Popular brands like Logitech, Razer, and Microsoft often offer models that cater to these specifications, providing reliable performance for professional video conferencing. It's essential to match the webcam with your specific needs, whether for professional meetings, personal use, or content creation, and consider factors like ease of use and compatibility with your operating system.
What is the ideal webcam resolution for Zoom?
The ideal webcam resolution for Zoom depends on your specific needs, but generally, a resolution of 720p (1280x720 pixels) is sufficient for most users, as it provides a good balance between video quality and bandwidth usage. This resolution is often referred to as HD and is typically supported by standard webcams and internet connections.
If you want a higher quality image and have good internet bandwidth, you can opt for 1080p (1920x1080 pixels) resolution, which offers Full HD video. However, be mindful that this could lead to increased data usage and may require more processing power and bandwidth to maintain smooth video conferencing.
For professional settings, streaming, or events where video quality is paramount, you might consider a 4K (3840x2160 pixels) webcam, though this is generally overkill for typical Zoom meetings and requires very strong internet capabilities to handle properly.
Ultimately, while 720p is a practical choice for most users, assessing your specific scenario in terms of internet speed, computer performance, and personal or professional requirements will help determine the best resolution for your needs.
What is a 4K webcam, and do I need one for Zoom?
A 4K webcam is a high-resolution camera designed to capture video at a resolution of 3840 x 2160 pixels, which is four times the resolution of 1080p (Full HD). This higher resolution can provide sharper and more detailed images, making it beneficial for professional video conferencing, streaming, content creation, or any scenario where high-quality video is important.
As for whether you need a 4K webcam for Zoom, it depends on your specific needs and circumstances:
- Standard Use: For general meetings, a 1080
How to increase webcam brightness for Zoom?
Increasing the brightness of your webcam for Zoom can generally be done through your computer's settings or webcam software. Here’s a step-by-step guide for different operating systems:
For Windows:
- Access Camera Settings: Open the installed webcam application (e.g., Logitech Camera Settings for Logitech webcams). Alternatively, search for “Camera” in the Windows search box and open it.
- Adjust Brightness: Navigate to the settings or adjustments section in the application. Look for brightness settings and adjust accordingly.
- Through Webcam Properties (if the app doesn’t help): Press Windows + S and type “Device Manager.” Expand the “Imaging devices” section and right-click your webcam. Select “Properties” and then “Driver.” Often, there will be an “Adjustment” or “Video Control” tab to tweak brightness, contrast, and other settings.
For macOS:
- External Webcam Software: Most external webcams come with their software. Ensure it’s installed, then look for video settings.
- Use System Preferences: Mac’s in-built camera settings are fairly limited, but sometimes adjustments can be found under System Preferences or within a video conferencing application's settings.
Application-Level Adjustments:
- Zoom Video Settings: Open Zoom and go to the settings menu by clicking the gear icon. Navigate to the “Video” tab. Click on “Adjust for low light” to automatically adjust brightness. Choose "Manual" to manually adjust the brightness slider.
- Other Software: Many webcams rely on software for driver functionality. Use the software that came with your device to adjust brightness, if applicable.
Additional Tips:
- Lighting Setup: Position a lamp or other light source behind your webcam and slightly above your face. Use natural lighting from a window but avoid backlighting.
- Third-Party Software: Use apps like ManyCam or iGlasses (macOS) to gain more control over your video settings.
Adjusting the physical environment in combination with the software settings can greatly enhance your image quality during Zoom calls.
How to troubleshoot a webcam not working on Zoom?
If your webcam is not working on Zoom, here are several troubleshooting steps you can follow to identify and resolve the issue:
- Check the Basics: Ensure your webcam is properly connected to your computer. If you're using an external webcam, try unplugging and reconnecting it. Restart your computer and open Zoom again. Make sure no other applications are using the webcam. Only one application can use the webcam at a time.
- Zoom Settings: Open Zoom and go to Settings by clicking on your profile picture or initials. Navigate to the “Video” tab and check if the correct camera is selected in the “Camera” dropdown menu. Test the camera within Zoom's video settings to see if it is detected.
- Permission Settings: Check that Zoom has permission to access your camera. On Windows, go to Settings > Privacy > Camera, and ensure Zoom is toggled on. On macOS, go to System Preferences > Security & Privacy > Privacy tab > Camera, and make sure Zoom is checked.
- Update Drivers: On Windows, you can update your webcam drivers by going to Device Manager, right-clicking your webcam under Imaging Devices, and selecting “Update driver.” Check for any updates on your system that might affect the webcam.
- Reinstall Zoom: Sometimes a simple reinstallation can fix issues. Uninstall Zoom from your computer, then download and install the latest version from the official Zoom website.
- Restart Zoom Client: Close the Zoom application completely (make sure it's not running in the system tray) and restart it.
- Test Webcam Outside of Zoom: Test your webcam with another application like Skype, or use an online webcam test tool to verify it’s working.
- System Updates: Ensure your operating system is up to date, as updates sometimes contain important fixes for hardware issues.
- Virtual Backgrounds: Disable any virtual backgrounds or video filters in Zoom, as these can sometimes cause the camera to malfunction.
- Check Antivirus or Firewall: Some antivirus software or firewall settings might block camera access. Temporarily disabling them can help identify if they are the cause.
- Contact Support: If none of the above steps work, you may need to contact Zoom support or consult your webcam manufacturer's support for more specific assistance.
Following these steps should help you identify the issue with your webcam and get it working again for your Zoom meetings.
How to use a DSLR camera as a webcam for Zoom?
Using a DSLR as a webcam can significantly enhance the video quality of your Zoom meetings. Here are several methods you can use to set this up:
Method 1: Using Manufacturer Software
Many camera manufacturers have developed software that allows you to use your DSLR as a webcam.
- Canon: Download and install the EOS Webcam Utility.
- Nikon: Download and install the Nikon Webcam Utility.
- Sony: Download and install the Imaging Edge Webcam software.
- Fujifilm: Download and install the Fujifilm X Webcam software.
- Panasonic: Download and install the Lumix Tether for Streaming (Beta).
Steps:
- Connect your DSLR to your computer using a USB cable.
- Open the respective webcam utility software.
- Select your camera as the video source in Zoom.
Method 2: Using HDMI Capture Card
This method is more universal and works with most DSLRs that have an HDMI output.
- Equipment Needed: HDMI Cable compatible with your camera. HDMI Video Capture Card (like the Elgato Cam Link or any USB HDMI capture device). Tripod or stable support for your camera.
- Steps: Connect the HDMI cable to your DSLR and the other end to the HDMI capture card. Plug the capture card into your computer's USB port. Turn on your DSLR and set it to video mode. Open Zoom and go to Settings -> Video. Select the capture card as your camera.
Method 3: Wireless Connection
Some cameras offer the ability to connect wirelessly to your computer.
Steps:
- Ensure your camera's firmware is up to date.
- Use the camera's Wi-Fi or Bluetooth functionality to connect with your computer.
- Use the manufacturer's software or third-party apps to recognize your camera as a webcam.
Additional Settings and Tips
- Power Supply: Ensure your DSLR has sufficient power to last through your call. Consider using a dummy battery connected to a power source.
- Lens and Focus: Make sure the lens is clean and the focus is adjusted properly. A wide aperture will create a nice bokeh effect.
- Lighting: Good lighting will greatly improve your video quality. Use natural light or invest in a ring light or softbox.
- Audio: Consider using a separate microphone for better audio quality, as camera microphones are often not optimal for clear voice capture.
Whichever method you choose, ensure that your firmware and software are up to date for the best performance.
How to clean a webcam lens?
Cleaning a webcam lens is a simple process that can significantly improve image clarity. Here’s a step-by-step guide on how to do it safely:
- Turn Off the Webcam: For safety and to prevent any accidental movements or data transmission, make sure your webcam is turned off and disconnected if possible.
- Gather Your Supplies: A microfiber cloth Lens cleaning solution or water Compressed air (optional)
- Initial Dust Removal: Use a can of compressed air to blow away any loose dust or debris from the lens and surrounding area. Keep the can upright when spraying.
- Wipe the Lens Gently: Take a clean microfiber cloth and gently wipe the lens in a circular motion. Microfiber is preferred as it minimizes the risk of scratching compared to paper towels or other fabrics.
- Apply Cleaning Solution: If there are smudges or stubborn dirt, apply a small amount of lens cleaning solution or distilled water to the microfiber cloth (never directly onto the lens). Ensure the cloth is slightly damp, not wet.
- Clean the Lens: Wipe the lens again with the damp portion of the cloth, using gentle circular motions. Avoid putting too much pressure on the lens.
- Dry with a Clean Part of the Cloth: Use a dry part of the microfiber cloth to gently dry the lens, removing any leftover moisture.
- Inspect the Lens: Check the lens for remaining smudges or dirt. Repeat the process if necessary.
- Reassemble and Test: Once the lens is clean and dry, reconnect your webcam, turn it on, and check the image quality.
Additional Tips:
- Avoid using harsh chemicals or rough materials that might damage the lens coating.
- Regularly dusting your workspace can help prevent dust buildup on the lens.
- Consider using a lens cap when the webcam is not in use to protect it from dust and fingerprints.
By following these guidelines, you can maintain your webcam's lens in optimal condition and ensure the best possible image quality.