
Best Image Processing Tools to Buy in July 2026

JODSONE Gel Nail Polish Remover Kit - Set with 15ml Gel Nail Polish Remover, Cuticle Oil and Latex Tape, and Complete Remover Manicure Tool Set, No Soaking
-
ALL-IN-ONE KIT: COMPLETE TOOLS FOR EFFORTLESS GEL NAIL REMOVAL AT HOME.
-
GENTLE FORMULA: QUICK-ACTING REMOVER & LATEX TAPE PROTECTS SENSITIVE SKIN.
-
EASY STEPS: SIMPLE INSTRUCTIONS GUARANTEE A SALON-QUALITY EXPERIENCE.


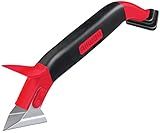
ALLWAY CT31 3-in-1 Caulk Tool for Removal and Application
- EFFORTLESSLY REMOVE OLD CAULK WITH STAINLESS-STEEL BLADE.
- ACHIEVE PERFECT FINISH WITH ROTATABLE 3-IN-1 SILICONE TOOL.
- VERSATILE FOR ANY PROJECT: WORKS ON ACRYLIC, LATEX, AND SILICONE.
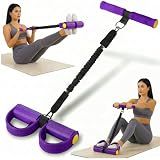
Upgraded Pedal Resistance Band with Handle - Fashion Puller Exercise Tool, Thickened Built-in Latex Tube Pedal Resistance Device & Soft Nitrile Rubber Anti-Slip Footrest for The Core/Arms
- SCULPT YOUR BODY: ACHIEVE RAPID FAT BURNING AND TOTAL-BODY TONING.
- DURABLE & ELASTIC: ENGINEERED FOR LASTING PERFORMANCE AND POWERFUL TENSION.
- PORTABLE DESIGN: LIGHTWEIGHT AND EASY TO USE FOR HOME OR OUTDOOR WORKOUTS.
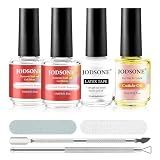
JODSONE Professional Gel Nail Polish Remover Kit:2Pcs 15ML Quick Gel Nail Polish Remover,15ML Cuticle Oil and Latex Tape Liquid,2 Sanding Strips and Steel Pushers,Remove at Home without Going Salon
-
DIY GEL POLISH REMOVAL: PROFESSIONAL TOOLS FOR SALON-QUALITY RESULTS AT HOME.
-
QUICK & GENTLE: FAST-ACTING REMOVER WITH LATEX TAPE FOR SENSITIVE SKIN CARE.
-
COMPLETE CARE: INCLUDES CUTICLE OIL FOR HEALTHY, MOISTURIZED NAILS EVERY USE.

Krud Kutter Brush-Wash Cleaner and Renewer, 32 oz, Paint Brush Cleaner for Latex and Oil Based Paint, Restores Brushes and Rollers, Removes Paint Residue and Buildup
- REVIVES BRUSHES & ROLLERS, EXTENDING TOOL LIFE FOR BETTER PERFORMANCE.
- CLEANS BOTH LATEX & OIL-BASED PAINTS FOR VERSATILE APPLICATION.
- EASY SOAK AND RINSE FOR QUICK CLEANUPS AND DEEP RESTORATIONS.

Casting Latex 32 Fl Oz - Premium Latex for Prop Making, Easy Mold Making, Pouring, and Brushing on Coats!
- CREATE VERSATILE MOLDS FOR PLASTER, WAX, AND MORE WITH EASE!
- FAST CURING, STRONG LATEX ENSURES DURABLE, HIGH-QUALITY RESULTS.
- IDEAL FOR MULTI-LAYER CASTING; ACHIEVE PROFESSIONAL-GRADE PROPS!

12 Pieces Professional Makeup Sponge Set,Latex Free Flawless Soft Setting Face Puffs,Multicolor Makeup Blending Sponge Cosmetic Applicator for Powder,Liquid,Facial Makeup Tools
- VERSATILE SHAPES & COLORS: 3 SPONGES IN TEARDROP & BEVELED SHAPES FOR ALL NEEDS.
- SOFT, LATEX-FREE MATERIAL: ENSURES A SMOOTH APPLICATION FOR FLAWLESS MAKEUP.
- WET & DRY USE: EXPANDS WHEN WET FOR EVEN, ATTRACTIVE COVERAGE EVERY TIME.

LOUINSTIC Gel Nail Polish Remover & Liquid Latex for Nails: Skin's Protective Barrier Helps Remove Easily in 2-5 Minutes, Low-Irritation, No Residue, No Foil Needed, with Manicure Tools
- COMPLETE ALL-IN-ONE KIT FOR SALON-QUALITY REMOVAL AT HOME!
- FAST, ACETONE-FREE FORMULA SAFELY REMOVES GEL IN 2–5 MINUTES!
- PROTECTIVE LIQUID LATEX BARRIER ENSURES MESS-FREE NAIL ART!

Sensory Brush Therapy Set - Occupational and Sensory Brushing Tools for Calming and Stimulation - Soft Bristles, Latex Free - Ideal for Adults with Autism or Sensory Needs
-
DEEP PRESSURE MASSAGE AIDS SENSORY DEFENSIVENESS IMPROVEMENT.
-
ESSENTIAL TOOL FOR ENHANCING FOCUS AND SMOOTH ACTIVITY TRANSITIONS.
-
COMPACT, ERGONOMIC DESIGN FOR COMFORTABLE USE BY ALL AGES.
To add a JPG image in LaTeX, first ensure you have the graphicx package included in the preamble of your document by using the command \usepackage{graphicx}. Then, use the \includegraphics command within the figure environment to insert the image into your document. Make sure the image file is in the same directory as your LaTeX file or provide the correct path to the image. You can also adjust the image size using options such as width or height within the brackets of the \includegraphics command. For example, \includegraphics[width=\textwidth]{image.jpg} will scale the image to the full width of the text. Remember to compile your document with a LaTeX engine that supports JPG files, such as PDFLaTeX.
How to link an image to a URL in LaTeX?
To link an image to a URL in a LaTeX document, you can use the hyperref package alongside the graphicx package to manage the image inclusion. Here's a step-by-step guide on how to do it:
- First, make sure to include both the graphicx and hyperref packages in the preamble of your LaTeX document: \usepackage{graphicx} \usepackage{hyperref}
- Embed the image in your document and wrap it in a hyperlink using the \href command provided by the hyperref package. You will use \includegraphics to include the image and \href to create the hyperlink. Here's an example of how you might do it: \documentclass{article} \usepackage{graphicx} \usepackage{hyperref} \begin{document} % Link to an image \href{http://www.example.com}{\\includegraphics\[width=0.5\\linewidth\]{path/to/your/image.png}} \end{document}
![http://www.example.com}{\\includegraphics\[width=0.5\\linewidth\]{path/to/your/image.png}}](http://www.example.com%7D%7B%5C%5Cincludegraphics%5C%5Bwidth=0.5%5C%5Clinewidth%5C%5D%7Bpath/to/your/image.png%7D%7D)
In this example, replace http://www.example.com with your desired URL and path/to/your/image.png with the correct path to your image file. You can also adjust the width of the image as needed by modifying the width parameter in the \includegraphics command.
How to add a JPG image to a Beamer presentation?
To add a JPG image to a Beamer presentation in LaTeX, you should follow these steps. Beamer is a LaTeX document class for creating presentations, and you can include images using the graphicx package. Here’s how you can do it:
- Include the graphicx package: Make sure you include the graphicx package in your document preamble, which allows you to include graphics in your document.
- Use the \includegraphics command: Wherever you want the image to appear in your presentation, you can use this command.
Here's a simple example to demonstrate how this works:
\documentclass{beamer} \usepackage{graphicx} % Include the graphicx package
\begin{document}
\begin{frame}{Title of the Slide} \begin{figure} \centering \includegraphics[width=\linewidth]{path/to/your/image.jpg} \caption{Caption for your image} \end{figure} \end{frame}
\end{document}
Key Points:
- Path: Replace path/to/your/image.jpg with the relative or absolute path to your JPG image file.
- Size Adjustments: You can adjust the size of the image with options like width=\linewidth, height=5cm, scale=0.5, etc., depending on how you want the image to fit within your slide.
- Figure Environment: While the figure environment is often used, it’s not strictly necessary in Beamer, unless you want to add a caption as shown in the example.
Additional Tips:
- Graphics Path: If you have multiple images stored in a specific folder, you can add a graphics path in the preamble: \graphicspath{{images/}} where images/ is the folder containing your images, making it easier to manage image paths.
- Figure Positioning: Use LaTeX’s usual centering and positioning commands to adjust where and how the image appears on the slide.
With these steps, you’ll be able to include a JPG image in your Beamer presentation effectively.
How to merge two images side by side in LaTeX?
To merge two images side by side in LaTeX, you can use the graphicx package, which provides the figure environment and the \includegraphics command. A common approach is to use a minipage environment for each image to control their placement. Here is a simple example of how you can do this:
\documentclass{article} \usepackage{graphicx} % Include the necessary package
\begin{document}
\begin{figure}[ht] \centering \begin{minipage}{0.45\textwidth} \centering \includegraphics[width=\linewidth]{image1.jpg} % replace with your image file \caption{Caption for the first image} \label{fig:image1} \end{minipage}% \hfill % or \hspace{\fill} to add space between the images \begin{minipage}{0.45\textwidth} \centering \includegraphics[width=\linewidth]{image2.jpg} % replace with your image file \caption{Caption for the second image} \label{fig:image2} \end{minipage} \end{figure}
\end{document}
Explanation:
- \documentclass{article}: This specifies the type of document you're creating. Here, I've used the article class.
- \usepackage{graphicx}: This line includes the graphicx package, which provides the \includegraphics command used to include images.
- figure environment: Encloses the images for better positioning and adding optional captions and labels.
- minipage environment: Used to place multiple contents next to each other. Here, it controls the width of the images. Adjust 0.45\textwidth to alter the width - it should be less than 0.5\textwidth for both to fit side by side with some space between them.
- \includegraphics: This command is used to include images. width=\linewidth scales the image to the width of the containing minipage.
- \hfill: This creates horizontal space between the two minipages. Alternatively, you can use \hspace{\fill}.
- \caption{} and \label{}: Add captions and labels for reference in your document.
Replace image1.jpg and image2.jpg with the path to your actual image files. Adjust the path, sizes, and additional options per your specific needs.
How to add a figure caption on a specific line in LaTeX?
In LaTeX, you can add captions to figures using the \caption command within a figure environment. However, if you want a figure caption to appear on a specific line or in a specific position, you generally have to manipulate the environment around these commands, because LaTeX places figure environments (which include both figures and their captions) according to the float rules unless otherwise specified.
Here is a standard approach to place a figure and its caption:
\begin{figure}[h] \centering \includegraphics[width=\linewidth]{your-figure-file} \caption{Your figure caption here.} \label{fig:your-figure} \end{figure}
If you want the caption to appear at a specific point in the document relative to other content, one approach is to use the \usepackage{float} package, which provides the H option to enforce the placement:
- Include the float package in your preamble: \usepackage{float}
- Use the H option for the figure's placement, which stands for "here": \begin{figure}[H] \centering \includegraphics[width=\linewidth]{your-figure-file} \caption{Your figure caption here.} \label{fig:your-figure} \end{figure}
The [H] option tells LaTeX to place the float exactly at the location in the source code. However, be cautious with this approach as it can interfere with LaTeX's ability to manage floats effectively across pages. Use it when you're sure that figures won’t cause undesired layouts, or if precise placement is crucial for your document.
What is the ‘scalebox’ command in LaTeX?
In LaTeX, the \scalebox command is used to resize content such as text or images. This command is provided by the graphicx package, which you need to include in your document's preamble with the line \usepackage{graphicx}.
The syntax for the \scalebox command is:
\scalebox{scale_factor}{content}
- scale_factor: This is a numeric value indicating the scaling factor. A value greater than 1 increases the size, while a value between 0 and 1 reduces the size.
- content: This is the material you want to scale, which can be text, a figure, etc.
Here's a simple example:
\documentclass{article} \usepackage{graphicx}
\begin{document}
Original size: \fbox{Sample Text}
\vspace{1cm}
Scaled by a factor of 1.5: \scalebox{1.5}{\fbox{Sample Text}}
\vspace{1cm}
Scaled by a factor of 0.5: \scalebox{0.5}{\fbox{Sample Text}}
\end{document}
In this example, the text "Sample Text" is scaled to 1.5 times its original size and also to half its size. The \fbox command is used to draw a visible border around the text to better illustrate the effect of \scalebox.