
Best Logo Design Software to Buy in June 2026
Logos that Last: How to Create Iconic Visual Branding


Made by James: The Honest Guide to Creativity and Logo Design
Left Chest Logo Placement Tool for Heat Press, Embroidery Placement Ruler, Acrylic Tshirt Ruler for Pocket Prints
- PERFECT LEFT CHEST PLACEMENT FOR FLAWLESS APPAREL PRINTING!
- UNIVERSAL FIT FOR ALL ADULT T-SHIRTS; NO MORE GUESSWORK!
- DURABLE ACRYLIC RULER ENSURES PRECISE PRINT ALIGNMENT EVERY TIME!
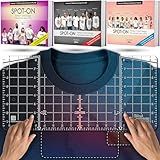
Vowlove Tshirt Ruler Guide for Vinyl Alignment, T Shirt Ruler to Center Designs Alignment Tool for Embroidery Left Chest Logo Placement Tee Shirt Guide Ruler for Heat Press T-Shirt Printing Guide Set
-
EFFORTLESSLY CENTER DESIGNS ON SHIRTS-NO MORE GUESSWORK INVOLVED!
-
DURABLE, FLEXIBLE RULERS REUSABLE FOR PRECISE PLACEMENTS EVERY TIME.
-
CLEAR MARKINGS ENSURE EASY READING ON ANY SHIRT COLOR FOR ACCURACY.

Logo Design Love: A Guide to Creating Iconic Brand Identities, 2nd Edition
(Upgraded - XL Size) Tshirt Ruler Guide Vinyl Alignment - Shirt Measurement Tool Placement Center Design, DTF Template, Left Chest Logo, Accessories for Cricut, Heat Press Sublimation Iron on HTV
-
ACHIEVE PERFECT PRINTS WITH URBONI'S TRIPLE REFERENCE ALIGNMENT.
-
DUAL-COLOR-LINE ENSURES CLEAR VISIBILITY ON ALL FABRIC SHADES.
-
BONUS EBOOKS INCLUDED FOR MASTERING PLACEMENT AND DESIGN.
To add a logo in React.js, you can follow these steps:
- First, make sure you have the logo image file in the appropriate format (e.g., PNG or SVG) that you want to use as the logo.
- Create a new component or find an existing component in your React.js project where you want to add the logo. This component could be the main app component or any other component where you want to display the logo.
- Import the logo image file into your component using the import statement at the top of your component file. For example:
import logo from './logo.png'; // Replace `logo.png` with the correct file name and path of your logo image
- Use the imported logo image within your component's JSX code. You can utilize the tag and provide the src attribute with the imported logo image variable. For example:
function MyComponent() { return ( {/* Add any other JSX code as needed */} ); }
export default MyComponent;
- Save the changes and run your React.js application. You should now see the logo displayed in your component.
Remember to replace './logo.png' with the correct file name and path of your logo image. Additionally, you can style the logo using CSS or inline styles as needed for your project's design requirements.
What is the impact of a high-resolution logo on website loading speed in React.js?
Using a high-resolution logo on a website can have a negative impact on loading speed in React.js. This is because high-resolution images have larger file sizes, which take longer to download and render on the web page.
When a React.js website loads, it needs to fetch all the necessary assets, including images, from the server. Large file sizes increase the amount of data that needs to be transferred, leading to longer loading times. This can result in a slower user experience and potential abandonment if the loading time is too long.
To mitigate this impact, there are a few strategies that can be employed.
- Optimizing image file size: The logo image can be compressed and optimized before being used on the website. This reduces the file size without significantly affecting the visual quality.
- Lazy loading: Rather than loading the high-resolution logo immediately, lazy loading can be implemented. This means that the logo image is only loaded when it becomes visible in the user's viewport. This improves the initial loading time and prioritizes visible content.
- Progressive loading: Instead of loading the entire logo image at once, progressive loading can be used to gradually load the high-resolution image. This technique allows for a quicker initial display by first rendering a low-resolution or placeholder version of the logo, which is then replaced with the high-resolution image as it loads in the background.
- Content Delivery Network (CDN): Utilizing a CDN can improve loading times by storing and delivering the logo image from servers closer to the user's location, reducing the network latency.
By employing these techniques, the negative impact of a high-resolution logo on website loading speed can be minimized, leading to a faster and smoother user experience.
How to display a logo in multiple locations within a React.js application?
There are several ways to display a logo in multiple locations within a React.js application. Here are a few methods you can use:
- Component Approach: Create a separate Logo component that renders the logo image wherever it is needed. You can pass different props to customize the logo's appearance or behavior in different locations. For example:
import logo from './logo.svg';
function Logo(props) { return ; }
// Usage in different components
- CSS Approach: You can use CSS to display the logo in multiple locations by adding a class name or style to the logo element. Define the logo image as a background image in your CSS file, and then apply the class or style to the appropriate elements. For example:
// CSS file .logo { background-image: url('path/to/logo.svg'); background-repeat: no-repeat; background-size: contain; width: 100px; height: 100px; }
// Usage in different components
- Context API: If you need to display the logo in various locations across a deeply nested component tree, you can use the React Context API. Wrap the logo component or the relevant parts of your application with a Context Provider that provides the logo image as a context value. Then, consume this context value wherever you need to display the logo. For example:
import logo from './logo.svg';
const LogoContext = React.createContext(logo);
// Provider component function App() { return ( <LogoContext.Provider value={logo}> {/* Rest of the application */} </LogoContext.Provider> ); }
// Usage in different components function ComponentA() { const logo = useContext(LogoContext);
return ; }
function ComponentB() { const logo = useContext(LogoContext);
return {logo}; }
These are just a few ways to display a logo in multiple locations within a React.js application. Choose the method that suits your requirements and project structure.
How to add a logo to a navigation bar in React.js?
To add a logo to a navigation bar in React.js, you can follow these steps:
- Import your logo image into your React component. You can use the import statement to import the logo from its file location.
import logo from 'path/to/your/logo.png';
- In your navigation bar component, use the img tag to display the logo. You can place it within the nav element or any other appropriate location in your navigation bar component.
- Style the logo using CSS or inline styles. You can add custom styles to the img element to control its size, position, and any other desired properties.
- Ensure that you have added the necessary CSS or styles to position and style the navigation bar itself. This may involve setting appropriate styles for the nav element and other child elements.
By following these steps, you should be able to add a logo to your navigation bar in React.js.
How to change the shape of a logo in React.js?
To change the shape of a logo in React.js, you will need to modify the SVG element representing the logo. Here's a step-by-step guide on how to achieve this:
-
Import the logo SVG file into your React component. You can do this by adding an import statement at the top of the component file, assuming the logo file is in the same directory: import { ReactComponent as Logo } from './logo.svg';
-
Add the imported SVG component to your React component's render method, or wherever you want to display the logo: render() { return (
); }
-
To change the shape of the logo, you can modify the SVG code directly or use CSS styles to transform it. If you want to modify the SVG code, you can open the logo.svg file and edit its shape using SVG syntax.
-
If you prefer to use CSS to transform the shape, you can add a className or style attribute to the SVG component and define CSS rules accordingly. For example, to make the logo circular, you can add the following CSS: .logo { width: 100px; height: 100px; border-radius: 50%; }
-
Apply the CSS class or style to the SVG component by modifying its JSX code: render() { return (
); }
By following these steps, you can modify the shape of a logo in a React.js application. Remember that you may need to adjust width, height, or other SVG properties to achieve the desired shape.
How to display a different logo based on screen size in React.js?
To display a different logo based on screen size in React.js, you can follow these steps:
- Import the necessary components and assets:
import React, { useState, useEffect } from "react"; import logoSmall from "./assets/logo-small.png"; import logoMedium from "./assets/logo-medium.png"; import logoLarge from "./assets/logo-large.png";
- Create a functional component called Logo:
const Logo = () => { const [screenSize, setScreenSize] = useState(window.innerWidth);
useEffect(() => { const handleResize = () => { setScreenSize(window.innerWidth); };
window.addEventListener("resize", handleResize);
return () => {
  window.removeEventListener("resize", handleResize);
};
}, []);
let logo; if (screenSize < 768) { logo = logoSmall; } else if (screenSize < 1024) { logo = logoMedium; } else { logo = logoLarge; }
return ; };
- Use the Logo component in your desired component:
const App = () => { return ( {/* Other components */} {/* Other components */} ); };
In this example, the Logo component initializes the screenSize state with the initial window width using the useState hook. The useEffect hook is used to add the event listener for detecting screen size changes on resize, and remove the listener when the component unmounts.
The screenSize state is then used to determine which logo to display by using conditionals (if-else) based on the current screen size. The appropriate logo image path is stored in the logo variable.
Finally, the logo variable is rendered as an <img> component with the src attribute set to display the appropriate logo based on the screen size.