Best Tools and Resources for Gzip Compression to Buy in July 2026
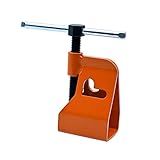
Compression Sleeve Puller Tool Remove Nut & Ferrule Of Pipe 03943, Sleeve Remover For 1/2” Compression Fittings Only, Corroded & Frozen Supply Stops, Plumbing Tools Compression Ring Removal Tool
-
NO WALL DAMAGE: SAFELY REMOVES COMPRESSION SLEEVES WITHOUT DAMAGING WALLS.
-
TIME-SAVING TOOL: QUICKLY EXTRACTS OLD FITTINGS WITHOUT PIPE CUTTING.
-
WORKS ON CORROSION: EFFORTLESS REMOVAL, EVEN FROM CORRODED OR FROZEN FITTINGS.


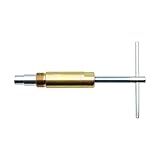
DURATECH Compression Sleeve Puller Tool, Ferrule Puller for 1/2 ” Compression Fittings, Without Damage, Corrosion Resistance, Remove Nut and Ferrule of Pipe in Kitchen, Sinks, and Bathtubs
-
EFFORTLESSLY REMOVE CORRODED NUTS WITHOUT DAMAGING PIPES OR WALLS.
-
COMPACT, LIGHTWEIGHT DESIGN MAKES IT PERFECT FOR ANY HOME REPAIR TOOLKIT.
-
HIGH-QUALITY STEEL ENSURES DURABILITY AND RELIABLE PERFORMANCE EVERY TIME.

Compression Sleeve Puller Remove Tool Nut & Ferrule of Pipe 03943 - Sleeve Remover for 1/2-Inch Compression Fittings Only - Plumbing Tools Compression Ring Removal Tool Corroded & Frozen Supply Stops
- EFFORTLESSLY REMOVES COMPRESSION SLEEVES, SAVING YOU VALUABLE TIME.
- DESIGNED TO SAFELY EXTRACT COMPONENTS WITHOUT DAMAGING YOUR WALLS.
- DURABLE AND CORROSION-RESISTANT FOR RELIABLE USE ON TOUGH FITTINGS.
Compression Sleeve Puller and Sleeve Remover for 1/2 Inch Compression Fittings Only,Remove Nut & Ferrule of Pipe 03943 Plumbing Tools Compression Ring Removal Tool - Corroded & Frozen Supply Stops
-
NO WALL DAMAGE: EFFORTLESSLY REMOVES SLEEVES WITHOUT HARMING WALLS.
-
HANDLES CORROSION: EXTRACTS STUBBORN SLEEVES FROM FROZEN, CORRODED PIPES.
-
SAVES TIME: QUICKLY REFORMS CRIMPED PIPES, NO CUTTING NEEDED.
Compression Sleeve Puller Tool Remove Nut and Tube Ferrule (4661) - Ferrule Puller for 1/2" Copper Water Compression Sleeves - 1/2" Copper Tubing - Pipe Tool Compression Ring Removal Tool
- EFFORTLESSLY REMOVES COPPER SLEEVES WITHOUT DAMAGING WALLS.
- SAVES TIME BY REFORMING CRIMPED PIPES-NO CUTTING REQUIRED!
- ONE-YEAR MONEY-BACK GUARANTEE FOR COMPLETE CUSTOMER CONFIDENCE.
Compression Sleeve Puller Tool Remove Nut & Ferrule Of Pipe 03943- Sleeve Remover for 1/2-Inch Compression Fittings Only Corroded & Frozen Supply Stops Plumbing Tools Compression Ring Removal Tool
- EFFORTLESSLY REMOVES OLD COMPRESSION RINGS, SAVING YOU VALUABLE TIME.
- DAMAGE-FREE REMOVAL OF 1/2-INCH SLEEVES; EASY TO USE, HASSLE-FREE.
- CORROSION-RESISTANT DESIGN; IDEAL FOR TOUGH, FROZEN SUPPLY STOPS.
Enabling Gzip compression in Nginx allows for reducing the size of files sent from the server to the client, thus improving website loading times. Here is a step-by-step guide to enable Gzip compression:
- Open the Nginx configuration file. The default location is usually /etc/nginx/nginx.conf.
- Locate the http block within the configuration file.
- Inside the http block, add the following directive to enable Gzip compression: gzip on;
- Additionally, you can configure the level of compression by specifying a compression level value. The range is between 1 (lowest compression) and 9 (highest compression). For example: gzip_comp_level 6;
- To specify which file types should be compressed, add the gzip_types directive followed by a list of file types. Here is an example of common file types to compress: gzip_types text/plain text/css application/javascript application/json application/x-javascript text/xml application/xml application/xml+rss text/javascript;
- If you want to exclude certain user agents from receiving compressed files, you can use the gzip_disable directive. Here is an example of how to exclude Internet Explorer 6: gzip_disable "MSIE [1-6]\.(?!.*SV1)";
- Save the configuration file.
- Finally, reload or restart Nginx to apply the changes. The command may vary depending on your system, but it is commonly either of the following: sudo service nginx reload sudo systemctl reload nginx
Once enabled, Nginx will automatically compress the specified file types and deliver them to the client with reduced file sizes. This can significantly improve website performance and user experience.
How can I troubleshoot Gzip compression issues in Nginx?
There are several steps you can take to troubleshoot Gzip compression issues in Nginx:
- Check Nginx configuration: Ensure that the Gzip module is installed and enabled in your Nginx configuration. Verify the configuration file (usually located in /etc/nginx/nginx.conf or /etc/nginx/conf.d/default.conf) includes the relevant configurations: gzip on; gzip_comp_level 2; gzip_min_length 1000; gzip_types text/plain text/css application/javascript application/json; Adjust these settings as per your requirements.
- Test Gzip compression: Use online tools or browser extensions like "GIDZipTest" or "PageSpeed Insights" to test if Gzip compression is working correctly on your website. These tools will analyze the response headers of your webpages and inform you if Gzip compression is enabled.
- Check response headers: Inspect the response headers your Nginx server sends to client browsers. To do this, you can use browser developer tools or command-line tools like curl: curl -I https://example.com Look for the Content-Encoding header in the response. If it's set to gzip, then Nginx is correctly compressing the content.
- Verify mime types: Ensure that the gzip_types directive in your Nginx configuration includes the appropriate mime types for compression. For example, if your website serves custom file types, make sure the corresponding mime types are added to gzip_types.
- Check for conflicting configurations: Make sure there are no conflicting Gzip compression settings in other configuration files or server blocks that override your desired settings. Use the grep command to search for other occurrences of the Gzip settings: grep -r "gzip" /etc/nginx/ Review the results to find any conflicting configurations.
- Test Gzip compression directly: You can test Gzip compression on your Nginx server by executing the command below: curl -H "Accept-Encoding: gzip" -I https://example.com If the response header includes Content-Encoding: gzip, it indicates that Gzip compression is working correctly.
- Monitor Nginx error logs: Check the Nginx error log file (/var/log/nginx/error.log) for any error messages related to Gzip compression. This can provide insights into the cause of the problem.
- Update Nginx and Gzip module: Ensure that you are using the latest version of Nginx and the Gzip module. Upgrading to the latest releases can help resolve any known Gzip compression issues.
By following these troubleshooting steps, you should be able to uncover and resolve any Gzip compression issues in Nginx.
What are the prerequisites for enabling Gzip compression in Nginx?
To enable Gzip compression in Nginx, there are a few prerequisites that need to be met:
- Nginx server must be installed and properly configured.
- Gzip module should be enabled in Nginx. To check if it is enabled, run the command nginx -V and look for --with-http_gzip_module in the output.
- The website or web application should be hosted on the Nginx server.
- Access to Nginx server configuration file (usually located in /etc/nginx/nginx.conf) is required.
- Basic understanding of Nginx configuration directives and syntax.
- Optionally, knowledge of the target audience and their preferred browser support for Gzip compression.
Can I enable Gzip compression for JSON and XML responses?
Yes, you can enable Gzip compression for JSON and XML responses. Enabling Gzip compression can significantly reduce the size of the responses and improve the performance of your application.
To enable Gzip compression, you need to configure your web server or framework to compress the responses. Here are a few examples for popular server and framework configurations:
- Apache: If you are using Apache HTTP Server, you can enable Gzip compression by adding the following lines to your Apache configuration file (e.g., httpd.conf or .htaccess):
<IfModule mod_deflate.c> AddOutputFilterByType DEFLATE application/json application/xml
- Nginx: For Nginx, you can enable Gzip compression by adding the following lines to your Nginx configuration file:
gzip on; gzip_types application/json application/xml;
- Express.js (Node.js): If you are using Express.js, you can enable Gzip compression by installing the compression middleware and adding the following lines to your server file:
const compression = require('compression'); // ... app.use(compression({ threshold: 0, level: 9 }));
These are just a few examples, and the specific configuration may vary depending on your web server or framework. Ensure that Gzip compression is supported by your client applications to ensure proper decompression of the responses.
Are there any performance implications of enabling Gzip compression?
Yes, there can be performance implications of enabling Gzip compression.
The main advantage of enabling Gzip compression is that it can reduce the size of HTML, CSS, JavaScript, and other types of files by up to 70-90%, which leads to faster download times for users. Smaller file sizes result in reduced bandwidth usage and faster page loading speeds.
However, the compression process itself requires server resources (CPU power) to compress files and users' devices need to decompress the compressed files. This means there may be a slight increase in CPU usage on the server and possibly increased processing time on the client-side.
The impact on performance will vary depending on the server's hardware, the size and complexity of the files being compressed, and the capabilities of the users' devices.
Overall, the performance gains from reduced file sizes and faster downloads usually outweigh the minimal performance impact caused by enabling Gzip compression.
Is there a way to exclude certain file types from Gzip compression?
Yes, it is possible to exclude certain file types from Gzip compression. One way to accomplish this is by configuring your web server to ignore specific file types when applying Gzip compression.
For example, if you are using Apache HTTP Server, you can modify the .htaccess file or server configuration file (e.g., httpd.conf) with the following directive:
<IfModule mod_deflate.c> # Enable compression SetOutputFilter DEFLATE # Exclude specific file types from compression SetEnvIfNoCase Request_URI \.(?:gif|jpe?g|png)$ no-gzip
In this example, the directive SetOutputFilter DEFLATE enables compression using the mod_deflate module. The following line, SetEnvIfNoCase Request_URI \.(?:gif|jpe?g|png)$ no-gzip, excludes files with extensions .gif, .jpg, .[jpeg](https://internetcloak.com/blog/how-to-compress-jpeg-files-in-adobe-photoshop), and .png from Gzip compression.
This approach can vary depending on the web server you are using. For other web servers, you may need to refer to their respective documentation to find the appropriate method for excluding specific file types from Gzip compression.
How can I enable Gzip compression for JavaScript files in Nginx?
To enable Gzip compression for JavaScript files in Nginx, you can follow these steps:
- Open your Nginx configuration file. The location of the file may vary depending on your operating system and configuration, but it is usually located at /etc/nginx/nginx.conf or /etc/nginx/sites-available/default.
- Inside the http block of your configuration file, add the following lines to enable Gzip compression for JavaScript files:
gzip on; gzip_comp_level 5; gzip_min_length 256; gzip_types application/javascript;
- gzip on; enables Gzip compression in Nginx.
- gzip_comp_level 5; sets the compression level to 5 (a reasonable compromise between compression ratio and CPU usage).
- gzip_min_length 256; specifies the minimum length of a response that will be compressed. You can adjust this value according to your needs.
- gzip_types application/javascript; configures which file types should be compressed. In this case, we are enabling compression for JavaScript files.
- Save the configuration file and restart Nginx to apply the changes.
After these steps, Nginx will compress JavaScript files with Gzip when serving them to clients, which can significantly reduce the file size and improve page load times.
Why is Gzip compression important for web servers?
Gzip compression is important for web servers because it helps reduce the size of files that are being transferred between the server and the client's web browser.
When a user requests a webpage, the server needs to send various files such as HTML, CSS, JavaScript, and images. These files can often be quite large and take longer to transfer over the internet, especially for users with slow internet connections or accessing the website on mobile devices.
Gzip compression compresses these files on the server-side before sending them to the client. Compressed files are smaller in size and therefore take less time to transfer. This results in faster load times for web pages and better overall user experience.
Additionally, reducing the file size using Gzip compression can also have a positive impact on bandwidth consumption, especially for websites with high traffic volumes. It helps optimize server resources by reducing the amount of data that needs to be transferred, improving server response times, reducing data transfer costs, and potentially allowing for more simultaneous connections.
Overall, Gzip compression is an important technique for web servers to optimize website performance, enhance user experience, and improve the efficiency of data transfer over the internet.