
Best Hosting Control Panels to Buy in July 2026

Complete Guide to Control Web Panel: Graduate from Rental Servers Build Your Own High-Speed Hosting Environment Techniques for Free and Secure Server Management (Japanese Edition)


Food Warming Mat Extension Panels C for iTRUSOU Electric Warming Tray BWP01-A – Add-On Expandable Warming Mat for Food, Must Be Used with Main Control Panel A, for Buffet, Party Chafing Dishes
- EXPAND YOUR WARMING AREA EFFORTLESSLY WITH PANELS B & C
- EASILY CONNECT TO PANEL A FOR SEAMLESS BUFFETS & GATHERINGS
- FOOD-GRADE SILICONE ENSURES DURABILITY & SAFE OPERATION

Electric Warming Tray for Buffet Party - 8 Panels Electric Glass Top Heating Plate, 8 Level Temp Control Easy Clean Surface Overheat Protection and Timer: for Busy Hosts Party Dinners and Holiday Meal
-
FAST EVEN HEATING: KEEPS DISHES HOT FOR 24 HOURS WITH NO HOT SPOTS.
-
CHILD SAFETY LOCK: ENJOY PEACE OF MIND; LITTLE HANDS STAY SAFE.
-
8 TEMP SETTINGS: PERFECT WARMTH FOR ALL DISHES; NO MORE DRIED-OUT FOOD.

CHICIRIS Solar Battery Box for LED String Lights, Outdoor Lights Control Panel with DC Charging 8 Remote Modes Pack Powered Lithium Lamp with Remote (Output Boost 24V)
- CONVENIENT REMOTE CONTROL: ADJUST SETTINGS FROM 5M AWAY EFFORTLESSLY!
- LONG-LASTING BATTERY: ENJOY UP TO 40 HOURS OF ILLUMINATION ON A FULL CHARGE.
- AUTOMATIC LIGHT CONTROL: HASSLE-FREE LIGHTING WITH SMART DAY/NIGHT SENSING!

Food Warming Mat Extension Panels B+C for iTRUSOU Electric Warming Tray BWP01-A – Add-On Expandable Warming Mat for Food, Must Be Used with Main Control Panel A, for Buffet, Party Chafing Dishes
-
SEAMLESS EXPANSION: CONNECT PANELS B & C FOR MORE WARMING SPACE!
-
ENERGY EFFICIENT: EXPAND ONLY WHEN NEEDED, NO WASTE!
-
SAFETY FIRST: PATENTED INTERLOCKING DESIGN ENSURES SECURE CONNECTIONS!

Mini LED Sign for Car - Devil Eyes Light for Motorcycle, Flexible Programmable 7"x3" LED Matrix Panel for Advertising & DIY Use,App & Remote Control
-
VIBRANT CUSTOM LED MESSAGES: GRAB ATTENTION WITH UNIQUE DISPLAYS!
-
WIRELESS CONTROL: EFFORTLESSLY PERSONALIZE VIA APP OR REMOTE!
-
DYNAMIC EFFECTS & MUSIC SYNC: ELEVATE YOUR VISUALS WITH RHYTHM!
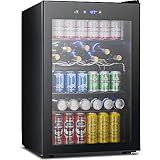
Electactic 37 Bottle Wine Fridge,Freestanding 145 Can Beverage Refrigerator with Smart Temperature Control,4.5 CU FT Quiet Mini Fridge with Child Lock Panel for Family Restaurant Bar, Black
-
PRECISE TEMP CONTROL: PERFECTLY AGE WINES FROM 32℉ TO 61℉!
-
STYLISH DESIGN: SPACE-SAVING COOLER FOR ANY ROOM OR OCCASION!
-
FLEXIBLE STORAGE: REMOVABLE SHELVES FOR 145-CAN BEVERAGE CAPACITY!
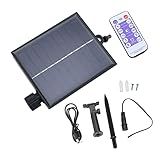
CHICIRIS Solar Battery Box for LED String Lights, Outdoor Lights Control Panel with DC Charging 8 Remote Modes Pack Powered Lithium Lamp with Remote (Output Flat Pressure 3V)
- REMOTE CONTROL ALLOWS EASY ADJUSTMENTS FROM UP TO 5 METERS AWAY.
- LONG-LASTING BATTERY SUPPORTS UP TO 14-40 HOURS OF ILLUMINATION.
- 8 DYNAMIC MODES PERFECT FOR ANY OCCASION OR AMBIANCE CREATION.

Food Warming Mat Extension Panels B for iTRUSOU Electric Warming Tray BWP01-A – Add-On Expandable Warming Mat for Food, Must Be Used with Main Control Panel A, for Buffet, Party Chafing Dishes
- EXPAND YOUR WARMING AREA EFFORTLESSLY WITH PANELS B & C!
- CONNECT FOR INSTANT EXTRA SPACE – PERFECT FOR LARGE GATHERINGS!
- SAFE, DURABLE PANELS MADE FROM PREMIUM FOOD-GRADE SILICONE!
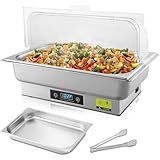
THXSUN Electric Buffet Server 9QT, Roll Top Chafing Dish Food Warmer with Button Panel Temperature Control, Stainless Steel Buffet Warmer for Catering, Parties, Events
-
9-QUART CAPACITY: SERVES 8+ GUESTS, PERFECT FOR ANY GATHERING.
-
DURABLE STAINLESS STEEL: LFGB-CERTIFIED, SAFE, AND CORROSION-RESISTANT.
-
ADJUSTABLE TEMP CONTROL: MONITOR AND MAINTAIN WARMTH WITH EASE.
To install Plesk on DreamHost, follow these steps:
- Sign in to the DreamHost control panel using your account credentials.
- Navigate to the "Goodies" section and click on "One-Click Installs."
- On the One-Click Installs page, scroll down and find the "Plesk" option. Click on it.
- Next, you will be prompted to select the domain you want to install Plesk on. Choose the desired domain from the drop-down menu.
- Now, enter an administrator username and password for Plesk. Make sure to choose a strong password to enhance security.
- Review and agree to the terms of service and click on the "Install it for me now!" button.
- The installation process may take a few minutes. Once completed, DreamHost will display a success message with login credentials for Plesk.
- Click on the provided login URL, and enter the administrator username and password you created earlier.
- You will now have access to the Plesk control panel, where you can start managing your domains, websites, and other settings.
Remember to keep your Plesk software up to date by regularly checking for updates and installing them as necessary.
What is the Plesk Extensions Catalog and how to install extensions on DreamHost?
The Plesk Extensions Catalog is a marketplace where users can find and install extensions to enhance the functionality of their Plesk control panel. It offers a wide range of extensions such as backup tools, security features, eCommerce platforms, and more.
To install extensions on DreamHost, follow these steps:
- Log in to your DreamHost panel.
- Go to the "Domains" section and select the domain you want to manage with Plesk.
- Click on the "Manage" button next to the domain you selected.
- In the navigation menu on the left, click on "Plesk" to access the Plesk control panel.
- Once in the Plesk control panel, click on the "Extensions" tab in the top menu.
- In the Extensions Catalog, you can browse through available extensions or use the search bar to find a specific one.
- Select the desired extension and click on the "Install" button.
- Review the extension details and click on the "Continue" button.
- Accept the extension's terms of use and click on the "Continue" button again.
- The extension will start installing, and once the installation is complete, you'll be able to configure and use it.
Note: Some extensions may require additional configuration or setup steps. Make sure to read the documentation or instructions provided for each extension to ensure proper installation and usage.
Please note that these instructions may vary depending on the version of Plesk and the DreamHost panel you are using. It's always recommended to refer to the official documentation or contact DreamHost support for specific guidance.
How to install additional PHP modules in Plesk on DreamHost?
To install additional PHP modules in Plesk on DreamHost, you can follow these steps:
- Log in to your Plesk Panel.
- Go to the "Domains" tab and select the domain for which you want to install the PHP module.
- Click on the "PHP Settings" option.
- Scroll down to the section called "Additional PHP Directives" and click on it.
- In the "Directive" field, enter the name of the PHP module that you want to install, prefixed with "extension=" (e.g., extension=module_name.so).
- In the "Value" field, enter the path to the PHP module on the server (e.g., /usr/lib64/php/modules/module_name.so).
- Click on the "OK" button to save the changes.
- Restart the Apache web server for the changes to take effect. You can do this by going to the "Domains" tab, selecting the domain, and clicking on the "Restart button located at the top of the page.
Note: The steps mentioned above may vary depending on the version of Plesk and DreamHost you are using. It is recommended to refer to DreamHost's documentation or contact their support for specific instructions tailored to your setup.
What is the difference between Plesk Web Pro Edition and Web Host Edition on DreamHost?
Plesk is a web hosting control panel that allows users to manage their websites and server settings. DreamHost offers two editions of Plesk: Web Pro Edition and Web Host Edition.
- Plesk Web Pro Edition: This edition is designed for web professionals and small agencies who need to manage multiple websites. It includes features like website and domain management, email accounts, FTP access, database management, and WordPress toolkit. With Web Pro Edition, users can host up to 30 websites.
- Plesk Web Host Edition: This edition is suitable for web hosting providers or businesses that need to manage multiple clients or resell hosting services. It includes all the features of the Web Pro Edition but allows hosting an unlimited number of websites. It also provides additional functionalities like user and subscription management, reseller options, and automated provisioning of customer accounts.
In summary, while both editions offer similar features, the Web Host Edition is more robust and tailored towards hosting providers or businesses managing a large number of websites. The Web Pro Edition is designed for individual web professionals or agencies with a smaller website portfolio.
How to enable spam filtering for email accounts in Plesk on DreamHost?
To enable spam filtering for email accounts in Plesk on DreamHost, follow these steps:
- Log in to your Plesk control panel.
- Go to the "Mail" tab.
- Click on "Mail Settings."
- Scroll down to the "Additional Services" section.
- Enable the "Spam Filter" option by checking the box next to it.
- Choose the desired level of spam filtering by adjusting the slider. The higher the level, the more aggressive the filtering will be.
- Click on the "Apply" button to save the changes.
Note: It may take some time for the spam filter settings to take effect. Additionally, keep in mind that the spam filter is not 100% accurate and some legitimate emails may be marked as spam or vice versa. It is always recommended to periodically check the spam folder for any false positives.
How to update Plesk to the latest version on DreamHost?
Unfortunately, DreamHost does not support Plesk control panel. DreamHost uses its proprietary control panel, which is called "DreamHost Panel". Therefore, you won't be able to update Plesk to the latest version on DreamHost.