Best Plotting Tools for Julia to Buy in July 2026
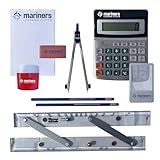
Dunzoom 3 Pcs Marine Navigation Kit, Basic Navigation Set Include 18" Marine Parallel Ruler with Clear Scales, 8" Diameter Nautical Plotter Protractor, 6" Fixed Point Divider for Boat Accessories
- ALL-IN-ONE NAVIGATION KIT: RULER, DIVIDER, PROTRACTOR INCLUDED.
- DURABLE MATERIALS ENSURE ACTIVE NAVIGATION WITH PRECISE ACCURACY.
- EASY-TO-USE TOOLS ENHANCE CONVENIENCE FOR ALL BOATING EXPERIENCES.


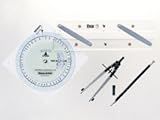
WEEMS & PLATH Essentials Navigation Kit
- STREAMLINED ULRALIGHT DESIGN FOR OPTIMAL PORTABILITY AND EASE OF USE.
- ACCURATE PLOTTING WITH THE WEEMS PARALLEL PLOTTER FOR NAVIGATION PRECISION.
- ESSENTIAL CALCULATIONS MADE EASY WITH THE NAUTICAL SLIDE RULE INCLUDED.
Weems & Plath #176 Marine Navigation Ultralight Divider
- DURABLE MARINE ALLOY & PLASTIC RESIST CORROSION FOR LONG-LASTING USE.
- USER-FRIENDLY CENTER GEAR MECHANISM FOR EFFORTLESS OPERATION.
- BACKED BY A LIFETIME WARRANTY-QUALITY YOU CAN TRUST!
Mariners Chart Plotting Tool Kit - Marine Navigation Equipment, Weems and Plath Parallel Rulers, Dividers & Accessories for Nautical Charts, Sailing and Boating Exam Preparation
-
MASTER NAVIGATION WITHOUT GPS-ENHANCE SKILLS WITH TRADITIONAL TOOLS.
-
COMPLETE NAUTICAL PLOTTING KIT FOR PRECISE COURSE PLOTTING ON CHARTS.
-
ESSENTIAL FOR MARITIME STUDENTS-ACE BOATING EXAMS WITH CONFIDENCE.
Weems & Plath Marine Navigation Primary Navigation Set
- ULTRALIGHT DIVIDER/COMPASS FOR PRECISE MEASUREMENTS ON-THE-GO.
- PARALLEL RULER STREAMLINES DRAWING WITH ACCURACY AND EASE.
- SLEEK STORAGE POUCH KEEPS TOOLS ORGANIZED AND PROTECTED.
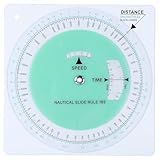
Saypacck Marine Navigation Slide Rule Nautical Plotter Protractor Ship Navigation Tools Course Plotter Divider
- NAVIGATE WITH PRECISION: ACCURATE ROUTE PLOTTING FOR SAILORS AT SEA.
- BUILT TO LAST: DURABLE, FLEXIBLE PVC WITHSTANDS HARSH MARINE CONDITIONS.
- SPEEDY CALCULATIONS: EASILY MEASURE TIME, SPEED, AND DISTANCE EFFICIENTLY.
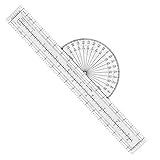
Premier Fixed Plotter for Pilots, Efficiently Plotting Tool for Pilots, Planning Flight Routes, Accurate Scale, Transparent
- ACCURATE MEASUREMENTS SIMPLIFY ROUTE PLANNING FOR PILOTS.
- DURABLE RESIN WITHSTANDS EXTREME TEMPERATURES; BUILT TO LAST.
- QUICK SCALE REFERENCES MAKE NAVIGATION EASY AND EFFICIENT.
In Julia, you can easily plot shapes using the Plots package. To do this, you first need to install the Plots package by running using Pkg; Pkg.add("Plots"). Once the package is installed, you can create a plot by importing the Plots package with using Plots.
To plot shapes, you can use the plot() function and specify the type of shape you want to plot using the shape argument. Some common shapes that you can plot include circles, rectangles, triangles, and polygons. For example, to plot a circle with a radius of 1 centered at the origin, you can use the following code:
using Plots plot(0, 0, shape = :circle, ratio = 1)
Similarly, you can plot other shapes by changing the shape argument. For instance, to plot a rectangle with a width of 2 and a height of 1 centered at the origin, you can use the following code:
plot(0, 0, shape = :rect, ratio = 1, xlims = (-1, 1), ylims = (-0.5, 0.5))
You can also customize the appearance of the shapes by specifying additional arguments such as color, linewidth, and linestyle.
Overall, plotting shapes in Julia is straightforward and can be done using the Plots package with just a few lines of code.
What is the function for customizing the size of shapes in Julia?
In Julia, the function linewidth() can be used to customize the size of shapes. This function takes a single parameter that represents the width of the shape's outline. For example, to set the width of a shape to 2 pixels, you would use the following code:
plot(x, y, linewidth=2)
where x and y are the coordinates of the shape that you are plotting.
How to plot a circle in Julia?
To plot a circle in Julia, you can use the Plots.jl package, which provides a high-level interface for creating plots. Here is an example of how to plot a circle with radius 1 centered at the origin:
- First, install the Plots and GR packages if you haven't already:
using Pkg Pkg.add("Plots") Pkg.add("GR")
- Next, import the Plots package and create a plot of a circle:
using Plots gr()
Define the circle equation
θ = LinRange(0, 2π, 100) # 100 points around the circle x = cos.(θ) y = sin.(θ)
Plot the circle
plot(x, y, aspect_ratio=:equal, legend=false)
This will generate a plot of a circle with radius 1 centered at the origin. You can adjust the radius and center of the circle by scaling and translating the x and y values accordingly.
How to plot an octagon in Julia?
To plot an octagon in Julia, you can use the Plots package. Here's a simple example code to plot an octagon:
using Plots
function plot_octagon(x, y, side_length) θ = [0,π/4,π/2,3π/4,π,5π/4,3π/2,7π/4] x_coords = x .+ side_length * cos.(θ) y_coords = y .+ side_length * sin.(θ)
plot(x\_coords, y\_coords, aspect\_ratio=:equal, xlims=(-side\_length-1,side\_length+1), ylims=(-side\_length-1,side\_length+1), seriestype=:shape, lw=2, linecolor=:blue, fillalpha=0.5, linealpha=1, label="")
end
plot_octagon(0, 0, 1)
This code defines a function plot_octagon that takes the x and y coordinates of the center of the octagon, and the length of each side as arguments. It then calculates the x and y coordinates of the vertices of the octagon using trigonometry, and plots them using the plot function from the Plots package.
You can customize the plot by changing the center coordinates and side length in the plot_octagon function call.
What is the advantage of using Julia for plotting shapes?
One advantage of using Julia for plotting shapes is its high performance and low latency, which allows for real-time rendering of complex shapes and interactive visualization. Julia's ability to interface with other graphics libraries and tools, such as Plots.jl and PyPlot, also provides users with a wide range of options for creating customizable and high-quality plots of shapes. Additionally, Julia's easy-to-use syntax and extensive documentation make it a versatile and efficient tool for generating visualizations of mathematical concepts, data, and simulations.
What is the function for adding labels to shapes in Julia?
In Julia, you can add labels to shapes by using the Plots.jl library. The annotate! function is used to add labels to shapes in a plot. Here is an example of how to add a label to a shape in Julia:
using Plots
Create a plot with a shape
plot([1,2,3], [1,2,3], seriestype=:scatter, label="Data points")
Add a label to a shape
annotate!(2, 2, text("Label", :black, :center))
In this example, the annotate! function is used to add the text "Label" to the coordinates (2, 2) on the plot. The text function is used to specify the text, color, and alignment of the label.
What is the command for plotting circles in Julia?
In Julia, you can plot circles using the Plots.jl package. To plot a circle, you need to define the center and radius of the circle, and then use the plot! function to add the circle to a plot.
Here is an example code snippet that plots a circle with center at (0,0) and radius 1:
using Plots
define center and radius of circle
center = (0, 0) radius = 1
generate points along the circumference of the circle
θ = LinRange(0, 2π, 100) x = center[1] .+ radius * cos.(θ) y = center[2] .+ radius * sin.(θ)
plot circle
plot(x, y, aspect_ratio = 1, legend=false)
You can customize the appearance of the circle by changing the center, radius, number of points, line color, line width, etc.