Best Matlab Image Storage Solutions to Buy in July 2026
CRAFTSMAN 10-Compartment Small Tool Storage Organizer, Plastic (CMST14021)
- CUSTOMIZABLE DIVIDERS FOR TOOLS AND SMALL PARTS ORGANIZATION.
- STACKABLE DESIGN FOR SECURE TRANSPORT AND SPACE-SAVING STORAGE.
- SECURE LID STRUCTURE ENSURES YOUR TOOLS STAY PROTECTED.


CRAFTSMAN Storage Organizer, Small Parts Organizer, 3-Packs with 10-Compartments, Lid Includes Secure Latch (CMST60964M)
- CUSTOMIZABLE DIVIDERS FOR EFFICIENT STORAGE OF TOOLS AND PARTS.
- SECURE LATCHES ENABLE STACKING AND STAY-LOCKED CONTENTS.
- INNOVATIVE DESIGN PREVENTS SMALL PARTS FROM SHIFTING COMPARTMENTS.
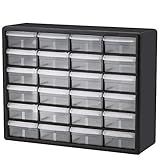
Akro-Mils 26-Drawer Plastic Drawer Storage Cabinet for Garage Organization, Bead Organizer, Building Bricks Storage, Teacher Toolbox, Makeup Organizer, 20" W x 6" D x 10" H, 10126 Black
-
DURABLE U.S.A. BUILT: HEAVY-DUTY PLASTIC CABINET ENSURES LONG-LASTING USE.
-
VERSATILE ORGANIZER: IDEAL FOR TOOLS, CLASSROOM SUPPLIES, AND CRAFTS.
-
SMART STORAGE SOLUTIONS: INCLUDES DIVIDERS & EASY-ACCESS DRAWERS.
Akro-Mils 24-Drawer Plastic Drawer Storage Cabinet for Garage Organization, Bead Organizer, Building Bricks Storage, Teacher Toolbox, Makeup Organizer, 20" W x 6" D x 16" H, 10724 Black
-
DURABLE 24-DRAWER DESIGN FOR ULTIMATE ORGANIZATION IN ANY SPACE.
-
VERSATILE USE: IDEAL FOR GARAGES, CLASSROOMS, AND HOME STORAGE NEEDS.
-
INCLUDES DIVIDERS AND WALL-MOUNT OPTIONS FOR CUSTOMIZABLE STORAGE.
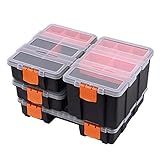
CASOMAN Hardware & Parts Organizers, 4 Piece Set Toolbox, Compartment Small Parts Organizer, Versatile and Durable Storage Tool Box
- VERSATILE SET WITH 4 ORGANIZERS FOR ALL YOUR STORAGE NEEDS!
- REMOVABLE DIVIDERS OFFER CUSTOMIZED CONFIGURATIONS FOR EASY USE.
- DURABLE PP PLASTIC ENSURES LONG-LASTING, RELIABLE ORGANIZATION!
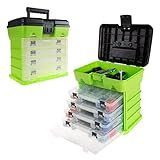
Portable Tool Box - Small Parts Organizer with Drawers and Customizable Compartments for Hardware, Fishing Tackle, Beads or Crafts by Stalwart (Green)
- CUSTOMIZABLE COMPARTMENTS: ORGANIZE WITH ADJUSTABLE DRAWER SIZES.
- PORTABILITY: LIGHTWEIGHT WITH STURDY LATCHES FOR SECURE TRAVEL.
- DURABLE BUILD: HIGH-IMPACT POLYPROPYLENE FOR LASTING USE EVERYWHERE.
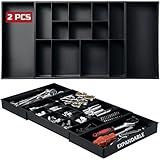
ONREVA Tool Box Organizer Tray Divider Set, Expandable Large Toolbox Storage Tray Kit, Rolling Tool Chest Drawer Bins, Hardware Screwdrivers Pliers Organization, 2pcs low profile Trays.
- OPTIMIZE WORKFLOW WITH PRECISE TOOL ORGANIZATION FOR EFFICIENCY.
- EXPANDABLE TRAYS FIT ANY TOOLBOX, MAKING STORAGE A BREEZE.
- TRANSFORM CHAOS INTO ORDER FOR A SEAMLESS WORK ENVIRONMENT.
In Matlab, you can store small images in several ways. Here are some commonly used methods:
- Using a multidimensional array: You can store images as a multidimensional array where each pixel value is represented by an element in the array. For instance, if you have a grayscale image, you can represent it using a 2D array. If you have a color image, you can represent it using a 3D array, where the third dimension represents the channels (usually red, green, and blue).
- Using a structure array: You can use a structure array to store image data. This allows you to store additional information along with the image, such as image size, image type, or metadata. Each element of the structure array can represent one image.
- Using a cell array: If you want to store multiple images of different sizes or types, you can use a cell array. Each cell in the array can hold a separate image. This is useful when dealing with images having varying dimensions.
- Using an image file format: Matlab supports various image file formats, such as JPEG, PNG, or TIFF. You can save small images as separate files and load them whenever needed. This method is convenient if you intend to use the images outside of Matlab or share them with others.
- Using a graphical user interface (GUI): If you are working with images interactively in Matlab, you can use the built-in GUI components to store and display small images. For example, you can use axes or image objects in a figure window to hold and visualize the images.
Choose the method that best suits your needs based on the specific requirements of your image processing tasks.
How to apply image morphing techniques in Matlab?
To apply image morphing techniques in Matlab, follow these steps:
- Load the two images that you want to morph using the imread function:
image1 = imread('image1.jpg'); image2 = imread('image2.jpg');
- Perform any necessary pre-processing on the images. This may include resizing the images, converting them to grayscale, or adjusting the brightness/contrast. For example, to resize the images to the same size, you can use the imresize function:
image1 = imresize(image1, [height, width]); image2 = imresize(image2, [height, width]);
- Create a meshgrid that specifies the control points for morphing. These control points should be identified on both images, and they should correspond to each other. The grid should have the same size as the images. You can use the meshgrid function to create a grid of X and Y coordinates:
[X, Y] = meshgrid(1:width, 1:height);
- Use the interp2 function to perform morphing. This function interpolates the pixel values between the control points of the two images. You can use a parameter t to control the morphing. A t value of 0 will produce the first image, while a t value of 1 will produce the second image. Values in between will produce intermediate morphed images. For example, to create a morphed image at t = 0.5:
t = 0.5; morphed_image = interp2(X, Y, double(image1), X+t*(X2-X), Y+t*(Y2-Y));
Note that X2 and Y2 represent the corresponding control points on the second image.
- Convert the morphed image back to the appropriate data type and display it using the imshow function:
imshow(uint8(morphed_image));
What is the function used for object extraction in Matlab?
The function used for object extraction in MATLAB is the bwlabel() function. This function takes a binary image as input and labels each connected component with a unique integer value. It groups the pixels of the same object together and assigns them the same label.
What is image morphing in Matlab?
Image morphing in Matlab refers to the process of smoothly transitioning from one image to another by creating a sequence of intermediate images. It involves warping and blending the pixels of two or more images to achieve the desired morphing effect. This technique is commonly used in computer graphics and animation to create smooth transitions between images or to create visual effects.
What is the file format used to store images in Matlab?
The file format commonly used to store images in Matlab is the Portable Network Graphics (PNG) format. Other commonly used formats include JPEG (Joint Photographic Experts Group) and TIFF (Tagged Image File Format).
What is the recommended image size for storing small images in Matlab?
The recommended image size for storing small images in Matlab can vary depending on the specific requirements of the application. However, a commonly used image format in Matlab is the raster graphics format (.bmp) which supports uncompressed image data.
For small images, a typical image size can be around 256x256 pixels or smaller. However, it is important to consider the trade-off between image size and the memory required to store the image. Larger image sizes will require more memory to store and process.
If memory usage is a concern, Matlab provides several other image formats such as .jpg or .png that use compression algorithms to reduce file size. However, using compressed formats may introduce some loss of image quality due to compression artifacts.
Ultimately, the recommended image size would depend on the specific requirements and constraints of your Matlab application.
How to crop an image in Matlab?
To crop an image in MATLAB, you can use the imcrop function. Here are the steps to follow:
- Read the image using the imread function and store it in a variable.
image = imread('image.jpg');
- Display the image using the imshow function.
imshow(image);
- Use the imcrop function to select a rectangular region of interest (ROI) in the image. Click and drag your mouse to select the region. Press the Enter key once you are satisfied with the selection.
croppedImage = imcrop(image);
- Display the cropped image using the imshow function.
imshow(croppedImage);
- You can also specify the ROI programmatically using the [x, y, width, height] coordinates. This allows you to automate the cropping process. For example, to crop a specific region from coordinates (x, y) with width w and height h, use:
croppedImage = imcrop(image, [x, y, w, h]);
Note: The imcrop function returns the cropped region as a new image, so you need to assign it to a new variable (e.g., croppedImage). You can save the cropped image using the imwrite function if desired:
imwrite(croppedImage, 'cropped_image.jpg');