
Best Logitech Gaming Mouse with Programmable Macros to Buy in July 2026
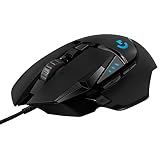
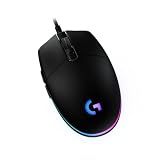
Logitech G502 Hero High Performance Wired Gaming Mouse, Hero 25K Sensor, 25,600 DPI, RGB, Adjustable Weights, 11 Programmable Buttons, On-Board Memory, PC/Mac - Black
- ACHIEVE PINPOINT ACCURACY WITH HERO SENSOR UP TO 25600 DPI!
- CUSTOMIZE GAMEPLAY WITH 11 PROGRAMMABLE BUTTONS FOR ULTIMATE CONTROL.
- PERSONALIZE WEIGHT AND BALANCE WITH ADJUSTABLE 3.6G WEIGHTS!


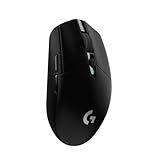
Logitech G305 Lightspeed Wireless Gaming Mouse, Hero Sensor, 12,000 DPI, Lightweight, 6 Programmable Buttons, 250h Battery, On-Board Memory, Compatible with PC, Mac - Black
- ULTRA-RESPONSIVE 1 MS LIGHTSPEED TECH FOR LAG-FREE GAMING.
- 250 HOURS OF GAMEPLAY ON 1 AA BATTERY; 9 MONTHS IN ENDURANCE MODE.
- LIGHTWEIGHT DESIGN AT 3.4 OZ FOR ULTIMATE MANEUVERABILITY AND COMFORT.
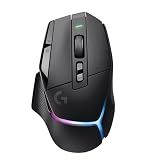
Logitech G PRO X2 SUPERSTRIKE Wireless Gaming Mouse: Customizable Rapid Trigger Magnetic Analog Switches, Adjustable Click Haptics, 61g Ultra Lightweight, USB-C, <8K Polling, for PC/Mac - Black/White
-
ENGINEERED FOR CHAMPIONS: CRAFTED WITH TOP ESPORTS PROS FOR PEAK PERFORMANCE.
-
LIGHTNING-FAST CLICKS: ENJOY 30 MS FASTER CLICKS AND CUSTOMIZABLE ACTUATION.
-
IMMERSIVE HAPTIC FEEDBACK: EXPERIENCE REAL-TIME FEEDBACK FOR ULTIMATE GAMEPLAY.
Logitech G502 X Plus Wireless Gaming Mouse: Optical Switches, LIGHTSYNC RGB, 13 Buttons, Infinite Scroll Toggle, Up to 130hr Battery, USB-C, PowerPlay Wireless Charging, PC/MacOS - Black
- ENHANCED GAMING PRECISION: HERO 25K SENSOR DELIVERS UNMATCHED ACCURACY.
- CUSTOMIZABLE EXPERIENCE: LIGHTSYNC RGB AND DPI-SHIFT FOR PERSONAL FLAIR.
- PRO-GRADE WIRELESS: ACHIEVES 68% FASTER RESPONSE FOR EFFORTLESS GAMEPLAY.
Logitech G203 Wired Gaming Mouse, 8,000 DPI, Rainbow Optical Effect LIGHTSYNC RGB, 6 Programmable Buttons, On-Board Memory, Screen Mapping, PC/Mac Computer and Laptop Compatible - Black
-
EXPERIENCE 8,000 DPI FOR UNMATCHED GAMING PRECISION AND CONTROL.
-
FULLY CUSTOMIZE RGB LIGHTING VIA LOGITECH G HUB FOR IMMERSIVE PLAY.
-
SIX-BUTTON DESIGN WITH CONFIGURABLE KEYS ENHANCES GAMEPLAY EFFICIENCY.

Logitech G703 Lightspeed Wireless Gaming Mouse W/Hero 25K Sensor, PowerPlay Compatible, Lightsync RGB, Lightweight 95G+10G Optional, 100-25, 600 DPI, Rubber Side Grips - Black
- ULTIMATE PRECISION: HERO 25K SENSOR OFFERS 1:1 TRACKING AND HIGH DPI.
- PRO WIRELESS GAMING: LIGHTSPEED TECH ENSURES LOW-LATENCY GAMEPLAY.
- ENDLESS POWER: POWERPLAY KEEPS YOUR MOUSE CHARGED UNINTERRUPTEDLY.
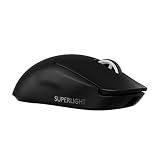
Logitech G PRO X Superlight 2 Wireless Gaming Mouse, 60g Pro-Grade with 5 Programmable Buttons, 44k DPI Sensor, 8kHz Report Rate, USB-C Charging for PC/Mac - Black
- ULTIMATE SPEED: 8 KHZ POLLING & 44,000 DPI FOR PRO-LEVEL PRECISION.
- UNMATCHED BATTERY LIFE: 95 HOURS WITH USB-C & POWERPLAY SUPPORT.
- SEAMLESS GLIDE: ZERO-ADDITIVE PTFE FEET FOR EFFORTLESS MOVEMENT.
Sure, here's a brief guide on how to program macros on a Logitech gaming mouse.
- Start by installing the Logitech Gaming Software (LGS) from the Logitech website. This software is designed specifically for Logitech gaming peripherals, including mice.
- Launch the Logitech Gaming Software and connect your Logitech gaming mouse to your computer.
- Once your mouse is recognized, open the software and you will see the main screen with different options.
- Click on the mouse icon or navigate to the "Customize Buttons" section, which will allow you to program macros on your mouse.
- Select the button on your mouse that you want to assign a macro to. You will see a drop-down menu with various options for that specific button.
- Choose the "Edit" option to customize the button's function.
- A new window will appear, providing different customization options. Look for the option to create a macro or assign a keystroke sequence to that button.
- Click on the "Record a Macro" option if you want to record a series of keystrokes to be executed by pressing the assigned button. Alternatively, select "Edit Script" if you have a pre-existing macro script or want to create a more complex script using Lua programming language.
- If you choose to record a macro, click the "Start Recording" button and proceed with typing the desired key combination or sequence. Click the "Stop Recording" button once you're done.
- Save your newly recorded or edited macro by clicking the "OK" or "Save" button.
- Test your macro by pressing the assigned button on your Logitech gaming mouse.
Remember to customize macros according to your needs and preferences, as they greatly enhance your gaming experience by automating certain commands or actions.
What is the maximum length of a macro that I can program on my Logitech gaming mouse?
The maximum length of a macro that you can program on Logitech gaming mice depends on the specific model and software you are using. However, most Logitech gaming mice support macros of up to 250-300 characters. It's important to note that some complex macros with excessive delays or commands may not fit within this limit.
How to assign a macro to a specific button on my Logitech gaming mouse?
To assign a macro to a specific button on your Logitech gaming mouse, you can follow these steps:
- Install the Logitech Gaming Software (LGS) if you haven't already. You can download it from the Logitech website.
- Launch the Logitech Gaming Software and connect your mouse to your computer.
- Make sure your mouse is recognized by the software. You should see your mouse listed on the main screen.
- Click on your mouse's icon. This will open the customization window for your mouse.
- In the customization window, navigate to the "Button Assignments" tab.
- The button assignments tab will show you a visual representation of your mouse's buttons. Click on the button you want to assign a macro to.
- In the dropdown menu, select the "Macro Manager" option. This will open the macro manager window.
- In the macro manager window, click on the "+" button to create a new macro.
- Enter a name for your macro and click "Ok".
- In the macro editing window, click on the "Record" button to start recording your macro.
- Perform the actions you want your macro to replicate. This can include keyboard presses, mouse clicks, or other inputs.
- Once you have finished recording, click on the "Stop" button in the macro editing window.
- Review your recorded macro and make any necessary edits.
- Click "Ok" to save your macro.
- Back in the customization window, click "Apply" to apply the macro to the selected button on your mouse.
Your macro will now be assigned to the specific button on your Logitech gaming mouse. Whenever you press that button, the assigned macro will be executed.
What is the process to record a macro on my Logitech gaming mouse?
To record a macro on your Logitech gaming mouse, you can follow these general steps:
- Install the Logitech software: Download and install Logitech's gaming software, such as Logitech G HUB or Logitech Gaming Software, from the official Logitech website. Make sure your mouse is compatible with the software.
- Open the software: Launch the software and ensure your mouse is connected to your computer.
- Identify the macro settings: Explore the software interface to locate the macro settings. This can usually be found under the mouse settings, customization, or configuration options.
- Create a new macro: Look for options to create a new macro or record a new macro. Click on the appropriate button to begin recording.
- Start recording: When prompted, press the key or buttons on your mouse that you want to assign the macro to. Proceed with the actions or keystrokes you want the macro to perform. This will be recorded by the software.
- Stop recording: Once you have completed the desired actions, press the designated button to stop recording the macro. Review and edit the recorded macro if needed.
- Assign macro to a button: Choose the mouse button where you want to assign the recorded macro. You can typically select from a list of available buttons or a custom option.
- Save and apply: Save the settings and apply the recorded macro to the desired button on your Logitech gaming mouse. Depending on the software, you may need to activate the profile or save the configuration to ensure the macro is active.
Note: The exact steps may vary slightly depending on the specific Logitech software version and mouse model you are using. It is recommended to refer to the official documentation or support resources provided by Logitech for accurate instructions related to your specific mouse model and software version.