
Best Logitech Mouse Profiles to Buy in July 2026
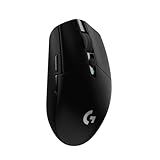
Logitech G305 LIGHTSPEED Wireless Gaming Mouse, Hero 12K Sensor, 12,000 DPI, Lightweight, 6 Programmable Buttons, 250h Battery Life, On-Board Memory, PC/Mac - Black
- LIGHTWEIGHT DESIGN FOR EFFORTLESS MANEUVERABILITY AND COMFORT.
- 1MS LIGHTSPEED WIRELESS TECHNOLOGY ENSURES LAG-FREE PERFORMANCE.
- UP TO 250 HOURS OF GAMEPLAY ON ONE AA BATTERY-PLAY UNINTERRUPTED!


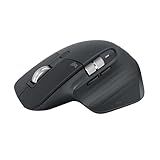
Logitech MX Master 3S Bluetooth Edition Wireless Mouse, No USB Receiver - Ultra-Fast Scrolling, Ergo, 8K DPI, Track on Glass, Quiet Clicks, Works with Apple Mac, Windows PC, Linux, Chrome - Graphite
- EFFORTLESSLY TRACK ON ANY SURFACE WITH 8K DPI PRECISION.
- EXPERIENCE WHISPER-QUIET CLICKS WITH 90% LESS NOISE.
- SEAMLESSLY CONTROL 3 DEVICES WITH MULTI-DEVICE BLUETOOTH CONNECTIVITY.
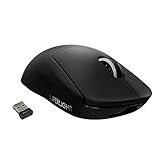
Logitech G PRO X SUPERLIGHT Wireless Gaming Mouse, Ultra-Lightweight, HERO 25K Sensor, 25,600 DPI, 5 Programmable Buttons, Long Battery Life, Compatible with PC / Mac - Black
-
LIGHTWEIGHT DESIGN: AT JUST 63G, ENJOY UNMATCHED SPEED AND AGILITY.
-
PRO-GRADE PERFORMANCE: COLLABORATIVELY DESIGNED WITH TOP ESPORTS CHAMPIONS.
-
SUPERIOR PRECISION: HERO SENSOR ENSURES FAST, ACCURATE GAMING CONTROL.
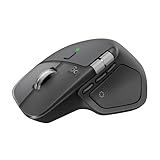
Logitech MX Master 4, Ergonomic Wireless Mouse with Advanced Performance Haptic Feedback, Ultra-Fast Scrolling, USB-C Charging, Bluetooth, Windows, MacOS - Graphite
- EXPERIENCE CUSTOMIZABLE HAPTIC FEEDBACK FOR ENHANCED PRODUCTIVITY.
- ACCESS FAVORITE TOOLS INSTANTLY WITH THE INTUITIVE ACTIONS RING.
- ENJOY THE FASTEST, QUIETEST SCROLLING WITH MAGSPEED WHEEL TECHNOLOGY.
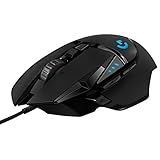
Logitech G502 HERO High Performance Wired Gaming Mouse, HERO 25K Sensor, 25,600 DPI, RGB, Adjustable Weights, 11 Buttons, On-Board Memory, PC/Mac
-
FREE HERO 25K SENSOR UPGRADE FOR UNMATCHED PRECISION IN GAMEPLAY.
-
PERSONALIZE WEIGHT WITH ADJUSTABLE 3.6G WEIGHTS FOR OPTIMAL BALANCE.
-
11 CUSTOMIZABLE BUTTONS FOR QUICK COMMANDS AND FIVE ONBOARD PROFILES.
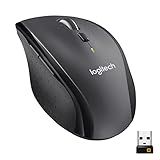
Logitech M705 Marathon Wireless Mouse, Gaming Mouse Wireless, 2.4 GHz USB-A Receiver, 5-Programmable Buttons, 3-Year Battery, PC, Mac, Laptop, Chromebook - Black
- ENJOY 3 YEARS OF USAGE-LESS POWER, FEWER BATTERY CHANGES!
- TINY UNIFYING RECEIVER STAYS PUT, MINIMIZING LOSS AND BREAKAGE.
- HYPER-FAST SCROLLING AND PRECISE TRACKING FOR EFFORTLESS NAVIGATION.
Setting up Logitech mouse profiles for different tasks allows you to customize the functionality of your mouse to match various activities you perform on your computer. This feature is especially useful for gamers, designers, and professionals who require different settings for different tasks. Here's a general guide on how to set up Logitech mouse profiles:
- Install Logitech software: Begin by installing Logitech's drivers and software on your computer. You can download this software from the Logitech website based on your specific mouse model.
- Launch Logitech software: After installation, open the Logitech software. This software is typically called Logitech Gaming Software or Logitech Options, depending on your mouse model.
- Connect your mouse: Connect your Logitech mouse to your computer using the provided USB cable or via Bluetooth connection. Ensure that your mouse is properly detected by the software.
- Create a new profile: Within the Logitech software, there should be an option to create a new mouse profile. Click on this option to begin configuring your customized settings for a specific task.
- Assign buttons: Logitech mice usually come with multiple programmable buttons. In the software, you can assign different functions, macros, or shortcuts to these buttons. For instance, you can assign a button to copy, paste, or perform a specific action within an application.
- Adjust DPI settings: DPI (dots per inch) determines the sensitivity of your mouse cursor. Depending on your task, you may want to set a higher DPI for gaming, where accuracy is crucial, or a lower DPI for graphic design, where precision is paramount. Navigate to DPI settings in the software and adjust accordingly.
- Save the profile: Once you have customized your buttons and DPI settings, save the profile within the Logitech software. You can give it a descriptive name related to the task or activity it's intended for.
- Switch between profiles: With Logitech software running, you can switch between profiles by accessing the software interface. Some Logitech mice have dedicated buttons that allow you to cycle through the profiles seamlessly. This way, you can quickly switch between profiles based on your current task.
- Customize additional settings: Depending on your mouse model, the Logitech software might offer additional customization options such as lighting effects, scrolling speed, and acceleration. Feel free to explore and tweak these settings as per your preferences.
By following these steps, you can set up Logitech mouse profiles to optimize your productivity or enhance your gaming experience. Remember, the exact steps and options may vary slightly depending on your specific Logitech mouse model and software version.
How to save and export Logitech mouse profiles for backup or sharing?
To save and export Logitech mouse profiles for backup or sharing, you can follow these steps:
- Launch the Logitech G HUB software on your computer. If you don't have it, make sure to download and install it from the Logitech website.
- Connect your Logitech mouse to your computer using the provided USB cable or through wireless connection.
- Once the G HUB software detects your mouse, click on the mouse icon on the main screen to access the mouse settings.
- In the mouse settings, you will find different tabs or sections like Assignments, Performance, Lighting, etc., depending on your specific Logitech mouse model. Navigate to the sections where you have customized your profiles, buttons, or other settings.
- To save and backup your profiles, go to each section and click on the profile name or icon. A dropdown menu will appear, and from there, select "Save profile to computer" or a similar option.
- Choose a location on your computer to save the profile file and give it a descriptive name.
- Repeat the process for all the profiles you want to save as separate files.
- To export and share the profiles with others, copy the saved profile files to a portable storage device like a USB drive or send them via email or cloud storage.
- On another computer where you want to import the profiles, make sure the Logitech G HUB software is installed and your mouse is connected.
- Copy the saved profile files from the portable storage or download them from email or cloud storage to the new computer.
- Launch the Logitech G HUB software on the new computer and click on the mouse icon.
- Navigate to the respective sections where you want to import the profiles and click on the profile name or icon. From the dropdown menu, choose "Import profile from file" or a similar option.
- Locate the saved profile file on your computer and select it.
- Repeat the process for all the profiles you want to import.
By following these steps, you can save and export your Logitech mouse profiles for backup or sharing, allowing you to transfer your customized settings to other devices or share them with friends.
What is DPI setting on a Logitech mouse?
DPI stands for "dots per inch" and is a measurement of the sensitivity of a mouse's movement. The DPI setting on a Logitech mouse refers to the adjustable sensitivity levels that can be selected by the user. Different Logitech mouse models may have different maximum DPI settings, but they typically range from a few hundred to several thousand DPI. Higher DPI settings allow for faster cursor movements, while lower DPI settings offer more precise control.
How to assign macros to Logitech mouse buttons?
To assign macros to Logitech mouse buttons, you can follow these steps:
- Install Logitech Gaming Software (LGS): Go to the Logitech website and download the Logitech Gaming Software compatible with your mouse model. Run the downloaded installer and follow the on-screen instructions to complete the installation.
- Launch the Logitech Gaming Software: Open the Logitech Gaming Software application on your computer.
- Identify your mouse: Make sure your mouse is detected by the software. If your mouse is not automatically detected, try reconnecting it or restarting your computer.
- Select your mouse model: Click on the mouse icon or name in the software's home screen to select your mouse model.
- Customize the mouse buttons: In the software's configuration interface, you will see a graphical representation of your mouse. Find the button you want to assign a macro to and click on it. In the popup menu, select "Assign New Command."
- Create a new macro: In the command options, select "Macro" under "Keystrokes" or "Multi Key" depending on your desired macro type. Click on the "Record" button. Perform the sequence of keystrokes or actions that you want the macro to emulate. Once finished, click on the "Stop" button.
- Edit the macro: If desired, you can further customize the macro by clicking on the "Edit" button. This allows you to modify individual keystrokes, delays, and other parameters.
- Assign the macro to the mouse button: After creating or editing the macro, click on "OK" to save it. The macro will now be assigned to the selected mouse button.
- Test the macro: To ensure the macro is functioning correctly, test it by pressing the assigned button on your mouse.
- Repeat the process for other buttons: Follow the same steps to assign macros to other buttons on your Logitech mouse.
Note: The specific steps and options might vary slightly depending on the Logitech mouse model and software version you are using, but the general process should remain the same.
How to set up Logitech mouse profiles for CAD software?
To set up Logitech mouse profiles for CAD software, you can follow these steps:
- Connect your Logitech mouse to your computer and ensure that the Logitech software is installed. If not, download and install it from the Logitech website.
- Open the Logitech software and locate the profile management section. This may vary depending on the specific Logitech software version you have installed.
- Create a new profile specifically for your CAD software. Click on the "Create New Profile" button or a similar option to start a new profile.
- Give your new profile a name, such as "CAD" or the name of the CAD software you are using.
- Customize the mouse buttons and functions for your CAD needs. In the Logitech software, you should see a list of programmable buttons on your mouse. These can be customized to perform specific actions in your CAD software.
- Click on each button you want to modify and assign a function or shortcut from the provided options. For CAD software, you may assign common functions like pan, zoom, rotate, or select to the mouse buttons.
- Add additional settings if needed. Depending on the Logitech software, you may have options like sensitivity adjustment, scroll behavior, or pointer speed that can be customized to suit your CAD workflow.
- Save and activate the profile. Once you have finished customizing the buttons and settings, save the profile. Some Logitech software may require you to activate the profile for it to take effect.
- Test the mouse functions in your CAD software. Open your CAD software and check if the mouse buttons are performing the assigned functions correctly.
- Fine-tune the settings if necessary. If you find that certain functions are not working as intended or if you want to make further adjustments, you can revisit the Logitech software and modify the profile accordingly.
By creating a dedicated Logitech mouse profile for your CAD software, you can optimize your workflow and have quick access to essential functions using the programmable buttons on your mouse.