
Best Subwoofer Troubleshooting Tips to Buy in July 2026
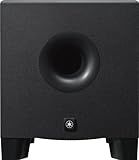
Yamaha HS8 Studio Subwoofer,Black
- DEEP BASS PERFORMANCE: 22HZ TO 150HZ FREQUENCY RESPONSE.
- POWERFUL SOUND: 150W AMPLIFIER FOR IMPACTFUL AUDIO DELIVERY.
- CUSTOMIZABLE SOUND: LOW/HIGH CUT CONTROLS AND PHASE SWITCH.


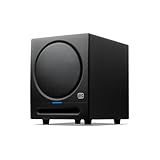
PreSonus Eris Sub 8BT — 8" Inch Powered Subwoofer, Powered Sub, Active Subwoofer, Wireless, Bluetooth, Home Audio, Bass Speaker, Home Theater, Music Production, Gaming
- STUDIO-QUALITY SOUND FOR MUSIC PRODUCTION AND LISTENING.
- POWERFUL 100W OUTPUT DELIVERS DEEP, ACCURATE BASS.
- BLUETOOTH 5.0 FOR SEAMLESS WIRELESS AND WIRED CONNECTIONS.
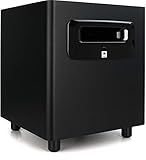
JBL Professional LSR310S - Studio Monitor Subwoofer, 10-Inch, Black
- EXPERIENCE DEEP, DYNAMIC BASS WITH PATENTED JBL PORT DESIGN.
- XLF SETTING BRINGS DANCE CLUB BASS TUNING TO YOUR STUDIO.
- PRO INPUTS/OUTPUTS ENSURE SEAMLESS INTEGRATION INTO ANY SETUP.
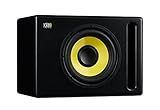
KRK S10.4 S10 Generation 4 10" 160 Watt Powered Studio Subwoofer
-
DEEP, IMPACTFUL BASS DOWN TO 28HZ FOR AN IMMERSIVE AUDIO EXPERIENCE.
-
VERSATILE PLACEMENT WITH CURVED DESIGN AND FRONT-FIRING BASS PORT.
-
EASY CONTROL WITH FOOTSWITCH FOR SEAMLESS SUB AND CROSSOVER ADJUSTMENTS.
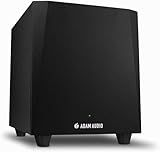
ADAM Audio T10S Studio Subwoofer for recording, mixing and mastering, Studio Quality Sound (Single)
- EXTEND BASS RESPONSE FOR CLARITY IN LOW FREQUENCIES WITH T10S.
- DESIGNED TO ENHANCE PERFORMANCE OF T5V AND T7V STUDIO MONITORS.
- FLEXIBLE PLACEMENT AND EASY CALIBRATION FOR OPTIMAL SOUND ACCURACY.
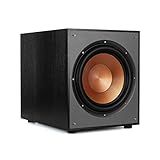
Klipsch R-120SW Subwoofer, Black
- POWERFUL 12 WOOFER DELIVERS DEEP BASS (29HZ - 120HZ)
- ROBUST 400W PEAK OUTPUT ENSURES POWERFUL SOUND PERFORMANCE
- ENHANCED ACOUSTICS WITH REAR-FIRING PORT FOR RICH BASS RESPONSE
Troubleshooting studio subwoofers for common issues involves checking various components of the subwoofer system. Start by ensuring that the subwoofer is receiving power and that all cables and connections are securely in place. Check the input source to make sure it is working properly and try connecting a different source to see if the issue is with the subwoofer or the source device.
If there is no sound coming from the subwoofer, make sure the volume levels are correctly set on both the subwoofer and the source device. Check the settings on the subwoofer to ensure it is configured properly for the room size and acoustics.
If the subwoofer is producing distorted or muffled sound, check the speaker cone for damage or debris that may be obstructing the sound. Adjust the crossover frequency and phase settings to ensure they are optimized for the rest of the audio system.
If the subwoofer is producing a buzzing or humming noise, check the power source to make sure it is clean and free from interference. Move any electronic devices or power cables away from the subwoofer to minimize interference.
If none of these steps resolves the issue, it may be necessary to consult the manufacturer's instructions or contact customer support for further troubleshooting and potential repair options.
How to address subwoofers that are producing intermittent sound?
- Make sure that all connections are secure: Check the cables connected to the subwoofer and the audio source to ensure that they are plugged in properly. Loose connections can cause intermittent sound.
- Check the power source: Make sure that the subwoofer is properly connected to a power source and that the power outlet is functioning correctly. If the subwoofer is powered by a battery, make sure it is fully charged.
- Troubleshoot the audio source: If the subwoofer is connected to a specific audio source (such as a receiver or amplifier), make sure that the audio source is working properly. Try connecting the subwoofer to a different audio source to see if the issue persists.
- Check the settings: Ensure that the volume, bass levels, and crossover settings on the subwoofer are properly configured. Adjust these settings as needed to see if it resolves the intermittent sound issue.
- Test the subwoofer: Play a test tone or a bass-heavy audio track to see if the subwoofer consistently produces sound. If the issue persists, there may be a problem with the subwoofer itself, and it may need to be inspected or repaired by a professional.
- Contact customer support: If none of the above steps resolve the issue, reach out to the manufacturer or retailer for further assistance. They may be able to provide additional troubleshooting steps or recommend a repair service.
How to troubleshoot subwoofers that are producing muffled sound?
- Check the subwoofer's connection: Make sure all cables are securely connected to the subwoofer, amplifier, and source device. A loose connection can result in poor sound quality.
- Adjust the settings: Check the settings on the subwoofer and the audio source device. Make sure the volume, frequency, and phase settings are properly adjusted.
- Check the enclosure: If the subwoofer is enclosed in a cabinet or box, make sure the enclosure is properly ventilated. Poor ventilation can cause sound distortion.
- Inspect the speaker cone: Check for any tears or damage to the subwoofer's speaker cone. Damage to the cone can result in muffled sound.
- Test the audio source: Try playing different audio sources to see if the muffled sound persists. If the issue only occurs with a specific source, there may be a problem with that source's audio output.
- Reset the subwoofer: Power off the subwoofer and unplug it from the power source for a few minutes. Then, plug it back in and power it on to see if the issue is resolved.
- Consult the manufacturer: If none of the above steps solve the problem, contact the manufacturer or a professional audio technician to diagnose and fix the issue.
How to identify and rectify subwoofer buzzing sounds?
- Check the connections: Ensure that all cables and connections are secure and properly connected. Loose connections can cause buzzing sounds.
- Check the power source: Make sure that the subwoofer is plugged into a grounded outlet or power strip. Electrical interference can cause buzzing sounds.
- Adjust the volume: If the volume is too high, it can cause distortion and buzzing sounds. Try lowering the volume to see if the buzzing decreases.
- Check for interference: Electronic devices such as cell phones, laptops, or other wireless devices can cause interference with the subwoofer, resulting in buzzing sounds. Try moving these devices away from the subwoofer to see if the buzzing stops.
- Isolate the subwoofer: Place the subwoofer on a separate surface away from other electronics to reduce interference and buzzing sounds.
- Check the subwoofer settings: Make sure the subwoofer settings are properly configured according to the manufacturer's recommendations. Adjusting the crossover and phase settings can help reduce buzzing sounds.
- Test the subwoofer with a different audio source: If the buzzing persists, try connecting the subwoofer to a different audio source to determine if the issue is with the subwoofer or the audio source.
- Contact the manufacturer: If none of the above steps resolve the issue, contact the manufacturer for further troubleshooting and possibly repair or replacement.
What is the best way to determine if a subwoofer driver is misaligned?
The best way to determine if a subwoofer driver is misaligned is to do a visual inspection of the subwoofer cabinet and driver. Look for any obvious signs of physical damage or misalignment, such as the driver not sitting properly in the cabinet, loose screws or mounting hardware, or visibly damaged cones or surrounds.
Another way to check if a subwoofer driver is misaligned is to listen for any unusual sounds or distortion coming from the subwoofer when playing music or test tones. A misaligned driver can cause vibrations or rattling noises that are not present in a properly aligned subwoofer.
Additionally, you can use a test tone generator or sound level meter to measure the frequency response of the subwoofer in different locations around the room. A misaligned driver may produce inconsistent or uneven frequency response readings, indicating that the driver is not properly aligned within the cabinet.
Overall, a combination of visual inspection, listening tests, and frequency response measurements can help determine if a subwoofer driver is misaligned and in need of adjustment or repair.
How to fix subwoofers that are producing humming noises?
- Check the grounding: Make sure that the subwoofer is properly grounded. Use a proper grounding plug or wire to prevent any electrical interference that could cause humming noises.
- Check the connections: Check all the connections of the subwoofer to ensure that they are secure and tight. Loose connections can lead to humming noises.
- Check the power source: Make sure that the subwoofer is properly connected to a stable power source. Fluctuations in power can also cause humming noises.
- Replace cables: If the cables connecting the subwoofer are old or damaged, they may cause humming noises. Replace them with new high-quality cables.
- Move the subwoofer: Sometimes, the position of the subwoofer can cause interference and result in humming noises. Experiment with moving the subwoofer to a different location to see if the humming noise stops.
- Check for interference: Nearby electronic devices or appliances can cause interference with the subwoofer, resulting in humming noises. Try turning off or moving nearby devices to see if the humming noise stops.
- Check the audio settings: Make sure that the audio settings on your receiver or amplifier are properly adjusted. Incorrect settings can also cause humming noises.
- Consult a professional: If none of the above solutions work, it may be time to consult a professional audio technician to diagnose and fix the issue with your subwoofer.