
Best CSV Tools to Buy in July 2026

Gaobige Network Tool Kit for Cat5 Cat5e Cat6, 11 in 1 Ethernet Crimper Kit
-
ALL-IN-ONE TOOLKIT FOR EFFICIENT NETWORKING TASK MANAGEMENT.
-
ERGONOMIC CRIMPER FOR FAST, RELIABLE CABLE PREPARATION.
-
HANDY TESTER FOR RELIABLE VERIFICATION OF NETWORK CONNECTIONS.


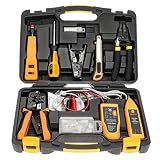
InstallerParts Professional Network Tool Kit 15 In 1 - RJ45 Crimper Tool Cat 5 Cat6 Cable Tester, Gauge Wire Stripper Cutting Twisting Tool, Ethernet Punch Down Tool, Screwdriver, Knife
-
LIGHTWEIGHT, DURABLE CASE FOR EASY TOOL ACCESS ANYWHERE, ANYTIME.
-
HIGH-QUALITY CRIMPER FOR VERSATILE CABLE TYPES; SAFE AND EFFICIENT USE.
-
ESSENTIAL TESTER AND PUNCH DOWN TOOL FOR SEAMLESS LAN INSTALLATIONS.

Network Tool Kit, ZOERAX 11 in 1 Professional RJ45 Crimp Tool Kit - Pass Through Crimper, RJ45 Tester, 110/88 Punch Down Tool, Stripper, Cutter, Cat6 Pass Through Connectors and Boots
-
ENHANCED VERSATILITY: PERFECT FOR HOMES, OFFICES, AND OUTDOOR USE.
-
ALL-IN-ONE SOLUTIONS: INCLUDES TOOLS FOR CRIMPING, TESTING, AND MANAGING CABLES.
-
PROFESSIONAL ORGANIZATION: COMES WITH A PORTABLE CASE FOR EASY STORAGE.

Paladin Tools PA4908 Network Tool Kit - VDV Technicians Kit - Wire Cutter, Wire Stripper, Scissors, Punchdown Tool, Plugs - RJ45 RJ11 RJ12 RJ22 (POE Ethernet)
- TRUST PALADIN TOOLS FOR PRO-GRADE EXCELLENCE AND FLAWLESS RESULTS.
- COMPLETE KIT FOR EASY INSTALLATION & MAINTENANCE OF DATA NETWORKS.
- BUILT TO LAST WITH A LIFETIME WARRANTY-ENGINEERED FOR DURABILITY!
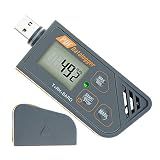
USB Temperature Data Logger Recorder for Temperature Humidity and Atmospheric Pressure, IP65 Waterproof Temperature Logger with PDF and CSV Reports High Accuracy
-
REAL-TIME DATA TRACKING: SIMULTANEOUSLY MONITOR TEMP, HUMIDITY, PRESSURE.
-
EASY USB ACCESS: PLUG AND PLAY; NO EXTRA CABLES OR READERS NEEDED.
-
HIGHLY CUSTOMIZABLE: ADJUST INTERVALS, ALARMS, AND LANGUAGES EASILY.
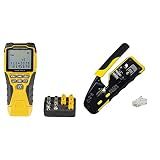
Klein Tools Cable Tester and Data Cable Installation Tool Kit
- COMPREHENSIVE CABLE TESTING: TEST VOICE, DATA, AND VIDEO UP TO 2000 FT.
- EFFICIENT CABLE MAPPING: LOCATE MULTIPLE RUNS WITH RJ45 AND COAXMAP REMOTES.
- QUICK INSTALLATION: PASS-THRU MODULAR PLUGS ENSURE FAST CAT6 CRIMPING.
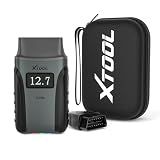
Anyscan+ A30M OBD2 Scanner Kit - No Subscription Fees, Wireless Code Reader Bidirectional Scan Tool for iOS & Android, 26 Resets, Live Data, CAN FD, FCA, Storage Bag
-
NO SUBSCRIPTION FEES: LIFETIME SOFTWARE UPDATES INCLUDED!
-
FULL SYSTEM DIAGNOSTICS: ACCESS ALL VEHICLE MODULES INSTANTLY!
-
DURABLE CASE & FLEXIBLE CABLE: PERFECT FOR ORGANIZED, ON-THE-GO USE!

DocketPORT 687 Duplex Card Scanner (DP687) with DocketSCAN Business Card
- EFFORTLESSLY IMPORT/EXPORT CONTACTS TO OUTLOOK WITH A SINGLE LICENSE!
- ELIMINATE DUPLICATES AND KEEP YOUR CONTACT LIST ORGANIZED EFFORTLESSLY.
- AUTOMATIC DATA BACKUP ENSURES YOU NEVER LOSE IMPORTANT CONTACT INFO!

Data Sketches: A journey of imagination, exploration, and beautiful data visualizations (AK Peters Visualization Series)
When importing CSV data into Matplotlib, you can use column names as labels for the data. A CSV file contains tabulated data, where each row represents a specific record, and each column represents a different attribute or variable.
To begin, you need to import the necessary libraries. Matplotlib is a plotting library in Python widely used for data visualization.
import matplotlib.pyplot as plt import pandas as pd
Next, you can read the CSV file using the pd.read_csv() function and store it in a DataFrame variable. The DataFrame is a two-dimensional labeled data structure with columns of potentially different types.
data = pd.read_csv('data.csv')
If you want to visualize a specific column in your CSV file, you can access it using the column name as an index of the DataFrame. For example, if you have a column named "x_values" and "y_values", you can refer to them as data['x_values'] and data['y_values'], respectively.
x = data['x_values'] y = data['y_values']
Once you have extracted your desired data columns, you can plot them using Matplotlib's plotting functions. For example, to create a basic line plot:
plt.plot(x, y) plt.xlabel('X-axis') plt.ylabel('Y-axis') plt.title('CSV Data Plot') plt.show()
By setting the xlabel, ylabel, and title attributes, you can add labels to the respective axes and provide a title for the plot.
Make sure the column names in your CSV file accurately reflect the data they represent. Using the correct names for labeling the data will enhance the readability and interpretation of your plots.
How to set row index while importing CSV data into Matplotlib?
To set the row index while importing CSV data into Matplotlib, you need to do the following steps:
- Firstly, import the required libraries:
import matplotlib.pyplot as plt import pandas as pd
- Load the CSV file using pandas library:
data = pd.read_csv('data.csv', index_col='column_name')
Replace 'data.csv' with the actual file path, and 'column_name' with the desired column in your CSV file that you want to set as the row index.
- Plot the data using Matplotlib, where you can now use the row index as the x-axis:
plt.plot(data.index, data['column_name']) plt.show()
Replace 'column_name' with the desired column in your CSV file that you want to plot.
This way, you can set the row index while importing CSV data into Matplotlib and use it as an x-axis while plotting.
How to set column index while importing CSV data?
To set a specific column as the index while importing CSV data in Python, you can use pandas library. Here's an example code:
import pandas as pd
Read the CSV file
data = pd.read_csv('data.csv')
Set the desired column as the index
data.set_index('column_name', inplace=True)
Print the updated dataframe
print(data)
Replace 'data.csv' with the path to your CSV file, and 'column_name' with the name of the column you want to set as the index.
This code reads the CSV file using pd.read_csv() function from pandas and stores it in the data variable. Then it uses set_index() method to set the desired column as the index. The inplace=True parameter modifies the existing dataframe instead of creating a new one. Finally, it prints the updated dataframe.
What is a delimiter in CSV files?
A delimiter in CSV (Comma-Separated Values) files is a character used to separate individual fields or values within each row of the file. The most common delimiter used is a comma (,), hence the name CSV. However, other delimiters like semicolon (;), tab character (\t), or pipe symbol (|) can also be used depending on the requirements of the file. The delimiter helps to organize and structure the data within the CSV file, allowing applications and software to accurately parse and interpret the information.
What is a header row in a CSV file?
A header row is the first row in a CSV (Comma Separated Values) file that contains the names or labels for each column of data. It is used to provide a clear and descriptive representation of the data present in the subsequent rows. The header row typically includes field names or column headings such as "Name", "Age", "Country", etc., making it easier for users or software programs to understand and work with the data in the file.
How to specify data types of columns while importing CSV data into Matplotlib?
CSV file does not have an inherent mechanism to specify data types for columns. However, you can use the dtype parameter of the numpy.genfromtxt() function in Matplotlib to specify the data types of the columns while importing the CSV data.
Here is an example of how you can specify the data types of columns while importing a CSV file using Matplotlib:
import numpy as np import matplotlib.pyplot as plt
Define the data types for each column
dtypes = [('column1', int), ('column2', float), ('column3', str)]
Import the CSV file using numpy.genfromtxt() with specified column types
data = np.genfromtxt('data.csv', delimiter=',', dtype=dtypes, names=True)
Access the columns by their names
column1 = data['column1'] column2 = data['column2'] column3 = data['column3']
Plot the data
plt.plot(column1, column2) plt.xlabel('Column 1') plt.ylabel('Column 2') plt.show()
In this example, dtypes is a list of tuples where each tuple represents a column. The first element of each tuple is the name of the column, and the second element is the data type. You can define the data types according to your requirement (e.g., int, float, str, etc.).
The np.genfromtxt() function is used to import the CSV file, and we pass the dtype parameter with our defined data types. The names=True parameter ensures that the columns are accessible by their names.
After importing the data, you can access the columns using their names as shown in the example. You can then manipulate or visualize the data using Matplotlib or any other required operations.