
Best Tools to Analyze .NET Projects to Buy in July 2026

Tools and Skills for .NET 8


Software Architecture with C# 12 and .NET 8: Build enterprise applications using microservices, DevOps, EF Core, and design patterns for Azure

Practical Binary Analysis: Build Your Own Linux Tools for Binary Instrumentation, Analysis, and Disassembly

Modern Distributed Tracing in .NET: A practical guide to observability and performance analysis for microservices

Practical Malware Analysis: The Hands-On Guide to Dissecting Malicious Software

Coloured Petri Nets: Basic Concepts, Analysis Methods and Practical Use. Volume 1 (Monographs in Theoretical Computer Science. An EATCS Series)
- AFFORDABLE PRICES FOR QUALITY READS-SAVE MONEY AND ENJOY LITERATURE!
- ECO-FRIENDLY CHOICE: REDUCE WASTE BY REUSING GENTLY-LOVED BOOKS.
- DIVERSE SELECTION: DISCOVER UNIQUE TITLES THAT MAY BE OUT OF PRINT!

Dependency Injection in .NET
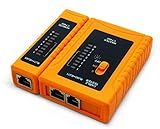
iMBAPrice - RJ45 Network Cable Tester for Lan Phone RJ45/RJ11/RJ12/CAT5/CAT6/CAT7 UTP Wire Test Tool
- AUTOMATED TESTING FOR CONTINUITY AND CIRCUITS ENSURES QUICK CHECKS.
- LED STATUS DISPLAY PROVIDES INSTANT VISIBILITY OF TESTING RESULTS.
- COMPATIBLE WITH MULTIPLE CABLE TYPES FOR VERSATILE USE IN NETWORKING.

Software Architecture with C# 9 and .NET 5: Architecting software solutions using microservices, DevOps, and design patterns for Azure, 2nd Edition

Metaprogramming in C#: Automate your .NET development and simplify overcomplicated code
Analyzing a .NET project using SonarQube involves the following steps:
- Install SonarQube: Download and install SonarQube on your machine. It requires Java to be installed as well.
- Set up a SonarQube server: Start the SonarQube server by running the appropriate command. It will start a web server that hosts the SonarQube dashboard.
- Configure SonarQube for .NET: Install the required plugins for analyzing .NET projects. You may need to install the SonarScanner for .NET and SonarC# plugins. These plugins enable SonarQube to understand and analyze .NET code.
- Configure the SonarQube project: Create a SonarQube project for your .NET project. This involves providing the necessary project details and specifying the project key.
- Generate the SonarQube scanner properties file: Create a sonar-project.properties file at the root of your .NET project. This file contains the configuration details needed for SonarQube analysis, such as project key, project name, and source code location.
- Build the .NET project: Build your .NET project using your preferred build system, such as MSBuild or Visual Studio.
- Run the SonarQube scanner: Execute the SonarQube scanner command with the path to the sonar-project.properties file as a parameter. This command triggers the analysis and sends the findings to the SonarQube server.
- View the analysis report: Access the SonarQube dashboard through a web browser and navigate to your project. You can explore the code analysis results, quality profiles, and other relevant metrics and issues.
- Interpret the analysis results: Review the analysis results to understand code quality, security vulnerabilities, bugs, and code smells in your .NET project. SonarQube provides detailed reports and allows you to drill down into each issue for a deeper understanding.
- Take corrective actions: Based on the analysis results, address the identified issues in your .NET project. Follow the recommended best practices and guidelines provided by SonarQube to improve the overall code quality.
By following these steps, you can effectively analyze your .NET project using SonarQube and promote the adoption of good coding practices within your development team.
How to schedule automatic code analysis using SonarQube in a .NET project?
To schedule automatic code analysis using SonarQube in a .NET project, you need to follow these steps:
- Install SonarQube: Download and install SonarQube from the official website.
- Set up SonarQube Server: Start the SonarQube server by running the appropriate executable for your operating system.
- Configure SonarQube Scanner: Download and install the SonarQube Scanner for .NET. Set up the scanner by configuring sonar-project.properties file in the root directory of your .NET project.
- Generate and Configure a Token: Generate a token in SonarQube that will be used for authentication during the analysis. Copy the token to be used in the configuration.
- Create a script: Create a script that runs the SonarScanner for .NET on your project. Make sure to include the token and specify the SonarQube server URL in the script.
- Set up a scheduled task: Open the Windows Task Scheduler and create a new task. Specify the script created in the previous step as the action of the task. Set the schedule to run the task at the desired intervals (e.g., daily, weekly, etc.).
- Run the scheduled task: Execute the scheduled task manually to verify that it runs successfully. The code analysis will begin and the results will be reported in SonarQube.
By following these steps, you can schedule automatic code analysis using SonarQube in your .NET project. The code analysis results will help you track code quality, identify potential issues, and ensure adherence to coding standards.
How to install SonarQube on a Windows machine?
To install SonarQube on a Windows machine, follow these steps:
- Download SonarQube: Go to the official SonarQube website (https://www.sonarqube.org/downloads/) and download the latest version of SonarQube for Windows.
- Extract the downloaded file: Once the download is complete, extract the contents of the downloaded file to a directory of your choice (e.g., C:\sonarqube).
- Configure SonarQube: Open the "conf" folder within the extracted directory and edit the sonar.properties file using a text editor. Set the values according to your requirements, such as database settings, server port, etc. Save the file after making the necessary changes.
- Install and configure a compatible Java Runtime Environment (JRE): SonarQube requires a JRE to run. Download and install a compatible version of Java (e.g., OpenJDK or Oracle JDK). Set the JAVA_HOME environment variable to the installed JRE directory.
- Start SonarQube: Open a command prompt as an administrator and navigate to the "bin" folder within the SonarQube installation directory (e.g., C:\sonarqube\bin\windows-x86-64). Run the "StartSonar.bat" script to start the SonarQube server.
- Access SonarQube web interface: Open a web browser and navigate to http://localhost:9000 (default SonarQube server address). If SonarQube starts successfully, you should see the SonarQube login page.
- Log in to SonarQube: By default, the administrator credentials are "admin" for both the username and password. Enter these credentials and click on the "Log In" button to access the SonarQube dashboard.
Congratulations! You have successfully installed SonarQube on your Windows machine. You can now configure further settings, analyze projects, and track code quality using SonarQube.
What are the key metrics to focus on while analyzing a .NET project in SonarQube?
When analyzing a .NET project in SonarQube, there are several key metrics that you should focus on. These metrics provide insights into the quality and maintainability of the codebase. Here are some of the important metrics:
- Code coverage: It measures the percentage of code that is covered by unit tests. A higher code coverage indicates that more of the code is tested, reducing the risk of bugs and errors.
- Code duplication: This metric highlights duplicated code across the project. Higher duplication indicates code smells and can lead to maintenance challenges, as changes might need to be made in multiple places.
- Code complexity: Measures the complexity of the codebase using metrics like cyclomatic complexity or Cognitive Complexity. A higher complexity suggests that the code is harder to understand and maintain.
- Code smells: SonarQube detects various code smells such as long methods, large classes, unused variables, etc. Identifying and fixing these smells improves code readability and maintainability.
- Security vulnerabilities: SonarQube can flag potential security issues like SQL injection, cross-site scripting (XSS), and other vulnerabilities. Addressing these vulnerabilities is crucial for ensuring the security of your application.
- Maintainability rating: SonarQube rates the maintainability of the codebase based on various factors like complexity, code duplication, and code smells. A higher maintainability rating indicates that the code is easier to maintain and understand.
- Test failures: SonarQube can integrate with your testing framework and report test failures. Monitoring test failures helps ensure the reliability of the codebase.
- Technical debt: SonarQube calculates technical debt by estimating the effort required to fix various code issues. Monitoring technical debt helps prioritize code improvements and reduces the cost of long-term maintenance.
By analyzing and addressing these key metrics in SonarQube, you can improve the overall quality, maintainability, and security of your .NET project.